


If you are new here, welcome to my creative works blog- "John's Creative Space!"
--- Making MagicaVoxel Scenes ---
Take a look at this scene I created: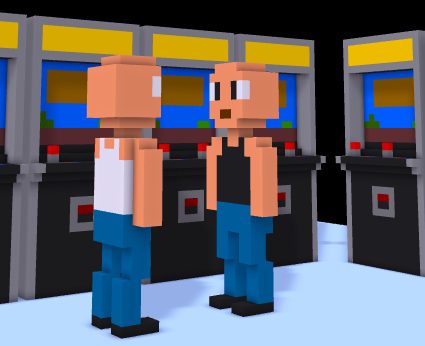
Here is the first scene attempt I made using MagicaVoxel. Just for fun, what do you think these guys are talking about in this scene? CAPTION THIS! :)
Once you learn to use the Pattern brush, it is possible to create scenes or even larger models. I used only two models I created to compile this scene. All I did was change up the color of one of the guys by making his shirt black. Other than that, I used only two models. The other model I used is a single vertical arcade unit. If you want to set up your own scenes in MagicaVoxel, let me share with you some tips.
Making Scenes in MagicaVoxel.
You could use a program like Blender to make scenes and to properly animate scenes. However, if you just want to make a scene through MagicaVoxel, let me explain how I got to learn making scenes in MagicaVoxel.• Setting Up the Scene
First, you are going to need to set up a large-enough scene for whatever scene you are coming up with. Just set up the dimensions to be as large as you want them to be to fill in the space. If you are unsure as to what is an acceptable size for your scene, you may want to use some of the larger default models in MagicaVoxel (such as "nature" or "room"), make a new model based on the dimensions, and click on "Zero" from the Edit - Tool menu. Make sure to save your scene under a special name if you want to save your work. A helpful hint would be to turn on the Frame feature from the "Line" menu. Turning on the Frame feature (the "F" in the Line section) will allow you to see the ground arranged in a grid layout. Pay special attention to two menus: "Shape" and "Pattern."
• Find the Pattern Brush in the "Shape" Section
In the column with the Brush menu is the "Shape" feature. Click on the Shape section and click on "Pattern." The Pattern brush will allow you to import MagicaVoxel models into your scene. The models can then be rotated and such to your liking as you place them into the scene.
• Find the "Pattern" Section; Using the Pattern Brush
Below the Model menu featuring all of the models, there is a menu called "Pattern." Click on "Pattern" to view all of the models. The Pattern menu allows you to add models into your scene for when you use the Pattern brush from the Shape Menu. Find a MagicaVoxel model you want to use and click on it. Using the Shape - Pattern feature, you will be able to add your voxel models into the scene. You can rotate the pattern models you put in by pressing the "-" and "+" keys (not the ones on the keypad). You can move pattern models up and down (respectively) using the Page Up and Page Down keys. You can reset all parameters of an imported pattern model by pressing the "0" key (the number pad; not the keypad). Models placed are rooted to the ground. You can stack imported pattern models on top of each other if you choose.
• Building the Scene Itself.
Once you start to practice putting multiple models into one scene, you begin to grow confident in building scenes, maps, and even creating larger models by piecing together multiple smaller models. So the Pattern feature can be very useful and beneficial for scenes and larger models. Take advantage of this feature like I did to create amazing scenes.
• Photography
All that basically remains is you taking pictures of your scene.
Use a combination of the mouse wheel to zoom in and out as well as clicking and holding the right mouse button to rotate around the scene. Once you find the angle or angles you wish to use you are free to take snapshots.
From the Edit - Export section, look for the "Snap" tool. There are a few things you must take note of before snapping pictures of your scene. First of all, if you click on Snap (or press F6 or CTRL+F6), everything enabled in the main window will be saved into a PNG format picture. So turn off certain features if you want a clean-looking view of your scene. You can collapse some of the extra menus to get a wider shot of your scene if you wish to make wider snapshots. Click on "Snap" from the Export section or press F6 or CTRL+F6 to save screenshots. All exported screenshots can be found in the "Export" folder of your MagicaVoxel folder.
I hope this is helpful for you in making scenes with MagicaVoxel. You can still use programs like Blender to animate your models and make all sorts of other effects, but I wanted to simply mention making scenes and importing multiple models into one scene in MagicaVoxel. In the future, I may create some extra material just to demonstrate making different kinds of scenes or even showing that it is possible to make larger models by simply making good use of the Pattern brush. Enjoy what I've created for now for you, though.
Being able to make a scene in MagicaVoxel has given me some new confidence in possibly making animations and other material. If I do create something interesting, I will be sure to share my work with all of you. Thank all of you for reading my blog post here on "John's Creative Space." I hope you continue to stay with me to see more of my work. Maybe I can inspire you to create your own material if you enjoy my work. Thank you for reading!


0 comments:
Post a Comment