Showing posts with label Game Assets. Show all posts

Wednesday, July 3, 2024

Recent Vehicle Work

John B. Marine | 8:53 PM | | | | Be the first to comment!
I have been 3D modeling vehicles lately. Part of these are 3D re-imaginations of my voxel vehicles. Others are completely original 3D vehicles. Gaining experience in modeling vehicles made me embark on a new project. I am doing what I can to try to showcase my skill in 3D modeling. I want to share some of my work and my plans in this blog post. So if you are inclined, let me share my work with you all.


Recent Vehicle Work


This blog post discusses work I have done lately in developing vehicles. Before I can share more of my work, I have to share how I got to this point.


Building Blocks.

This movement towards making vehicles began with me trying to learn to develop a vehicle controller for Unity3D. I properly followed a tutorial from Unity, and it got me to wonder how to develop more vehicles. The tutorial package from Unity had a car that would spin out too easily. Like, the tutorial couldn't handle sudden avoidance turns. That was besides the point of this blog post.

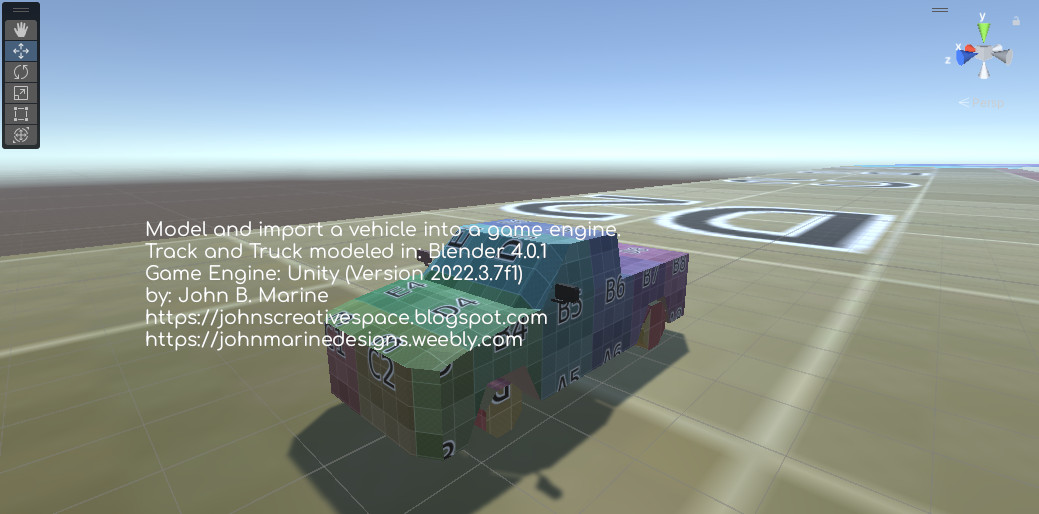
I kept practicing making the same Blockbench truck in a tutorial. Rather than re-create it in Blender, I re-made it in Blender. Once I got down how to develop it, I wanted to animate it. So what I did was add on some wheels. As any vehicle to be animated in 3D, I separated the wheels from the vehicle chassis. The next challenge was to take the same vehicle scripts from the Unity tutorial but implement them to a custom vehicle. This was harder because I had to rely on being able to properly set up the custom vehicle. I had to do some editing because I didn't set the origin of each wheel to their geometry. Therefore, my early vehicle had wonky rotation with the tires. I then changed up 3D options in Blender and re-exported to Unity. The end result? This picture:
unity vehicle controller
^ from: (my X/Twitter) - I developed this pickup truck and this simple oval race track.

I was so happy to get in enough of a groove to develop an interest for 3D modeling vehicles. My interests only pertain to low-polygon work. More to come.


The Low Polygon, Low-Spec Style


Let's get something straight. Low polygon can be very subjective. It is only as low polygon as one perceives low-polygon. Granted I never developed anything of seriously high detail, I have done enough to warrant some kind of attention towards low-polygon modeling. The most realistic 3D model I ever made was a human foot from a tutorial on YouTube. I lack the confidence to make a fully real vehicle. It didn't mean, however, I could not give full effort towards trying to make believable vehicles. Let me share with you some of my work.


Low Polygon Challenge.

Previous attempts at making a low-polygon vehicle haven't been too good. I fear not making things as detailed as possible, though I do not specialize in hyper-realistic and hyper-detailed models. It wasn't until one time that I made a true vehicle that could be perceived as "low-polygon."

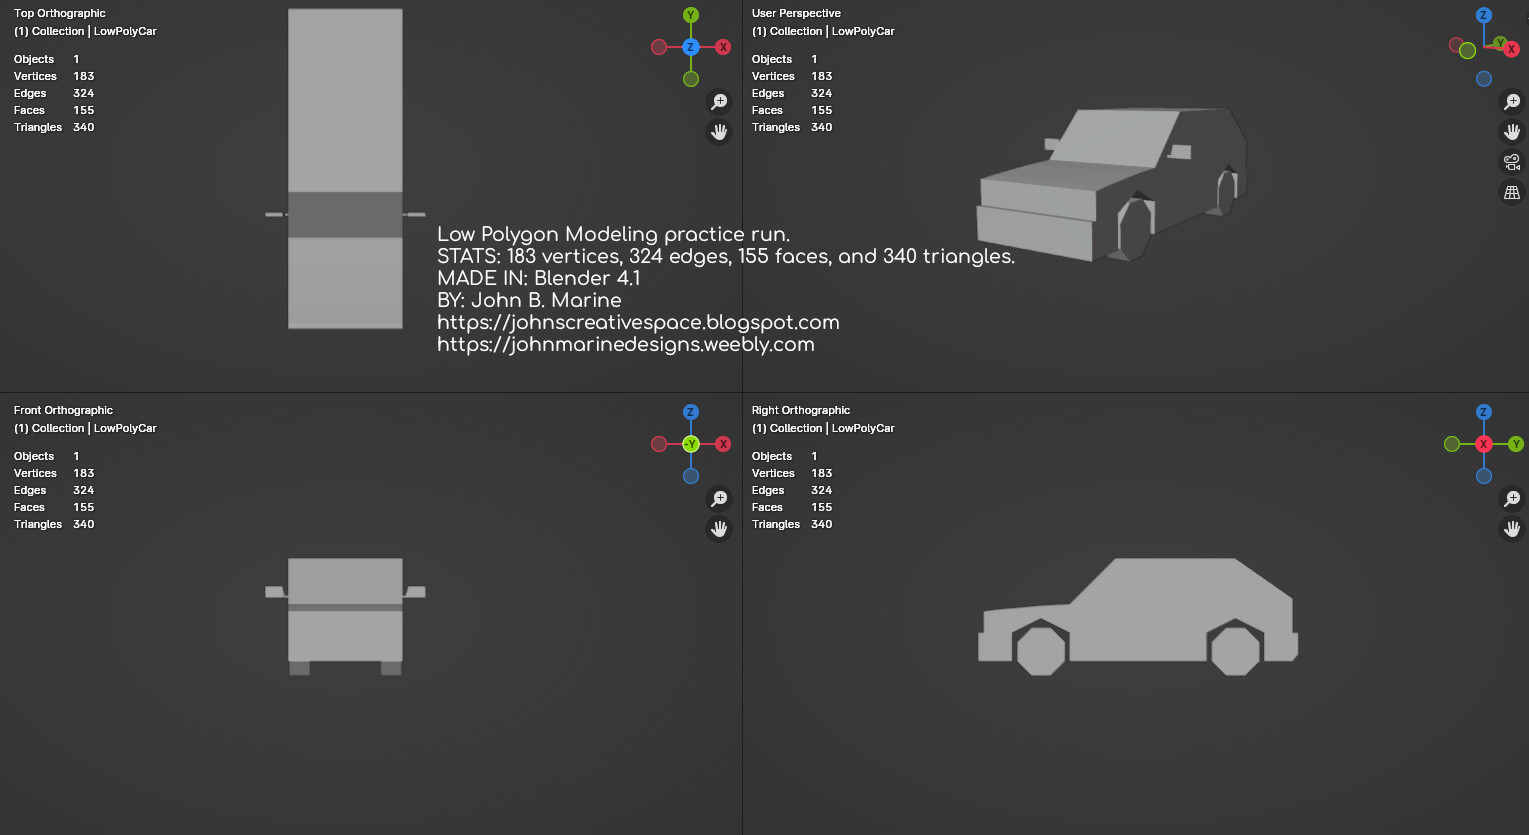
Previously, what was to be a low-polygon model ended up being something I further to being not low-polygon at all. One sports car model I developed in 2020 ended up with 2490 vertices, 1878 faces, and 4848 triangles. I made a low-polygon sport-utility vehicle (SUV) in 2021 that had 285 vertices, 221 faces, and 544 triangles. I surpassed both marks with a model I developed in June 2024. Here are the stats on my 2024 model: 183 vertices, 324 edges, 155 faces, and 340 triangles. The model I made in 2024 was a hatchback based on one of my old voxel vehicles. Here is a look at it:
low polygon hatchback
^ from: (my X/Twitter) - This was one of my best low-polygon efforts to date.

Trying to come up with as few polygons as possible but with decent detail is its own challenge. I made it happen, though.

Low Polygon With Pixel Textures.

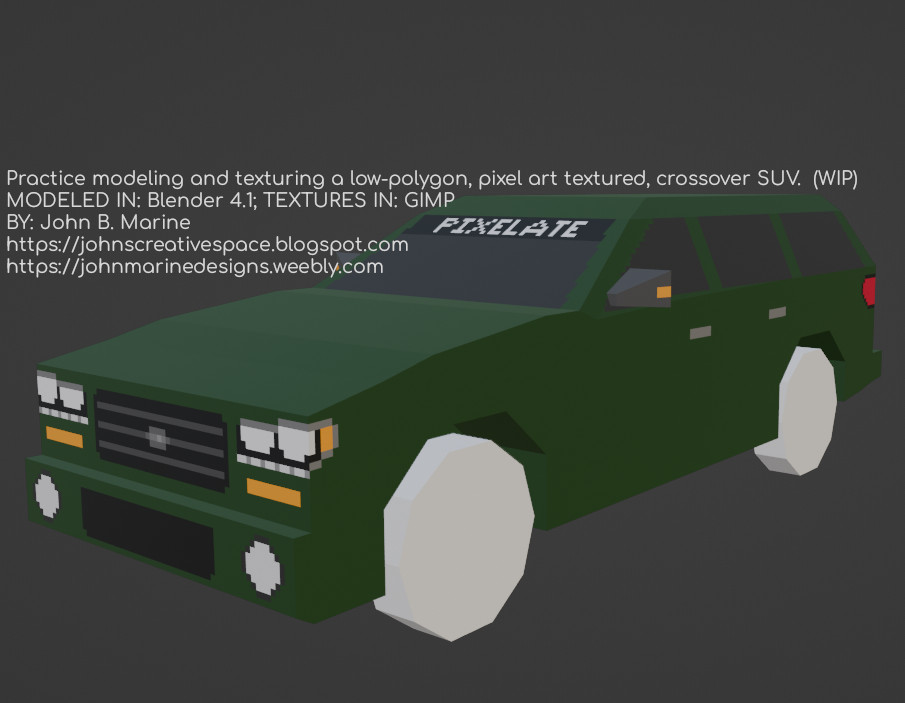
One of my best creations to date is another SUV I developed. The challenge was to make a vehicle and then it pixel art-style art. I still need to learn how to better detail things in pixel art. I actually thought of trying to learn how to bake lighting and shading into UV maps in Blender. I looked to old PlayStation 1 racing games for low-polygon insight. That is how I learned to make simple side-view mirrors. The work of about 3-6 hours to model and texture one vehicle led to this effort:

low polygon pixel textures
^ from: (my X/Twitter) - This was one of my best low-polygon efforts to date.

I had kind of a tough time thinking about how to texture this crossover SUV. I basically thought of it having a bold grill, lights with daytime running lights, and simple designs for the door handles and tail lights. I even had a bit of fun making a window banner saying "Pixelate." I used a blueprint of the 2006 Cadillac SRX in developing the side profile of it. Then, I used my imagination to make my own vehicle. This model is meant to be one of my 3D reimagined versions of one of my voxel vehicles.

My Latest Vehicle.

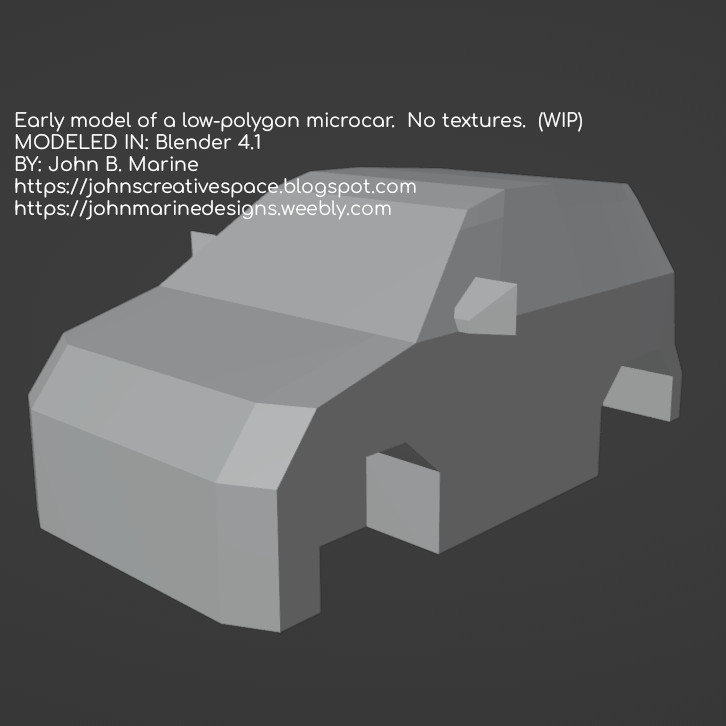
One vehicle I worked the past day or two (as of July 3, 2024) is this:

low polygon microcar
^ from: (my X/Twitter) - This microcar is one of my most recent works, and it is also one of my creations not based on any of my voxel vehicles.

This is a microcar I was working on. It is based on a blueprint of the 2015 smart fortwo. I did not complete a proper UV map for it, so that is why it has no texture to it.


Now that you have seen some of my latest vehicle work, I have to share what my plans are with these vehicles.


My Vehicle Plans


Originally, I developed these vehicles to be implemented into racing/driving games. I had the likes of GTR2, rFactor 1, and Assetto Corsa in mind. I may also just have them to be vehicles to use for nearly any game engine. The intent of these are to make vehicles that can be operated. However, I may develop some static vehicles that can be used as props.


TO DO.

I am slowly learning how to make better-quality 3D vehicle models. What I want to be able to do is develop vehicles with interiors as well as make vehicles with light housings. I have no plans to develop actual vehicles. My focus is on original, "generic" vehicles. Some generic vehicles of mine draw inspiration from actual vehicles while not being outright copies of them. Anyone who really knows vehicles may know what elements and machines my work spawns from.

Remember earlier I talked about making my custom vehicles for Unity car controllers? Well, one plan of mine was to take the Unity Skycar from their long deprecated Standard Assets Library and swap out the meshes to suit my vehicles. Doing this will allow me to tune the Unity Skycar code to fit any number of vehicles. It also means I get to be able to have engine sounds and braking sounds implemented. What I COULD do is learn to swap out meshes for Edy's Randomation Vehicle Physics, but I am not so sure that would work too well.


What I Want For My Supporters.

If you have ideas of having vehicles you can control for games or media projects, just know I have you covered as best as I can. I want to provide such products to the public-at-large. While I may not have complete material immediately, I will work over time to improve my skills and make better material for you all.


Wait, John... What About These "Blueprints" You Speak Of?

Oh, I downloaded a bunch of blueprints from a site called "The Blueprints." I have to do some adjusting to build them to a proper scale, but they have been a big help in modeling. Take a look at the blueprints offered in regular images and in vector images here: www.the-blueprints.com. Maybe you can create your own lovely vehicles with these blueprints! :)


That's all for this blog post. I hope you got some insight from me. Stay tuned to my creative works to see what all I have for you! Subscribe/Follow my blog(s) in any capacity if you love my work. Share my blog post(s) with others if you enjoy my work. Support me further by connecting with me on social media; and if you are inclined, feel free to donate to me (donations are voluntary but would be appreciated). Thank you for reading! Take care and be well.

Visit my JohnMarineDesigns Weebly site, subscribe to My Blog(s), and/or Follow on Bloglovin! Let's connect:
Contact Me via E-Mail Contact Me via Discord

(tips/donations are voluntary)
Visit and Subscribe to My Blogs...
Subscribe to John's Blog Space (JBS) Subscribe to John's Creative Space (JCS) Subscribe to John's Race Space (JRS) Subscribe to StyleSpace (SS) Subscribe to John's Life Space (JLS)
Get Social With Me!
Facebook (Friends) Facebook (Fans) Twitter YouTube
Pinterest LinkedIn (professionals only) Discord ???
Support My Creative Works!
JMDesigns John on Envato
Patreon Soundcloud Bandcamp
Twitch OpenGameArt TurboSquid
read more...

Thursday, February 29, 2024

3D Modeling Asset Breakthrough

John B. Marine | 4:56 PM | | | | Be the first to comment!
Of late, I had a breakthrough in testing 3D assets for games. Using GZDOOM for DOOM and JFDuke3D for Duke Nukem 3D, I finally found a way to test out my 3D assets. I learned to import my creations into these ports. The impact from my first successful 3D model importing is me trying to make more models to replace some of the sprites in such games. This blog post is a look at some of the creations I made and what I replaced some graphics with.


3D Modeling Asset Breakthrough


Most of what I have created was done in GZDOOM. I used Duke Nukem 3D also because it is my favorite first-person shooter. GZDOOM, though, was easier to import and implement my creations. JFDuke3D was more of a pain to get my models into the game. I still succeeded.


Model Showcase.

Here are samples of the 3D models I worked on...

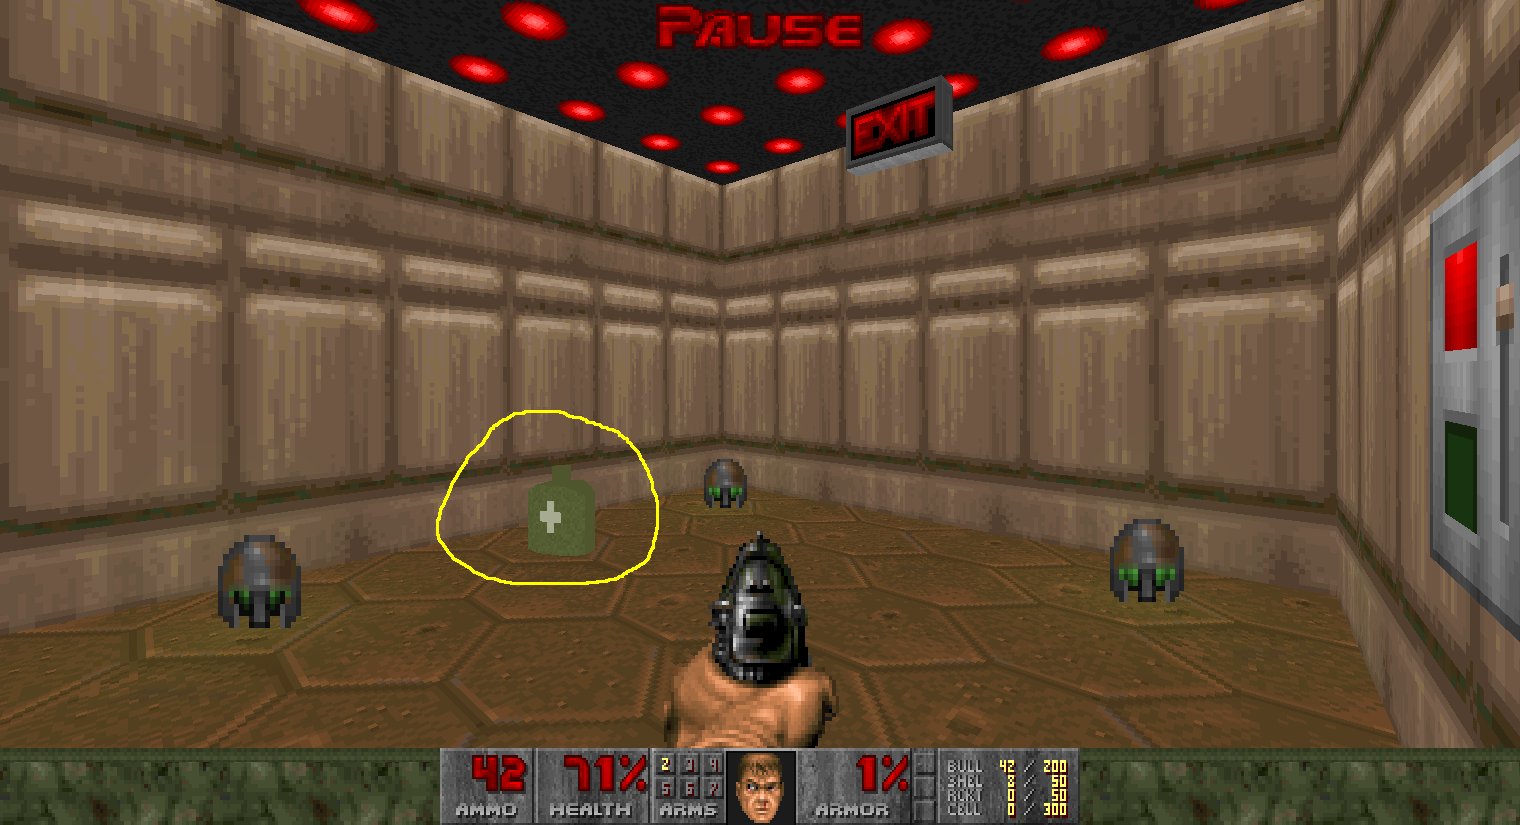
3d canteen DOOM
^ from: (my X/Twitter) - Carry around a canteen to hydrate while on duty.

3D canteen DN3D Duke Nukem 3D
^ from: (my X/Twitter) - My Canteen, in Duke Nukem 3D.

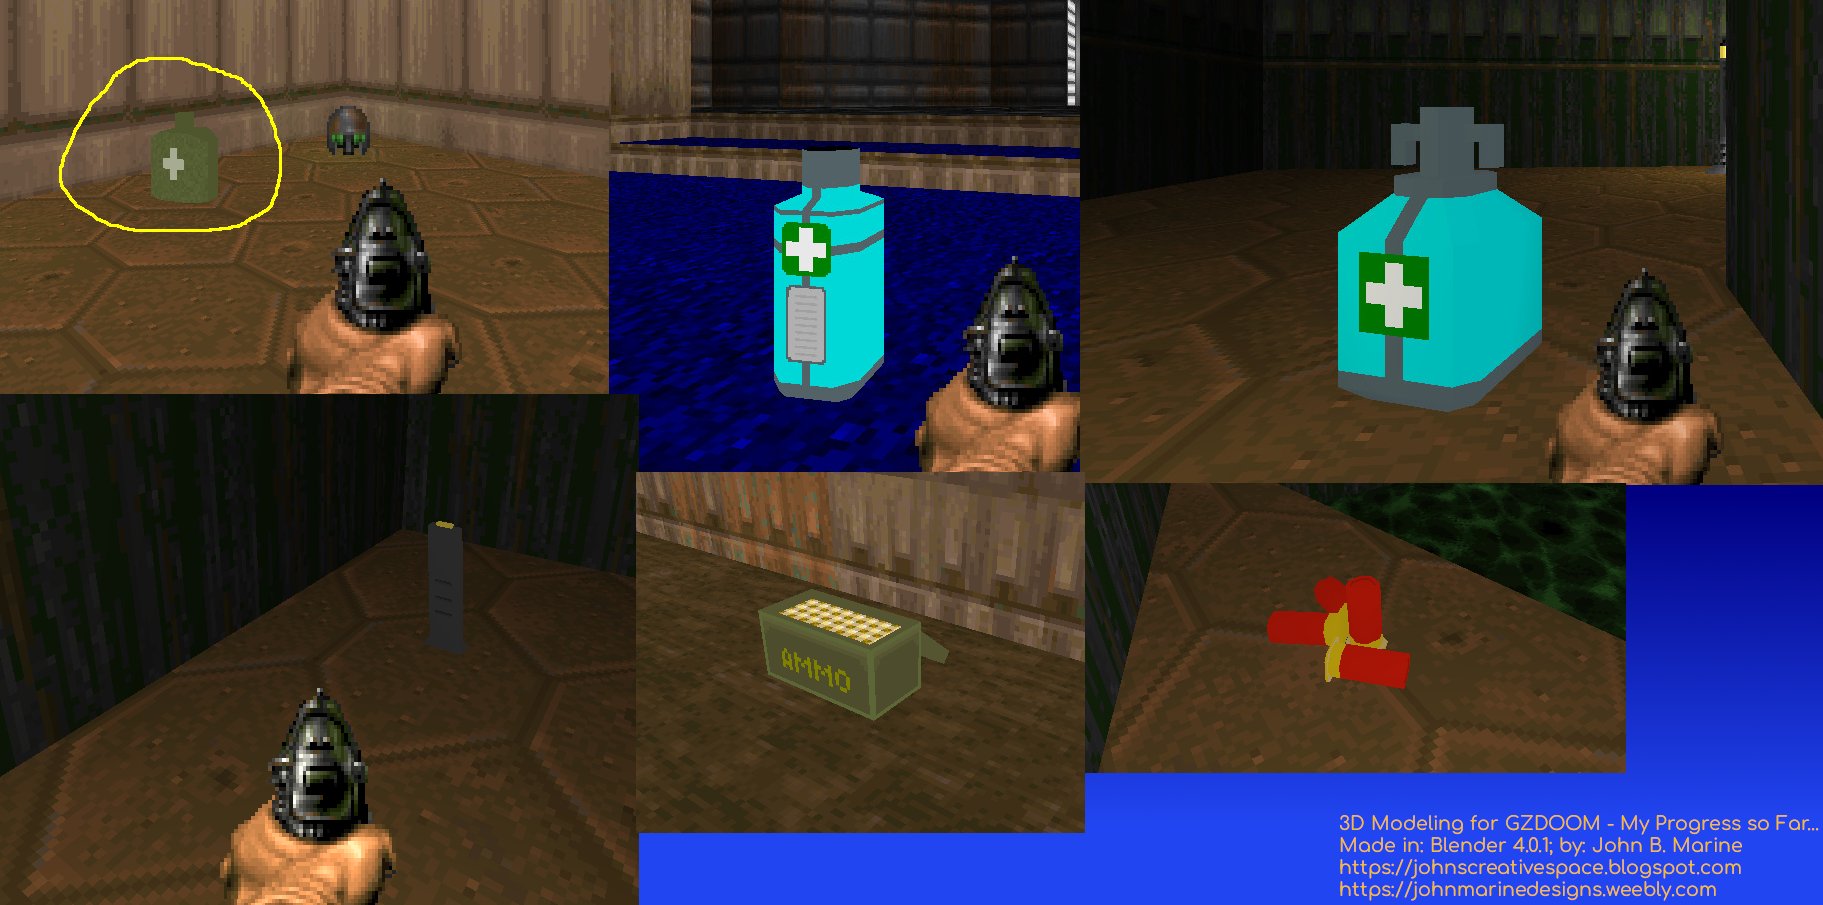
classic DOOM asset collage
^ from: (my X/Twitter) - This is a collage of assets in DOOM I developed. From left to right, top to bottom: canteen, small sci-fi healing kit, large sci-fi healing kit, pistol clip, ammo box, and four shotgun shells.

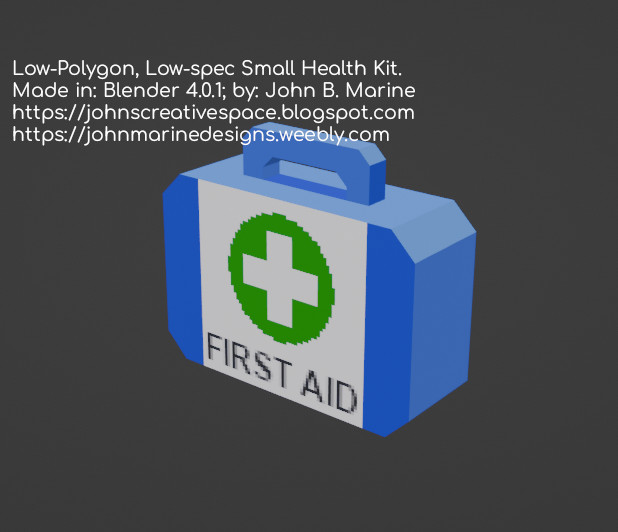
small health kit
^ from: (my X/Twitter) - This is a small healing kit. It will recover minimal health in a game.

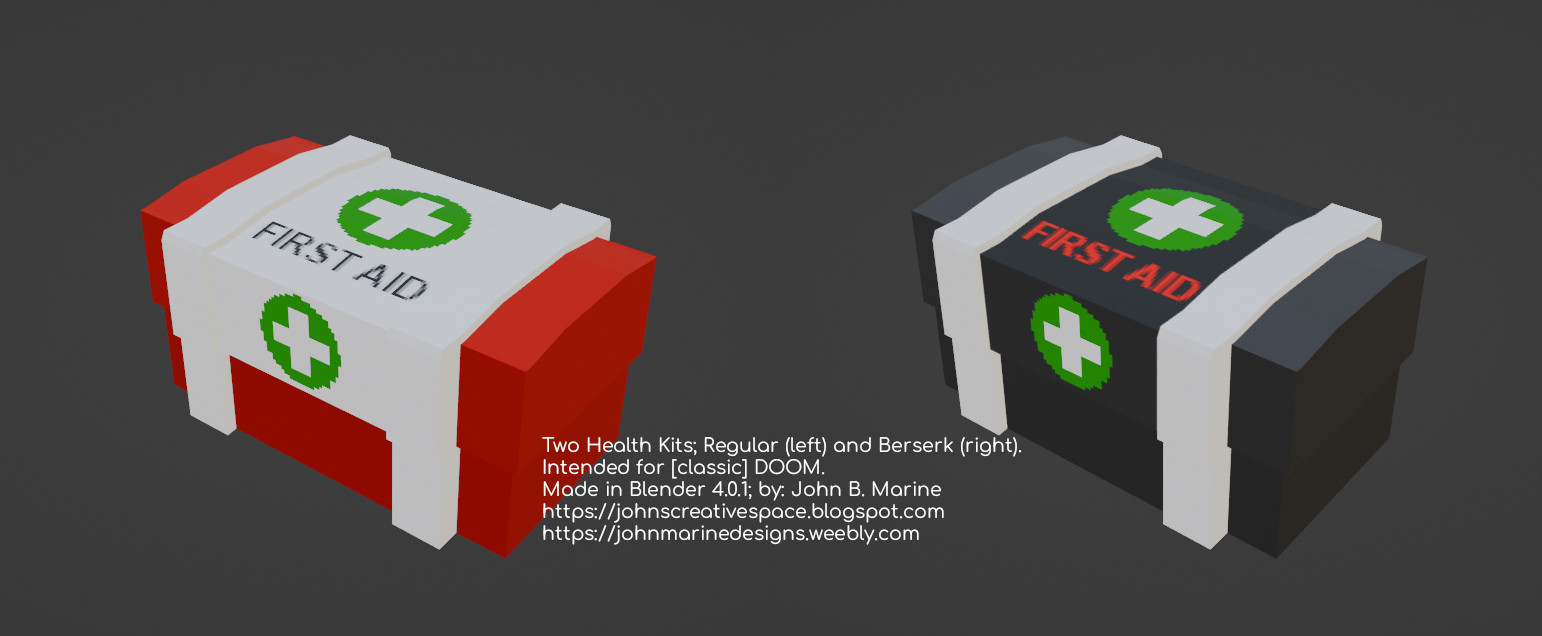
large health kit and berserk (DOOM only)
^ from: (my X/Twitter) - On the left is a large health kit, and on the right is a berserk health kit meant to be used in DOOM. The large health kit will recover a moderate amount of health. The berserk operates as it does in DOOM- full health and a damage increase.

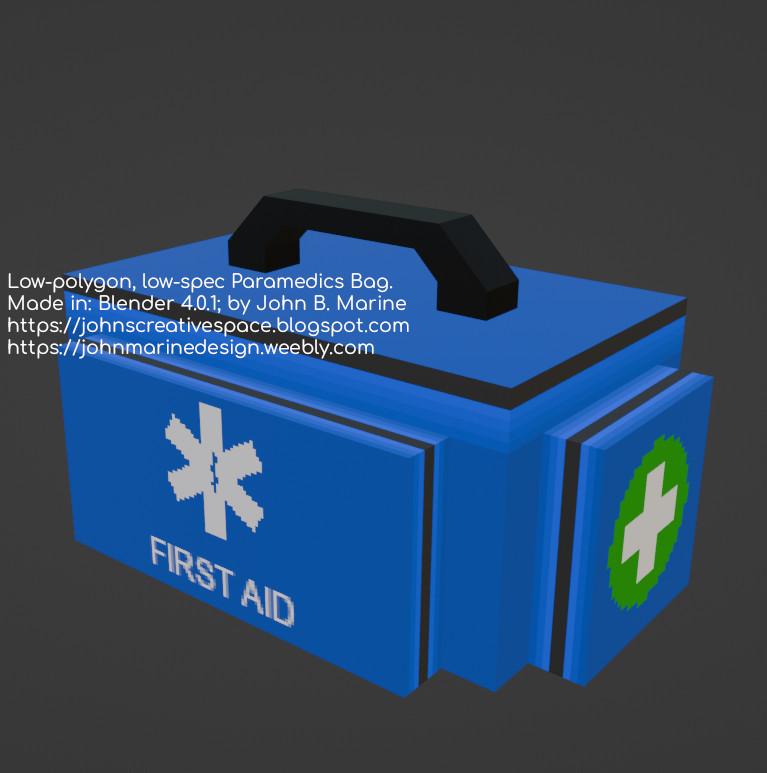
paramedic bag
^ from: (my X/Twitter) - This is a Paramedic bag. Depending on the game, this item restores a massive amount of health, grants full health, or takes your health a level above full health.

These are only a handful of game assets I developed. I may go back and edit some of the other game assets I worked on previously.


My Workflow Explained.

My workflow consists of using Blender to make the topology for my models. I use GIMP for texturing my models. I export a map (as well as a UV layout) from Blender to aid in trying to develop UV mapping for my models. Once that is done, I export my models to FBX.

I only exported selected objects and the animation and geometry data. From what Blender considers forward (-Y), I change Forward to "-X Forward" and Up to "Y Up." Other options: Apply Unit enabled, Use Space Transforms enabled, Apply Transforms enabled, triangulate objects, and bake animations.

I use a program called Noesis to convert my FBX to either MD2 or MD3. I had some better luck with MD3, so that is what I use for my exported format from FBX. What I do in Noesis is rotate the model 90 degrees. If exporting to GZDOOM, I use an Advanced Command of "-scale 0.5") or something so the model doesn't look massive in GZDOOM. The original FBX size of my models seem just fine for Duke Nukem 3D in most circumstances.


Struggles Implementing Models.

GZDOOM has been rather simple to implement models into. The one problem I run into is forgetting to put my creations into my own custom PK3 file. I realize why I don't see updated material because I fail to update my PK3! So if you're importing 3D models and textures into GZDOOM, remember to implement them into the PK3. It is recommended you use SLADE for editing PK3s, and also get ZDL to load up DOOM or DOOM2 using a custom 3D PK3.

I struggled so much with Duke Nukem 3D because I had trouble setting things up in DEF files. What makes DN3D easier, though, is that while you have the High Resolution Pack (HRP) installed, you do not need to compile everything into one file like with GZDOOM. The big problem with me is that the MD3 files I've used do not have animation frames to use. So when you define a model, you have to leave the part blank about certain animation frames (the "definemodelframe" property) if you're using a static model.

While I haven't tried out importing models for "Cube Engine" or "Cube 2 Sauerbraten," they were two other options I considered for making 3D models for. The process is rather difficult doing so. I also considered trying out my 3D assets in "Quake 3 Arena" or "OpenArena."


Future Plans.

I hope to be able to develop models that can be animated. I am looking at GZDOOM, Duke Nukem 3D, and even Cube 2 Sauerbraten for animation of MD3 models. GZDOOM seems the easiest to implement animated models, so most of my early attempts could be with GZDOOM. I am going to offer models anyways that will not be rigged or have any animations for those who want to use Mixamo or something for animating models. They will be offered in Blender format along with GIMP's XCF files. The benefit to this? You save money! That is... unless you prefer to subscribe to an *industry standard* at exorbitant prices...


That's all for this blog post. Thanks for checking out my creative work blog, John's Creative Space! Subscribe/Follow my blog(s) in any capacity if you love my work. Share my blog post(s) with others if you enjoy my work. Support me further by connecting with me on social media; and if you are inclined, feel free to donate to me (donations are voluntary but would be appreciated). Thank you for reading! Take care and be well.

Visit my JohnMarineDesigns Weebly site, subscribe to My Blog(s), and/or Follow on Bloglovin! Let's connect:
Contact Me via E-Mail Contact Me via Discord

(donations are voluntary)
Visit and Subscribe to My Blogs...
Subscribe to John's Blog Space (JBS) Subscribe to John's Creative Space (JCS) Subscribe to John's Race Space (JRS) Subscribe to StyleSpace (SS) Subscribe to John's Life Space (JLS)
Get Social With Me!
Facebook (Friends) Facebook (Fans) Twitter YouTube
Pinterest LinkedIn (professionals only) TikTok Discord
Support My Creative Works!
JMDesigns John on Envato
Patreon Soundcloud Bandcamp
Twitch OpenGameArt TurboSquid
read more...

Monday, June 13, 2022

New Life to Old Track Concepts

John B. Marine | 4:49 PM | | | Be the first to comment!
It was always a creative dream of mine to develop race tracks for games. While nothing has truly materialized into in-game works, I recently have taken hold of past projects for non-racing games. It was not possible for me to take levels from older games and give them modern 3D life. So therefore, I had to take my old concepts and then refine them. As someone who is into simulation-type racing games, I wanted to get into the style of thinking realistically about my older race track designs. This blog post will not announce any future plans or upcoming designs to share. It will, though, give you some early insight as to what I am working on as well as why now I am thinking of releasing some of my designs. So feel free to take a look at what I have to discuss here on "John's Creative Space!"


New Life to Old Track Concepts


I have been using Blender to try to 3D model. Let me explain something about past courses I made that I want to revive and bring to a modern world.


The Backstory of my Older Courses.

A number of older race courses I designed for games were mostly for a non-racing game. What game am I discussing here? Duke Nukem 3D. Since circa 1999, as I was learning more and more about motorsports, I wanted to take a concept of racing into my work. I would mostly set up bot multiplayer matches in Duke Nukem 3D (called DukeMatches). The only "racing" was that it was me going around the tracks defeating as many of the bots as possible. There were also competitions to try to score the most points during the course of a race. Races were limited to score counts or time. There were also pit stops for which to try to avoid being defeated. Since I was the only intelligent being against bots, I utilized pit stops to stay in the race.


Time is of the Essence.

On the basis of time, I have always been a fan of GT/Sportscar/Endurance racing. So I looked into a way to implement a sort of system to where time would change every so often. What I ended up coming up with is an animated sky that simulates time changes. To set the time distance apart, I had to make the time between frames rather long. I made two sets of animated skies- clear and cloudy. I also developed one set of skies for a 24-hour setting and then an "all-night" setting, which lasts from early evening of Day 1 to sunrise of Day 2. The cloudy sky animations were meant to simulate endurances either for cloudy days or for rainy (and even snowy) days. Because the animations would be a bit tough to follow, I set up timing gauges to let me know how much time is left in one phase of the day before going to the next.


Believable Race Tracks.

I was not very good at designing believable tracks, so a lot of my 3D modeling in Duke Nukem 3D was fairly basic. I did not utilize proper-looking curves in 3D modeling. A lot of the corners were mostly fake true curves. I had a lot of sharp corners also. The reason why tracks seemed so long was because I wanted the tracks to remain deathmatch-style courses. So to try to get away, blocking bits were used in trying to prevent the player to go out of bounds or to try to evade attackers.


Why NOW Trying to Update Past Concepts?

I felt a lot of my past race tracks designs deserve to be used for more modern applications and games. Also, I have had a tough time trying to play Duke Nukem 3D, my all-time favorite game, on a modern Windows 10 system. Rather than let old memories rot and die, I felt it was time to make my old concepts come alive in more modern forms. I also needed some practice to improve my 3D modeling skills.


I feel this is an opportunity to work closer towards one of my many different creative goals. It is just sad it has taken THIS long to realize this goal.


The Challenges Ahead


I now will share some of the things I am learning and hope to accomplish in providing these old concept tracks from Duke Nukem 3D. Please note that I am using a combination of Blender 3D, Unity3D's Skycar, and Edy's Vehicle Physics Pro (Community Edition).


The 3D Modeling.

All courses start with just the main road or roads. So when they are tested on, the challenge is to try to keep the car on the road and not fall forever if I drive off the main road. I am therefore careful driving my courses because of this situation.


The Realism Factor.

Many of the courses I created had a bunch of elements playfully added in. These even included a bunch of foolish-looking models and effects in levels. Essentially- eye candy. Because I have simulation racing games in mind, I have to think about how to make certain past ideas flow better in a proper sim racing game. It required me even to modify configurations to make them more believable. For one thing, some of my past courses had incredibly unrealistic elevation changes that would not even be completely possible in even the most decent simulation racing games.

One thing I want you to realize is that this not exactly a legacy project, but rather modernizing old concepts while not veering too far off course from previous styles. I had to lengthen old courses as well as add extra sections for multiple layouts. This was to provide much more usability and offer a handful more options for any player.

Another thing I was thinking about was trying to make tracks of a realistic scale. When I learned of unit scale in Blender, it opened my eyes to making my small-scale designs more realistic. What I did was put my measurements in Metric and used Meters. I found that using a unit scale of about 100.000000 was enough to make the roads wide enough and the overall map not feel so small without needing to scale up or down.

While this was great, I was still unsure as to how to properly measure my courses. One method I took was to make edge loops around sectors of my tracks. I would measure the distance from the start of one sector to the end of that sector. There are three sectors to courses I design. I would later take the sum of each distance and add them together to learn how long the courses are. However, most of the results I got seemed unrealistic. I felt my courses would have to be much longer than some of the unrealistic scale numbers I got. Basically, I felt like tracks long enough to host FIA Formula 1 or World Endurance Championship races were about as long as go-kart tracks from my measurements. For the most part, the tracks had the proper width and length of what I want to accomplish.

Though not a critical factor, I also found it important to try to set up each course in terms of the time of day. This was great in trying to make realistic conditions. However, it made some environments tough to drive in, especially courses meant to be done at night or with not as much sunlight. The VPP cars also had very weak lighting systems. You basically need to make your own spot lights on the car to illuminate the way. Either that, or add lighting around your course.


The Driving Aspect.

I needed a decent way to test my designs, so what I did was use the Vehicle Physics Pro asset for Unity. The provided asset for Unity for racing and driving is good for prototyping, but I needed a realistic solution for my simulation-type racing tracks. So I was fortunate enough to pick up the Vehicle Physics Pro asset (the Community/Free one).

Because I am using on-road racing, I am not using a model for off-road racing. The VPP asset from Edy features a sports coupe for on-road racing/driving and a pickup track tuned for off-road racing/driving. The default settings for the sport coupe are more than enough for performance driving, though the car seems pretty slow often times. The sport coupe's default settings max out the torque at about 220 Nm of torque (or about 162.32 lb. feet of torque). Granted this Unity asset doesn't drive like Gran Turismo, it is still a great way to get an idea of my courses in a simulation driving environment.


The Racing Aspect.

To test the tracks of mine in a performance environment, I set the car close to the Start/Finish line and then set up a stopwatch. I used a Clock application on one of my old smartphones to time one lap around the course. If my car flown off the track and falls forever, the run ends. I've done that multiple times. Sometimes, I had to re-do my sessions because the stopwatch function would not stop when I requested it to. I only tested in the normal direction of tracks.

Here is a progression in the tests I run:

• Hotlap - from a standing start, complete one lap around the course. These one-lap tests take place on each offered layout of each course.

• Two-Lap Sessions - from a standing start, complete two laps around a course. There are different two-lap tests for different variations of a track.

• Three-Lap Challenge - from a standing start, complete three laps around a course. A three-lap test is the default for a lot of races, so this is a test of a course in a basic sprint race.


One thing to keep in mind is that there are no AI drivers to contend against in these sessions. The purpose is to get a realistic driving sample for each course. With more experience and confidence, I may also pull longer tests- such as five-lap tests ("Grand Prix") and ten-lap tests ("Endurance").


A look at what you can expect is coming up, so visit the next section.


What You Can Expect Here


Any created track of mine that I complete will be made available across a number of 3D modeling stores online. I possibly will allow for my creations to be used in commercial racing/driving games, but reselling or selling modified versions of my courses will be disallowed or may require permission. This is a chance to finally share some of my most personal works with the world and make them available to the masses.


In Case You're Wondering...

If you are wondering about the vehicle controller I am using for my racing/driving tracks, I am using Edy's Vechicle Physics Pro (Community Edition), which you can find here: Vehicle Physics Pro - Community Edition | Physics | Unity Asset Store.


Again- I have nothing at present to share, but I will highlight more of my works in the future. So be sure to stay with "John's Creative Space" for more details. Thanks for visiting! If you enjoy my work, please Subscribe/Follow my blog(s) in any capacity if you love my work and want to support me any way you can. Share my blog post(s) with others if you enjoy my work. Thank you for reading! Take care and be well.

Visit my official website at johnbmarine.com, subscribe to My Blog(s), and/or Follow on Bloglovin!
Subscribe to John's Blog Space (JBS) Subscribe to John's Creative Space (JCS) Subscribe to John's Race Space (JRS) Subscribe to StyleSpace (SS) Subscribe to John's Life Space (JLS)
Support My Creative Works!
JMDesigns Patreon Soundcloud Bandcamp Twitch OpenGameArt TurboSquid
Get Social With Me!
Facebook (Friends) Facebook (Fans) Twitter YouTube Pinterest LinkedIn (professionals only) TikTok
Questions or Comments? Contact Me (serious inquiries only)...
Contact Me via E-Mail
read more...

Saturday, September 19, 2020

Voxel Buildings

John B. Marine | 8:11 AM | | | | | Be the first to comment!
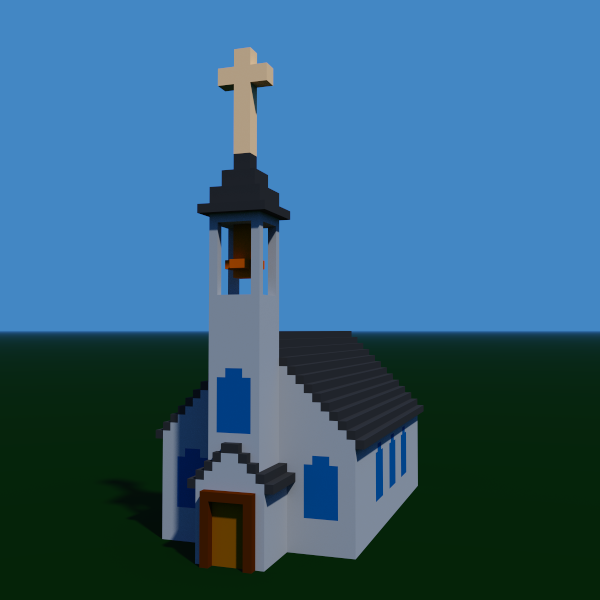
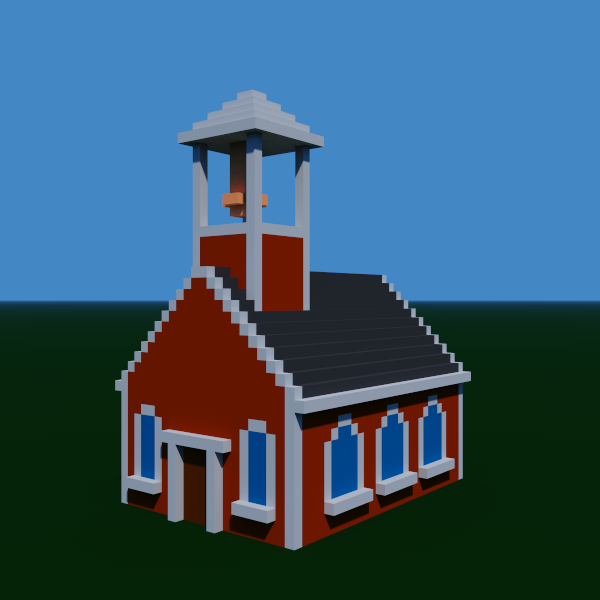
I returned to voxel modeling to try out MagicaVoxel 099.6. This newer version 099.6 ushers in a new level of development as it has enhanced facilities for modeling and rendering. Most notably, voxel models in MagicaVoxel can now go up to 256³, rather than being resticted to 126³ in dimensions. So more complicated models in one piece can be developed or viewed. This is great mostly for massive models or complex worlds. With these things in mind, I want to share with you two models I created and what I may intend using these for. Check these out...


voxel buildnig church house
^ from: (JohnMarineDesigns) - My model of a vintage church house modeled and rendered in MagicaVoxel.

voxel building school house
^ from: (JohnMarineDesigns) - This is a vintage school house I modeled and rendered in MagicaVoxel.

What do I intend on making these models for? Well, I have had ideas of using them for possible game assets or some media projects. I was kind of thinking of making a classic-style SimCity deal where you build a city from the ground up with the voxel building models I am trying to create. Also, I was considering the voxels being used for voxel-style 3D RPGs. The problem with that is that I am mostly fixated on more modern style structures. Therefore, I am not as adept designing Medieval-type structures or worlds. The two models I created will still get things rolling as far as designing voxel buildings. I also want to make this easy by having consistent dimensions to piece together spaces in equal grid amounts. I may also decide to just let everything be set up freestyle, letting the developer add the voxel models as he/she/they see fit in their voxel worlds.


I'm glad you got a chance to view my creative works blog! This is my first blog post since the new changes Blgoger/Blogspot blog posts are made. Thank you for reading! Take care and be well.

Visit my official website at johnbmarine.com, subscribe to My Blog(s), and/or Follow on Bloglovin!
Subscribe to John's Blog Space (JBS) Subscribe to John's Creative Space (JCS) Subscribe to John's Race Space (JRS) Subscribe to StyleSpace (SS) Subscribe to John's Life Space (JLS)
Support My Creative Works!
JMDesigns Patreon Soundcloud Bandcamp Twitch OpenGameArt TurboSquid
Get Social With Me!
Facebook (Friends) Facebook (Fans) Twitter YouTube Instagram Pinterest LinkedIn (professionals only)
Questions or Comments? Contact Me (serious inquiries only)...
Contact Me via E-Mail
read more...

Monday, June 1, 2020

3D Model and Showroom Plans

John B. Marine | 4:16 PM | | | | | Be the first to comment!
Making skins for vehicles in games is cool and all, but I have lately had interest in designing my own original vehicles all skinned up. Actually, I have wanted to develop my own models and my own showrooms. It was a dream for a long time to develop my own showroom for vehicles for games. As I started getting better with Blender, I am having more realistic visions of developing the sort of showrooms I want to develop. Allow me the opportunity to express myself. Okay? Good! Let me begin...


3D Model and Showroom Plans


I feel the need to develop even more original content. So I want to share plans I have in regards to various 3D models and showroom plans. Take a look:


3D Plans: Models.

My main areas of concentration for 3D modeling include vehicles and characters.

Vehicle Plans
On the vehicle front, I am starting to gain a new sort of direction towards how to model vehicles. The main concentration lies in low-polygon vehicles. I want to make low polygon a quality thing. This could even evolve into trying to refine them for other projects. This is actually a plan of mine of late. As I am starting to better use Blender, I feel I could master some techniques to at least attempt high-quality vehicles.

Previously, I noted that I had no interest in high-quality 3D vehicle models. I've learned some techniques that make me think otherwise in recent times. One of the most important things I am coming around to is that I do not need to put everything into one single mesh. In fact, some high-quality designs are a combination of separated objects. So a headlight assembly could be the main casing and all the individual lights that make up that headlight case. You also could independently work on a certain object of a full model. The one thing I always fear is that I may make a lot of changes that somehow will require me to do extra merging so that the model remains as complete topology-wise. It seems like a daunting task to make a high-quality vehicle. However, part of me says it is doable without stressing too much over certain details.

I also previously did not have interest in re-creating actual vehicles. That has changed... to an extent. I am not seriously considering completely accurate models. At the same time, though, I don't want to make any models of actual vehicles that seem overly cheap. I need to be careful on this front because some legal clearances have to be granted to make 3D products of actually-licensed vehicles available and can be used. I am not sure if I want to develop such vehicles for free for game mods, or if I want to offer vehicles for rendering. I still prefer doing original designs, but I am somewhat open to modeling actual vehicles.


Character Plans
I have not yet attempted any original characters. On one end, I have thought more along the lines of avatar-type models. I am talking about mostly humanoid models that you could freely customize as opposed to some completely original characters. I have not yet found any true inspiration to make this happen. However, I do have some ideas by following a bunch of different videos. No concrete plans have been considered as of yet. If and when I do get around to developing characters, expect a mix of freely-customizable characters and original characters.


Other 3D Models?
I have considered locations as 3D model projects. Namely, I have thought of things like buildings, some light scenery, and some light terrain. I also want to develop things like motor racing tracks. For race tracks, I am slowly looking at trying to develop in the mindset of Assetto Corsa. Assetto Corsa prefers you measure things in meters. So to that end, I will have to learn to put things into meters for measurement.


3D Plans: Showrooms.

No 3D model(s) will ever be worth showcasing if you lack a proper way to market them. So as I make skins for games like Assetto Corsa and Automobilista among others, I feel I have to develop a showroom to nicely showcase my 3D models. A showroom doesn't have to a "room." It can, in fact, be an outdoor scene stylish enough for showcasing work. One idea i seem to like is that Blender can handle HDRI images. For the uninitiated, an HDRI image contains color information within the image that can serve as the lighting and color for any given scene. Usually, some of these HDRI images can be pretty big files. I tend to like decently-sized images that won't beat up my PC in trying to render. Blender rendering through HDRI images is only done in Cycles Rendering. I will need to practice Cycles Rendering to be able to come up with great renders.

While showrooms suggest indoor scenes, showrooms can really be indoor or outdoor scenes. While I don't want the showrooms to be the focal point of my work, I do want them to serve as stylish 3D locales for which to display my work. I am gathering ideas for which to think about what kind(s) of showrooms I want to make. Because Cycles Renders allow you to develop a vast amount of ideas, I want to be able to make the best renders I can make regardless of my PC's power to create them masterfully. In fact, I dream of making certain render scenes that would be great for Assetto Corsa, since the majority of my renders are for Assetto Corsa. I have used custom showrooms for vehicles in rFactor. So I have a general idea of the importance of making quality showrooms for any set of vehicles for almost any racing/driving game.

Other than vehicles, I want to make some stylish showrooms for characters and other things. Imagine stylish scenes for which a character can be showcased. For example, imagine a stylish young lady at a stylish restaurant on a date night. Certain props or game assets can also be stylishly shown off in some kind of showroom. I haven't yet thought of any interesting showroom concepts to make these visions happen.


Now you know about some of my 3D plans. We'll see what materializes from my work in the future.


Thank all of you who love and support my work! I hope I can keep bringing the awesome that I can provide. Thank you for reading! Take care and be well.

Visit my official website at johnbmarine.com, subscribe to My Blog(s), and/or Follow on Bloglovin!
Subscribe to John's Blog Space (JBS) Subscribe to John's Creative Space (JCS) Subscribe to John's Race Space (JRS) Subscribe to StyleSpace (SS) Subscribe to John's Life Space (JLS)
Support My Creative Works!
JMDesigns Patreon Soundcloud Bandcamp Twitch OpenGameArt TurboSquid
Get Social With Me!
Facebook (Friends) Facebook (Fans) Twitter YouTube Instagram Pinterest LinkedIn (professionals only)
Questions or Comments? Contact Me (serious inquiries only)...
Contact Me via E-Mail


read more...

Thursday, October 10, 2019

Basic Voxel Vehicle Pack

John B. Marine | 6:58 AM | | | | | Be the first to comment!
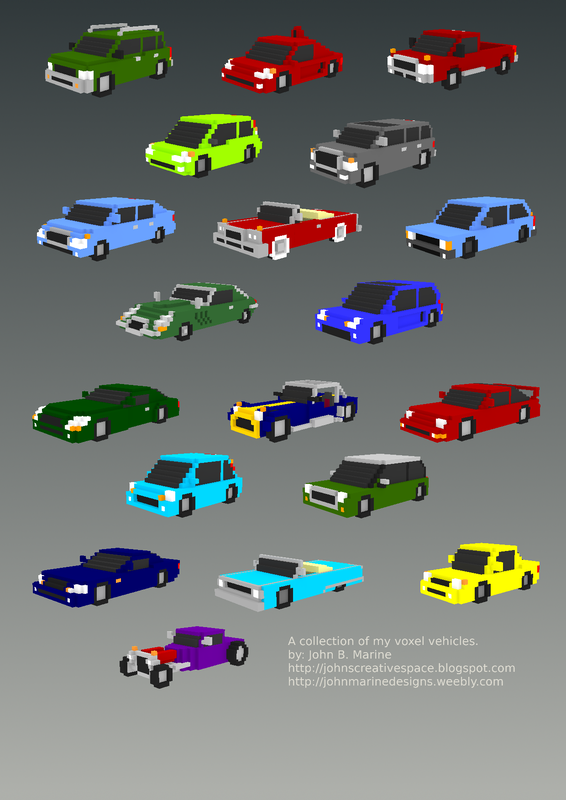
After several years putting it off and in not deciding what to do, I recently have FINALLY offered my voxel vehicles to the Internet public! This blog post describes what all I have done with these voxel vehicles I created. You will be able to purchase my voxel vehicles towards the end of this post. So stick around for more information!


My Basic Voxel Vehicle Pack


This is an opportunity for me to share with you my voxel vehicles. More information is included in this post, so read on if you are interested in my voxel vehicles.


What You Should Know.

My voxel vehicle creations were as of 2014 producing them with MagicaVoxel. I shared my voxel models across social media showcasing my work. I long planned to use my voxel models to develop a racing game. That game, however, never materialized. So the models I created have basically remained on my PC to never be available to the public. Despite a good amount of demand by some people who reached out to me, I was never fully ready to share my voxel models. That is until I finally decided in September 2019 to consider joing Envato. On October 1, I joined Envato. My first upload to any Envato product was made on October 7. My package was approved to 3DOcean for my voxel vehicle pack. Therefore, I am pleased to announce that my voxel vehicle pack is LIVE!

In my original upload to 3DOcean, I decided to keep the vehicles as static models. I had planned for some time to make the voxel models ready for animation. That will probably come in either an update or as a separate package. To keep polygon counts low, I filled up the invisible portions of the voxel models with voxels. Most of my models originally came with visible interiors if you remove the glass windshields and doors. Everything is low-polygon for the sake of game development. That was the original intent of my models.

The reworked voxel vehicles can be imported into programs like Blender or in game engines like Godot Game Engine. If you want to further use models for various applications, you are on your own to take my models and import them into other programs. So you will need to use a program like Blender to export my models into Unity3D if you want to use Unity with my voxel vehicle models. The Basic Voxel Vehicle Pack is available in three different formats: COLLADA DAE, OBJ, and the native MagicaVoxel VOX. Use the native VOX to freely edit the voxel models in their raw form.


Want to Get My Voxel Vehicles?

My voxel vehicle pack is available on Envato's 3DOcean. Purchase the Regular License if you want to feature my voxel vehicles in a free game or in certain media projects. Purchase an Extended License if you plan on using my voxel vehicle models in a paid game. Click on the image or link below to get started:

basic voxel vehicle pack
^ Click on the image or click on the following link to buy my voxel vehicle pack: Basic Voxel Vehicle Pack (Envato, 3DOcean)!

If you use my voxel vehicles in any project (personal or commercial), please let me know! I want to see how you plan on utilizing my voxel models. Please help support me and my work any way you can. Purchasing this package is one such way of showing your support... if you don't mind. I would appreciate your support.


That is all for this post! I hope you found it interesting. Thank you for reading! Take care and be well.

Visit my official website at johnbmarine.com, subscribe to My Blog(s), and/or Follow on Bloglovin!
Subscribe to John's Blog Space (JBS) Subscribe to John's Creative Space (JCS) Subscribe to John's Race Space (JRS) Subscribe to StyleSpace (SS) Subscribe to John's Life Space (JLS)
Support My Creative Works!
JMDesigns Patreon Soundcloud Bandcamp Twitch OpenGameArt TurboSquid
Get Social With Me!
Facebook (Friends) Facebook (Fans) Twitter YouTube Instagram Pinterest LinkedIn (professionals only)
Questions or Comments? Contact Me (serious inquiries only)...
Contact Me via E-Mail


read more...

Monday, March 11, 2019

Project Heloise

John B. Marine | 5:16 PM | | | | Be the first to comment!
Project Heloise is my code name for a new interest I have grown in creative work. The emphasis behind Project Heloise is in 2D animation with drawn and vector characters. The intent is to create 2D characters in animation ranging from animations to material that could be used in games and various media projects. I will explain further about this project as this post goes along.


Project Heloise


Allow me to further explain Project Heloise and what I hope to accomplish from it.


Project Heloise: The Concept.

"Project Heloise" was created as I was researching about 2D character sheets. These are usually large images compiled in Adobe's PSD format. The images are on a transparent base and are layered. In addition to these layers, these character sheets may even have proper pivot points for animation purposes. A majority of these character images are mostly designed for games and other media purposes. A lot of these character packs are offered in Adobe formats, EPS, and transparent PNGs. The advantage to these layered character sheets usually allows for smooth animation through modular creation of characters.

These character sheets are put together by game developers and other media artists. Among the game developer types, programs such as Unity3D, Unreal Engine, Godot, Construct 2, and GameMaker Studio are among a few used in the game development of these 2D characters. A number of programs even offer support for gaming outside of proper game engines. Some of these programs in 2D animation include Adobe Illustrator (formerly Adobe Flash), Adobe After Effects, Spine, Spriter Pro, Synfig, and DragonBones Pro among others. Other such programs can utilize these character sheets for non-gaming purposes. If you are adept enough, you can even use the all-purpose media program Blender 3D for your 2D animation needs.

When it comes to vector graphics, this is mostly done using Adobe Photoshop, or a popular free alternative- Inkscape. The advantage of vector graphics is that vector graphics allow you to freely re-size any such images without losing quality. Vector graphics are all based on mathematical coordinates. So you can make vectors as small or as large as need be for any media with no loss in quality when scaling down or scaling up. This makes the creation of material easier for when you rasterize images to be used in various programs.

Media projects outside of gaming usually involve animated short films. Some of these works include basic films, promotional videos for companies, educational or eLearning programs, and more. A lot of people usually look to certain websites that offer or sell already-made assets for 2D animation for those who can't make their own material or want something from established creators. Many different vendors even offer free 2D assets to be used in different media projects, which can cut some costs along with trying to find decent voice talent. These media projects with these 2D assets can be used in media ranging from simple presentations (such as Powerpoint) to any popular video formats (such as MP4 or MOV).


Project Héloise: My Ideas.

So where I tie into this? Lately, I have been thinking about trying to create 2D characters for some media projects as well as offer certain characters for sale. This began with wanting to try creating 2D characters that are animated and have animations to them. There was an attempt I made with Blender a few years ago where I quickly pieced together a simple 2D image that had layered body parts. While it was nothing special, it did give me some practice in trying to develop a 2D character that could be animated.

One time for the PC fighting game engine M.U.G.E.N., I developed a character out of vectors in Inkscape. I then converted the vector creation through Fighter Factory and imported my creation into the game. Again- nothing special. Most of the character was just a funky array of quadrilaterals that barely resembled an average human.

In my continued evolution and learning, it has now come to a point where I want to try vector graphics again and also try to make characters again. I want to develop 2D characters that I hope can be utilized in many different applications. I want to base some of my creations on past characters I have created. Besides that, I even wanted to try to give some life to some of my own created series. As an example, think of Sonic the Hedgehog as the simple car accessory in the SEGA racing game, "Rad Mobile," before Sonic eventually got his own game and eventually become one of the most successful gaming franchises of all time. I may just create some 2D characters based on my own creations for the simple use in media projects and games before possibly making something more serious.

Some of the early project ideas may involve game development or even use for media projects. Some media projects of mine may involve creating characters to jazz up websites and be used as individual avatars. You may even see those characters in my "John's Creative Space" blog or even on JohnMarineDesigns!


Project Heloise: Character Making and Animation Techniques.

I have to learn a lot to improve basic techniques on creating characters. For one thing, I have to learn to create lip syncing animations. Creating real characters that can talk takes some skill to act out some of the individual sounds. Originally, I just thought of simple mouth movement with nothing real serious. On the other hand, I have always been one to at least consider details even if I do not intend on being overly detailed. So it goes both ways to make basic animations for speaking.

Equally as important to animation as mouth movements are facial expressions. I want to get down blinking eyes, eye movements, and things like that. These are also as detailed and important in the basic creation of characters. The only way this doesn't matter is if I create characters that don't have any animations for the eyes or if I give them opaque glasses or something.

Most of all in character creation is in making the bodies and limbs themselves. A lot of people generate their modular creation of characters through sketches. They then go into programs like Inkscape to develop basic vector shapes. These vectors can consist of many different individual vector shapes all grouped together to make one layer that can be used in 2D animation. The possibilities are endless if one knows how to create quality 2D vector creations. In getting back into Inkscape, I have a lot to learn or re-learn to develop quality 2D characters through vectors.

I don't have the finances for an Adobe subscription, so it is unlikely I will develop anything that can be used for Adobe Illustrator or Adobe After Effects. As of March 11, 2019; I am looking at either Spine or Spriter Pro for 2D characters for game development. I also have programs like OpenToonz and DragonBones Pro for 2D game development and some basic 2D animation in general. I have Godot Game Engine for implementing 2D characters into game development. And of course, I have Blender. This sounds like a lot, but I have a lot on my mind and a lot to my disposal in trying to make these dreams reality.


Project Heloise: What You Can Expect.

You can expect that I will try to offer various creations for your liking if you are into 2D media work. I will simply offer my name to the many other developers of such content by providing my own uniquely styled work to the masses. For a lot of my own original characters, I want to make things special. I can offer a creation of mine, but I may also add an eBook of some kind for each character just for authenticity's sake. I want to make it seem like you are downloading something of quality and want to provide as complete of an experience as I can. The eBook may probably be in PDF format or something.

Even as I offer such assets to the masses, I will try to improve my techniques in creating characters. I really want this to take off like a lot of my other work. Your encouragement and interest both mean a lot to me during this time.


Now you know about some of my future plans. If you have any suggestions in me trying to come up with these 2D characters and such, be sure to contact me with hints and tips so I can improve my techniques. Thank you for reading! Take care and be well.

Subscribe to My Blog(s), and/or Follow on Bloglovin!
Subscribe to John's Blog Space (JBS) Subscribe to John's Creative Space (JCS) Subscribe to John's Race Space (JRS) Subscribe to StyleSpace (SS) Subscribe to John's Life Space (JLS)
Support My Creative Works!
JMDesigns Patreon Soundcloud Bandcamp Twitch OpenGameArt TurboSquid
Get Social With Me!
Facebook (Friends) Facebook (Fans) Twitter YouTube Instagram Google+ LinkedIn (professionals only)
Questions or Comments? Contact Me (serious inquiries only)...
Contact Me via E-Mail


read more...

Monday, January 1, 2018

Assetto Corsa Skinning

John B. Marine | 8:23 PM | | | | Be the first to comment!
Skinning for Aseeto Corsa cars is something I've done lately in trying to learn how to mod cars for this game. I have used GIMP for my skinning of cars. The really nice thing about this game is that all cars have templates for them supplied by the developer, Kunos Simulazioni. Part of the process is in trying to learn how to properly put in my material. I will share with you some of the skins I made for Assetto Corsa and what I have learned.

First, here is a decent skin I created:

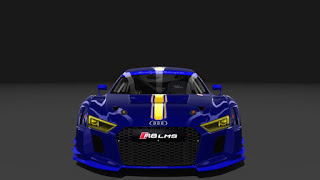
Assetto Corsa skin
^ This is a 2016 Audi R8 LMS colored in my Moonlight Motorsports livery.

This skin was created by me after learning how to properly design liveries for cars using GIMP. Part of this involved some trial and error. Making a skin with GIMP is not really difficult; it is just not as efficient and intuitive as with Photoshop.

What are my recommendations? First off, save the PSD format template to GIMP's proprietary XCF format. If you try to save over the PSD in GIMP, you will lose the texture group information- and you don't want that. So try to save the PSD file into XCF before doing any painting in GIMP. Assetto Corsa uses the DDS format for textures. The recommended format is DXT1 for textures that do not use alpha channels. Use DXT5 format DDS for images that have transparency to them. Transparency options usually are reserved for things like windshield graphics and some car skins that are basically overlays to cars.

When you save a DDS file through GIMP, the car skin will appear light at first. It is as if gamma correction is provided when a skin is successfully loaded into the game or through some external viewer. Also, pay special attention to what layer is active in GIMP, because the active layer will be exported when you try to load the skin onto a car. So when you're done with all of the livery graphics, flatten the image so all visible layers are applied to the car. Make sure also to not have the wireframe layer active if a skin has a wireframe layer. What about the colors? The method I use is to darken the color lightness and add some saturation. Use the "Hue-Saturation" option from the Colors menu in GIMP. The settings I use are Lightness at -75 and about Saturation of 15. After doing this, the skin comes out properly when I upload the skins into Assetto Corsa.

So in review, here is the skinning process:
• paint your livery onto a given car
• flatten the image
• darken the Lightness of the image and add some Saturation
• save the DDS file in DXT1 format, and also generate mipmaps

If you have Assetto Corsa, I recommend using "Content Manager" to preview skins for cars. The program updates skins in real time, so you can edit the skins as many times as you like to sample your skin before playing it in the game.


Now for the trial and error process. Consider the following:


Skinning Too Light.

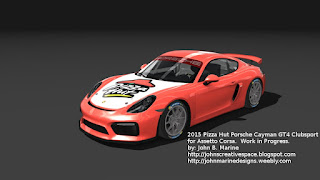
Assetto Corsa skin
^ This was a Porsche Cayman GT4 Clubsport appearing too bright.

With this effort, the colors appear faded, like badly worn jeans or other clothes. The colors are not rich enough and real enough for my tastes. Actually, I had previously added more saturation just to make sure the colors appear right. Even still, there was that sort of gamma correction that made the colors appear brighter than they should be. I didn't want that kind of gamma correction hampering the quality of my livery designs.


Skinning Too Dark.

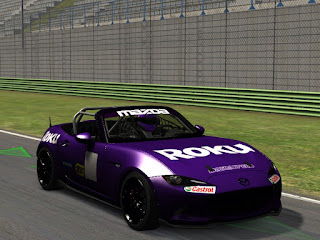
Assetto Corsa skin
^ This Mazda MX-5 Cup test car was colored darker than the original image.

There was a point where I sampled colors too dark. What I did was apply an all-black layer and gave it some opacity. This would darken my image without needing to apply Lightness or Saturation once I flattened the image. This worked well. However, it made some of my skins appear darker and less saturated than what they should be. So I then retired that method.


Lessons Learned.

Until I find a way around gamma correction, this is the method I use to try to apply proper color quality to my car skins in Assetto Corsa. The cars still come out beautifully once I import them into the game.


Happy new year, mates! Thank you for reading! Take care and be well.

Subscribe to My Blog(s), and/or Follow on Bloglovin!
Subscribe to John's Blog Space (JBS) Subscribe to John's Creative Space (JCS) Subscribe to John's Race Space (JRS) Subscribe to StyleSpace (SS) Subscribe to John's Life Space (JLS)
Support My Creative Works!
JMDesigns Patreon Soundcloud Bandcamp Twitch OpenGameArt TurboSquid
Get Social With Me!
Facebook (Friends) Facebook (Fans) Twitter YouTube Instagram Google+ LinkedIn (professionals only)
Questions or Comments? Contact Me (serious inquiries only)...
Contact Me via E-Mail


read more...

Wednesday, November 30, 2016

Voxel Character Starter Pack

John B. Marine | 10:51 PM | | | | Be the first to comment!
My voxel characters made in MagicaVoxel are now offered as a Starter Pack! This one features nine of my first voxel characters. All of them are static models in their raw VOX format. I decided to offer this package online to give people some voxel characters to use for games and other projects. I also want to showcase my voxel art talent to the world by offering this package.

Here is a look at the characters:

Voxel Character Starter Pack
^ from: (my Facebook Fan Page) - The original nine characters I made with my first character pack are now available for download. Get it now!

* base model - wears a white tank top, blue jeans, and black shoes.
* a teenage girl with a bright scarf, black top, and indigo jeans tucked into brown boots.
* a middle-aged woman in a sweater over a blouse, skirt, and pumps.
* a man in an open shirt with a T-shirt underneath and jeans tucked into dark brown boots.
* a young adult lady in a yellow dress and hot pink pumps.
* a Black male in a football jersey, dark blue jeans, and orange lug boots.
* a man in overalls and wears a baseball cap.
* a teenage boy in a varsity jacket, a T-shirt, blue jeans, and brown shoes.
* a college-age girl in a sporty tank top, and yoga legging pants tucked into sheepskin boots.

I am looking to rework my regular models and offer some more advanced options for those looking to animate my models. I will keep you posted here on "John's Creative Space" and elsewhere in media. All I want you to know here is that you will now be able to use my original models. If you think you can make better-looking models using my base model, the original VOX models are all concluded as they were from MagicaVoxel.


For More Information...

Want to download this package? Choose to support me on OpenGameArt, Voxel Art Store, or both! Links:

Voxel Character Starter Pack on OpenGameArt
Voxel Character Starter Pack on Voxel Art Store

Please also support me on Patreon. Visit www.patreon.com/johnbmarine and make a pledge. Your support can help me to provide more content and even gain funding towards performing other projects. Other than that, enjoy! :)


That concludes this blog post. Thank you for reading! Take care and be well.

"Like" me on Facebook, Follow JCS, visit my Weebly site, and/or Contact Me via E-Mail!
Subscribe to John's Blog Space (JBS) Subscribe to John's Creative Space (JCS) Subscribe to John's Race Space (JRS) Subscribe to StyleSpace (SS)
read more...

Tuesday, November 29, 2016

Block Breaking Block Pack

John B. Marine | 10:22 PM | | Be the first to comment!
UPDATED: December 6, 2016)

Recently on @opengameart, I offered my first #gamedev asset. This asset offered is for block breaking fans. Think Breakout or Arkanoid here. I devised a set of blocks that can be used for block breaking games the likes of Breakout or Arkanoid. There are 12 blocks in 25 different color combinations. Each block is pure pixel art- no vectoring, no pre-rendered graphics... just a four-color scheme with dark outlining on the bottom and right sides of each block. Here is a preview of my block breaking game asset:

block breaking Breakout Arkanoid
^ from: (my Facebook fan page) - 25 colors, 12 block packs, one great pack of block breaking game assets.

Here is a look at each of the color combinations (and some rules if you want to use the blocks):

01: red
02: orange
03: yellow
04: green
05: blue
06: violet/purple
07: pink
08: teal
09: aqua blue
10: crimson
11: sky blue
12: lavender
13: white
14: cyan
15: turquoise
16: forest green
17: Game Boy© Green
18: Virtual Boy© Red
19: brown
20: bronze*
21: silver*
22: gold**
23: sunset
24: alpha map
25: onyx***

* = takes two hits to destroy
** = takes three hits to destroy
*** = can not be destroyed

This package is offered in three different varieties. I am offering them separately. Click on the links below to find this asset in the different variations:

Block Breaking Block Pack (SD Version)
This is the basic block back. Each block is 16 pixels wide and 8 pixels tall.

Block Breaking Block Pack (HD Version)
This is the same pack as the Standard model, only upscaled and retouched. Each block is 32 pixels wide and 16 pixels tall.

Block Breaking Block Pack (HD2 Version)
(December 5, 2016 Update)
This is the enhanced HD pack at double the scale of the HD version. Each block is 64 pixels wide and 32 pixels tall.


Get the Block Breaking Block Pack Bundle!
This package features all three block breaking block packs, but it also includes six extra block types exclusively for the HD2 set! It is also my first pixel art submission to Voxel Art Store.


To keep up with all of my OpenGameArt work, please visit my OpenGameArt profile.


You have read a post on "John's Creative Space"- the creative works blog of mine! I hope you enjoyed your time here. Please Subscribe and Follow this blog (and my others) if you enjoy my content. Thank you for reading! Take care and be well.

"Like" me on Facebook, Follow JCS, visit my Weebly site, and/or Contact Me via E-Mail!
Subscribe to John's Blog Space (JBS) Subscribe to John's Creative Space (JCS) Subscribe to John's Race Space (JRS) Subscribe to StyleSpace (SS)
read more...

Thursday, March 3, 2016

Voxel Vehicle Starter Kit

John B. Marine | 1:27 AM | | | | Be the first to comment!
(UPDATED: April 23, 2016)

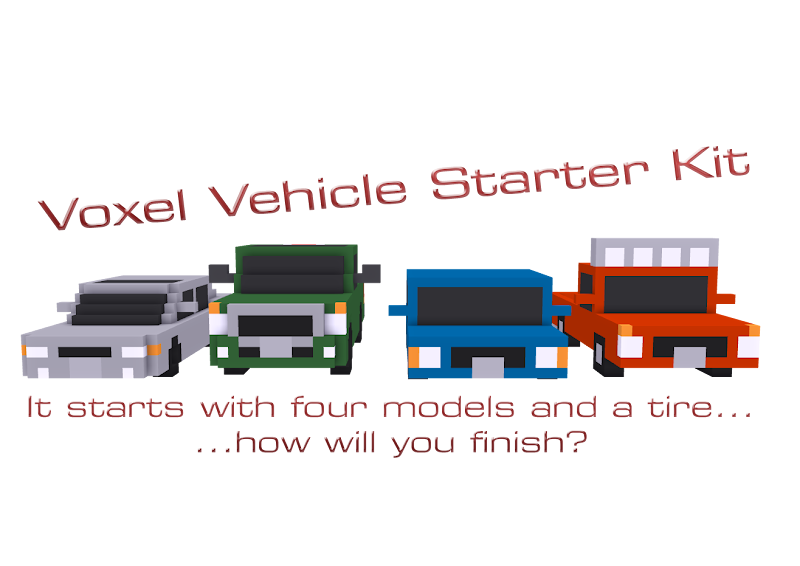
My first offering of voxel cars is with a package that went live on TurboSquid recently. I created a "Starter Kit" featuring four cars I designed myself including one tire model for games and media projects. I offered this to get my work exposed as well as get people started in their projects using some fine voxel models. While this package does not include any machines I've created previously, I do offer my own designs to help people get started and get a feel for my artistic style.

Here is a look at my work:

my first TurboSquid product
^ learn more here: Voxel Vehicle Starter Pack - I have finally offered my own voxel car designs to others.

Because this was my first TurboSquid product and because I want this to be a gateway to making more quality material, I am offering this for free. Each of the vehicles I have created are my own designs amd feature versions both with static wheels and with no wheels. The versions with no wheels can be used in programs like Blender in the creation of games and media projects. Since the no wheel versions (obviously) don't have wheels, I have included a tire that can be added to models. The tire model I created features a tire with an attached eight-spoke wheel all made of voxels. Just re-size the tires to fit into the wheel arches. It may look awkward with the rest of the vehicle, but you are at least fitting a nice set of wheels on the car. Of course, you could always make your own tires and wheels and affix them to the car in programs like Blender or something. You can set up the vehicle to have a basic rig setup or try more advanced rigs with suspension setups. No matter what, I have given a unique start to help fuel the dreams of those who love cars with my voxel vehicles.

You're welcome, world. :) For more information on this package, please visit: Voxel Vehicle Starter Pack (TurboSquid). Credit me if you use my work in your projects. Please?

To see more of my work, visit: JohnMarineDesigns on TurboSquid


LATEST UPDATE(S)/REVISION(S):

APR 23 2016 - edited a link, extra edits


If you loved this package, I hope to offer more material to you all in the future. If you liked this blog and/or this blog post, I hope to offer more blog material to you all. Thank you for reading! Take care and be well.

"Like" me on Facebook, Follow JCS, visit my Weebly site, and/or Contact Me via E-Mail!
Subscribe to John's Blog Space (JBS) Subscribe to John's Creative Space (JCS) Subscribe to John's Race Space (JRS) Subscribe to StyleSpace (SS)
read more...
JohnMarineDesigns on TurboSquid

Would you like to donate to support my creative work? If so, please show your support using this PayPal item:
I am now on Patreon! Support my creative work on Patreon today at: www.patreon.com/johnbmarine!
 
Copyright © 2015 John's Creative Space • All Rights Reserved.
Template Design by BTDesigner • Powered by Blogger