Showing posts with label Blender. Show all posts

Wednesday, August 14, 2024

Recent Character Work

John B. Marine | 12:33 AM | | | Be the first to comment!
Developing vehicles is tough work. Developing characters is even tougher work. I have lately found a style for which I could produce a number of low-polygon characters. The primary intent was to develop characters that can be animated. What I will do in this blog post is break down some of my recent kick of developing low-polygon characters. You also will get to see some of the work I have been doing lately, even including prototypes I developed.


Recent Character Work


I will share my recent work and prototypes later in this blog post. For now, though, I will provide you some background.

Character development has been a very tough thing for me to try to work on and develop. I designed characters in voxel form long ago. You can look in this blog or on my Weebly page to see the full array of my work.

Why develop characters? Well, you want to be able to have characters become their own stars of games or media projects, or you may want certain characters to fill spaces and bring life to scenes. How you develop characters and what kinds of characters go a long way towards building your portfolio. It also helps establish yourself as a designer. No one obviously wants to see created characters not be utilized proper.

One of my plans was to finally make something a long time coming- take my voxel model characters and evolve them for use in 3D modeling software, games, and media projects. I looked back at my original 43 voxel model characters and thought about how I could bring them to life and enhance them from voxel form. At the moment, most of my designs are in the prototype phase. I will improve them over time using different techniques and learning new techniques. A lot of the low polygon techniques are from studying 3D models from older games and less-intensive games. Mostly, these are models from the PlayStation 1, Nintendo 64, and SEGA Saturn era.


The Low-Polygon Technique.

What has become my method for a lot of my modeling of characters has been a grid-like system. Through Blender, I have had a habit of setting up front-facing square planes of 10 centimeters length. I try to rough out the model I want to create through these grid-like meshes. I may keep them like their grid form, or I may refine the models to make them more realistic. I do want to keep everything low-polygon. Because I want the models to be animated, I tried learning... actually, re-learning how to rig models. This meant I had to allow enough geometry for which animators can properly animate models. Since I am not going to make the models intensely realistic, I can actually get away with some 3D modeling styles that still allow for low-polygon, low-spec 3D modeling.


The Minecraft (and Some ROBLOX) Influence.

When most people think of low-spec 3D, a lot of people look to Minecraft, once the greatest independent/indie games of all-time before being sold to Microsoft. Minecraft is absolute simplicity in regards to 3D and 3D animation. Only six cubes make up a Minecraft player. They then have small PNG files as textures. Minecraft is the bare minimum for some low-polygon or blocky work.

Did you know my original voxel model characters were meant to be used in Minecraft? Minecraft never happened for those models. One of the things I was thinking about was making the re-made voxel models to have the six-bone style setup. Minecraft player models have animations for the body, head, both arms, and both legs. The human models I developed have kind of the six-bone human setup.

ROBLOX had two different character styles for their Robloxians. The ROBLOX R6 model is highly like a base Minecraft player with its six-bone setup. That explains the "6" in R6- nearly the same six-bone armature setup as a Minecraft player: torso, head, both arms, and both legs. Later, ROBLOX would release the ROBLOX R15 model. As its name suggests, the R15 has a 15-bone setup: two torso bones, each shoulder, head, two bones for each arm (upper arm and lower arm), two hip bones connecting to the legs, and two bones for each leg (upper leg and lower arm). The initial goal of my reworked voxel characters is to give them a 15-bone setup. What I started off with is trying to give them a six-bone setup. Once I learned some newer techniques, I decided to try my hand at a 15-bone setup for my characters.


Now that I have filled you in, I will go ahead and share some of my latest work.


Recent Character Work: Character Prototypes


Let me show you a lot of what I have worked on in regards to developing my low-polygon characters. Some of these pictures can also serve as previews of future characters I plan to release or want to release. So what you are getting here are possible previews of what I will offer across a number of different 3D model stores. If you are ready, please keep reading.


Shaka.


Shaka
^ from: (my X/Twitter) - This is Shaka, a protagonist to an unnamed project of mine.

I have no name for this project, but its main character is named Shaka. As I practiced making my prototypes for my enhanced voxel character models in Blender, I did this sort of one-off 3D model representing the hero of this project. I had to move around some mesh parts to make this character look good.

(Potentially Renamed Female Series).

These are some of the 3D characters for a past game project. The tentative name of the project is "Top Diva," but I may change it to something else. That is why I am labeling this as "potentially renamed female series." Each featured model is shown in the order of which ones I worked on least recently going to most recently.

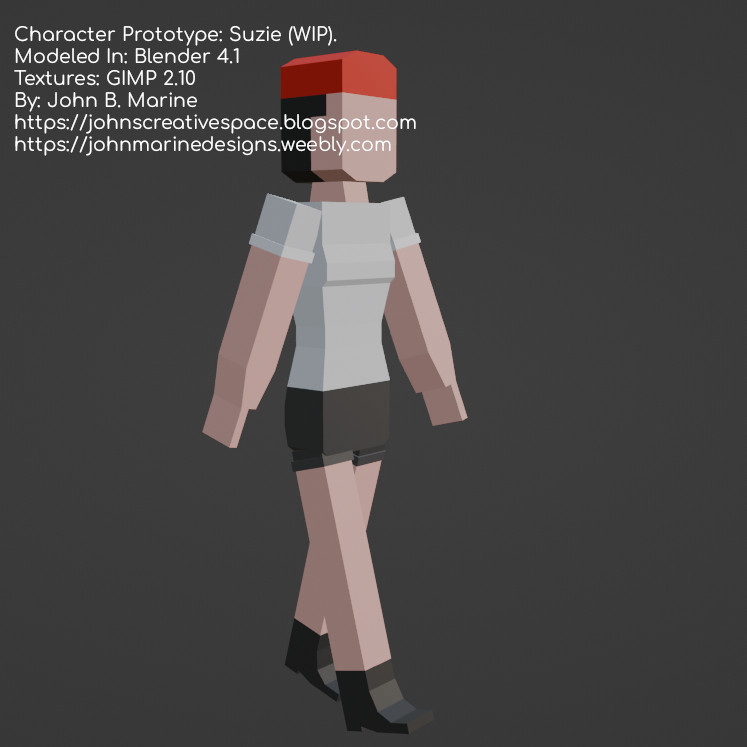
Suzie
^ from: (my X/Twitter) - This is Suzie, a French teenager.

When I first created Suzie, I realized I haven't developed any 3D character since January 2024 when I made this model for late July 2024. So imagine my happiness when I developed Suzie here. I did not know how I wanted to design the hands. I had loose hands in mind rather than clenched hands. I specially designed the cuffs for Suzie's shirt and her wool shorts. I used some good imagination to try to design her ankle boots in a stylish way.
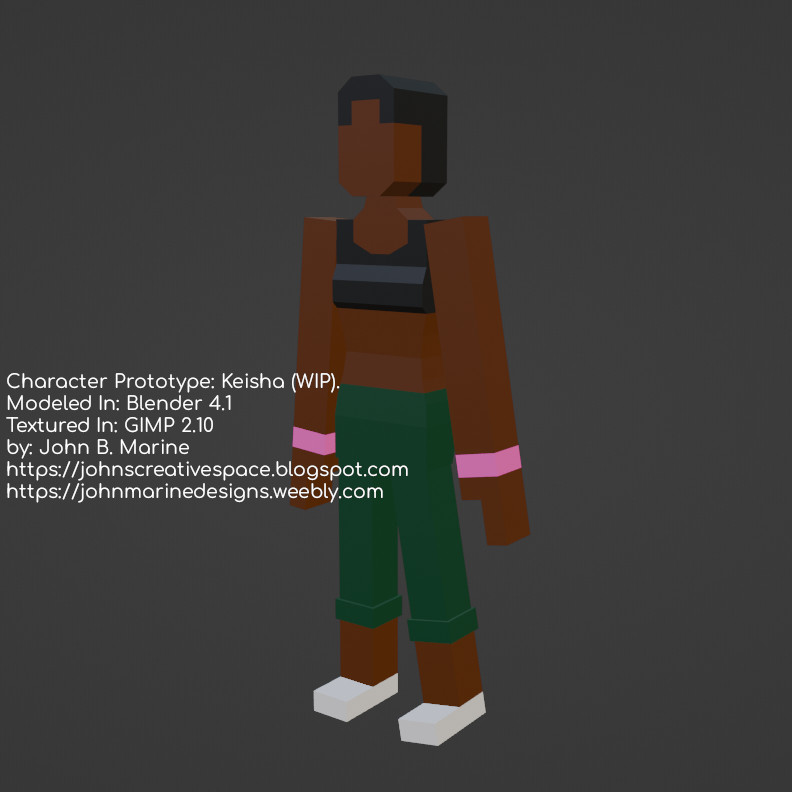
Keisha
^ from: (my X/Twitter) - Keisha is an athletic American dancer.

The original prototype for Keisha above has kind of the loose hands I thought of. However, no thumbs were modeled for those hands. I cuffed Keisha's pants. What I was going for is an urban girl with a little sportiness. I have made a duplicated mesh for testing making clothing designs. What this would present is the possibility of allowing a person to put one's own T-shirt designs or messages on it. That duplicate mesh layer is only one millimeter apart from the main mesh. Around the time of this model, however, I was unable to find out how to make transparent textures remain transparent.
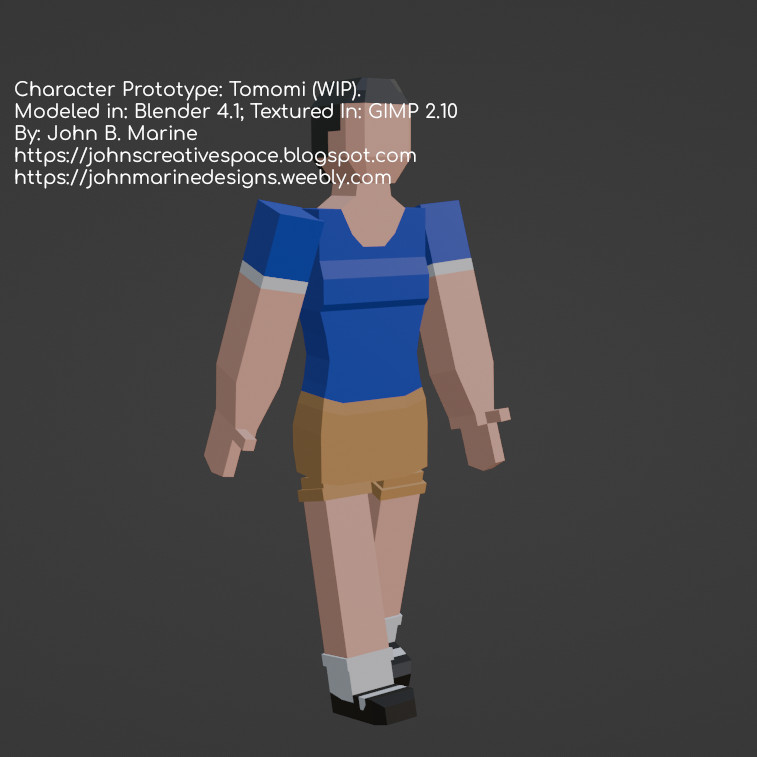
Tomomi
^ from: (my X/Twitter) - Tomomi is a Japanese teenager who stands only five feet tall.

Tomomi was my third design using the character style I've adopted for this series. I tried to design various elements through meshes rather than with textures. I also developed Tomomi with a hand model I developed that I was starting to like.
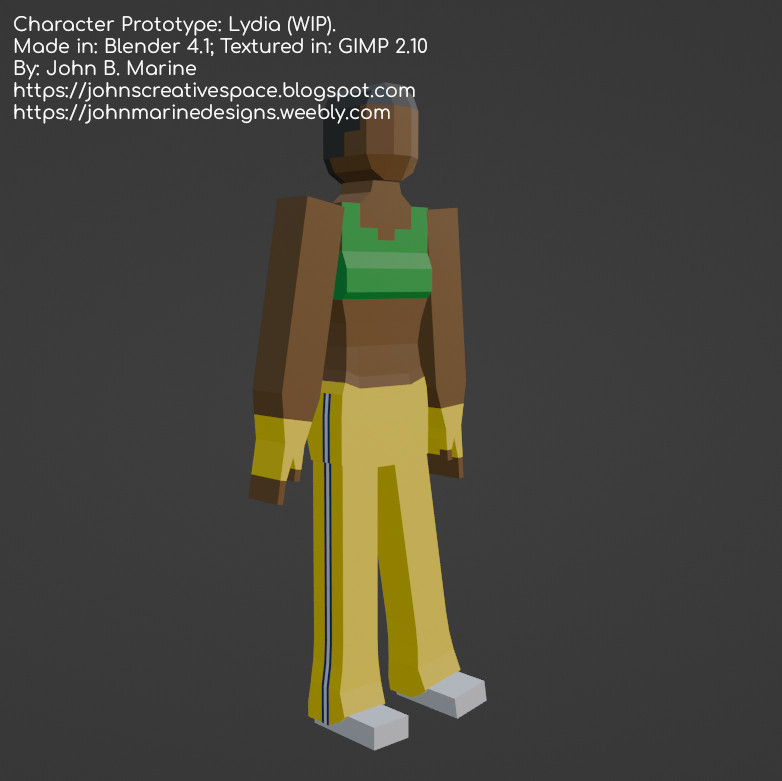
Lydia
^ from: (my X/Twitter) - Lydia is a Brazilian woman with a finely built body.

Because I developed Lydia to be a bit different with her pants, I kind of went the difficult route of designing Lydia and then texturing her from the stripes on the sides of her pants. I also went with a different hand design along with making her gloves.
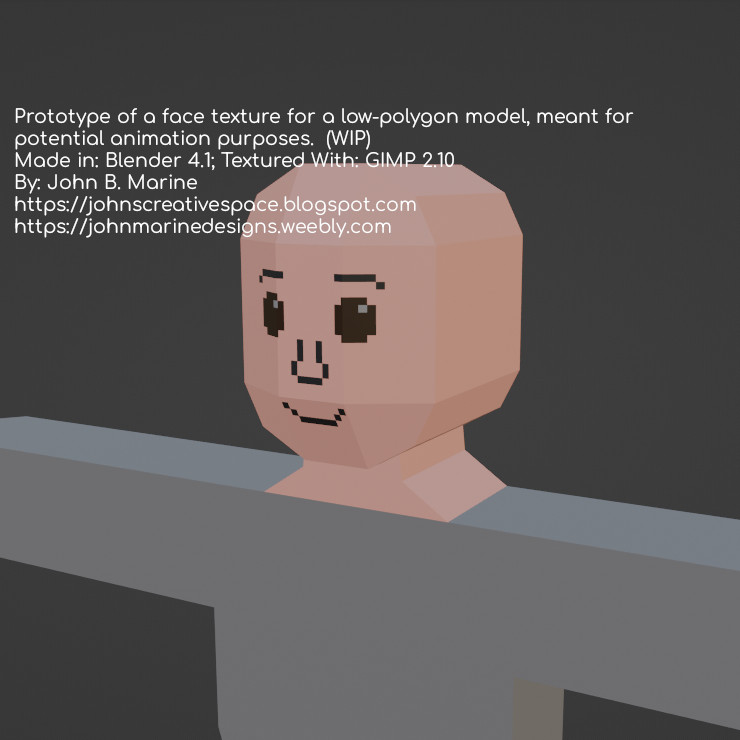

2D Facial Rigging Prototyping.

2D Facial Rigging
^ from: (my X/Twitter) - A duplicated mesh positioned a millimeter away from its face makes up this mesh. The intent is on 2D facial rigging through textures.

I had facial animation in mind when I worked on this prototype. Originally, I did not know how to make transparent textures or pictures with alpha parts appear transparent. I then learned how to use Shader nodes in Blender to allow for the use of transparent images and alpha images. I had to change up a few Shader notes and change the alpha type from opaque to Alpha Clip. Later on, my face image for the model became transparent! While I haven't learned how to implement 2D facial rigging, at least this was a step in the correct direction towards eventually making 2D facial rigs or even animating textures for 3D models.


I will now be looking at breaking down the models you've seen in this section.


Low-Polygon Model Breakdown


I will use this time to discuss the finer details of my 3D modeling of these characters.

The models I made for Blender follow nearly the same front dimensions of my original voxel models. For more ability, I made their legs one or two bits longer. I have not truly developed a hand style I want to develop for all characters. The head style is a mesh grid of three squares horizontally and four squares vertically. If there were parts that I wanted to be implemented with making textures that can be changed, I duplicate those parts of the mesh and then position them slightly away from the main mesh.

From the textured parts, the second, third, and fourth rows were used for facial rigging. I use Blender's "Projection From View" to map out the facial texture. I do the same by picking a row of vertices to use for designs for a shirt or some other details. Since my models were low-spec, I had to find a good enough texture size to allow for words to be put on an outfit. I found something like 128 pixels across to be a good start. Later, 256 pixels across for outfit graphics would be good. I want to learn how I can implement 2D facial rigging or even setting up animated textures for models.

Implementing armatures involves me learning how to set up armatures along with weight painting. I felt the best method of armatures was to use Armature Deform With Empty Groups. Only recently I learned of a better weight painting method that works well for my models. All I had to do was change one of the Weight Painting options to where the falloff is linear or constant. It quickly painted the mesh parts I wanted to weight paint properly.

As of this moment, where I struggle is finding a style to properly animate the arms and the legs. I made the upper arms and upper legs shorter than the lower arms and lower legs. However, I am not certain how I want to structure some models. So I am drawing more inspiration from other early 3D models to help construct my characters.


Rest assured that if/when I create models ready to be animated and utilized, I will share them on as many different 3D stores as possible. That means Turbosquid and Envato's 3D Ocean currently. I also will be looking for more platforms; such as (but not limited to): CGTrader, SketchFab, (maybe) ArtStation, and more. Stay tuned to my blog and my other social content for more information!


Now I want to make note that if I work on my individual characters, I will make blog posts as well as add to my Github personal page. I want to keep you entertained and engaged. It is the least I can do. The rest is up to you. Subscribe/Follow my blog(s) in any capacity if you love my work. Share my blog post(s) with others if you enjoy my work. Support me further by connecting with me on social media; and if you are inclined, feel free to donate to me (tips/donations are voluntary but would be appreciated). Thank you for reading! Take care and be well.

Visit my JohnMarineDesigns Weebly site, subscribe to My Blog(s), and/or Follow on Bloglovin! Let's connect:
Contact Me via E-Mail Contact Me via Discord

(tips/donations are voluntary)
Visit and Subscribe to My Blogs...
Subscribe to John's Blog Space (JBS) Subscribe to John's Creative Space (JCS) Subscribe to John's Race Space (JRS) Subscribe to StyleSpace (SS) Subscribe to John's Life Space (JLS)
Get Social With Me!
Facebook (Friends) Facebook (Fans) Twitter YouTube
Pinterest LinkedIn (professionals only) Discord ???
Support My Creative Works!
JMDesigns John on Envato
Patreon Soundcloud Bandcamp
Twitch OpenGameArt TurboSquid
read more...

Wednesday, July 3, 2024

Recent Vehicle Work

John B. Marine | 8:53 PM | | | | Be the first to comment!
I have been 3D modeling vehicles lately. Part of these are 3D re-imaginations of my voxel vehicles. Others are completely original 3D vehicles. Gaining experience in modeling vehicles made me embark on a new project. I am doing what I can to try to showcase my skill in 3D modeling. I want to share some of my work and my plans in this blog post. So if you are inclined, let me share my work with you all.


Recent Vehicle Work


This blog post discusses work I have done lately in developing vehicles. Before I can share more of my work, I have to share how I got to this point.


Building Blocks.

This movement towards making vehicles began with me trying to learn to develop a vehicle controller for Unity3D. I properly followed a tutorial from Unity, and it got me to wonder how to develop more vehicles. The tutorial package from Unity had a car that would spin out too easily. Like, the tutorial couldn't handle sudden avoidance turns. That was besides the point of this blog post.

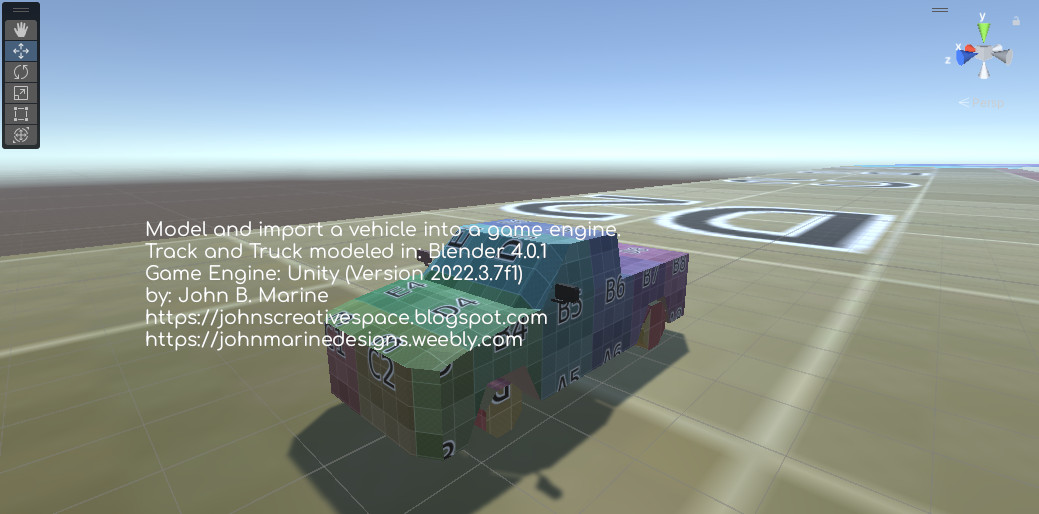
I kept practicing making the same Blockbench truck in a tutorial. Rather than re-create it in Blender, I re-made it in Blender. Once I got down how to develop it, I wanted to animate it. So what I did was add on some wheels. As any vehicle to be animated in 3D, I separated the wheels from the vehicle chassis. The next challenge was to take the same vehicle scripts from the Unity tutorial but implement them to a custom vehicle. This was harder because I had to rely on being able to properly set up the custom vehicle. I had to do some editing because I didn't set the origin of each wheel to their geometry. Therefore, my early vehicle had wonky rotation with the tires. I then changed up 3D options in Blender and re-exported to Unity. The end result? This picture:

unity vehicle controller
^ from: (my X/Twitter) - I developed this pickup truck and this simple oval race track.

I was so happy to get in enough of a groove to develop an interest for 3D modeling vehicles. My interests only pertain to low-polygon work. More to come.


The Low Polygon, Low-Spec Style


Let's get something straight. Low polygon can be very subjective. It is only as low polygon as one perceives low-polygon. Granted I never developed anything of seriously high detail, I have done enough to warrant some kind of attention towards low-polygon modeling. The most realistic 3D model I ever made was a human foot from a tutorial on YouTube. I lack the confidence to make a fully real vehicle. It didn't mean, however, I could not give full effort towards trying to make believable vehicles. Let me share with you some of my work.


Low Polygon Challenge.

Previous attempts at making a low-polygon vehicle haven't been too good. I fear not making things as detailed as possible, though I do not specialize in hyper-realistic and hyper-detailed models. It wasn't until one time that I made a true vehicle that could be perceived as "low-polygon."

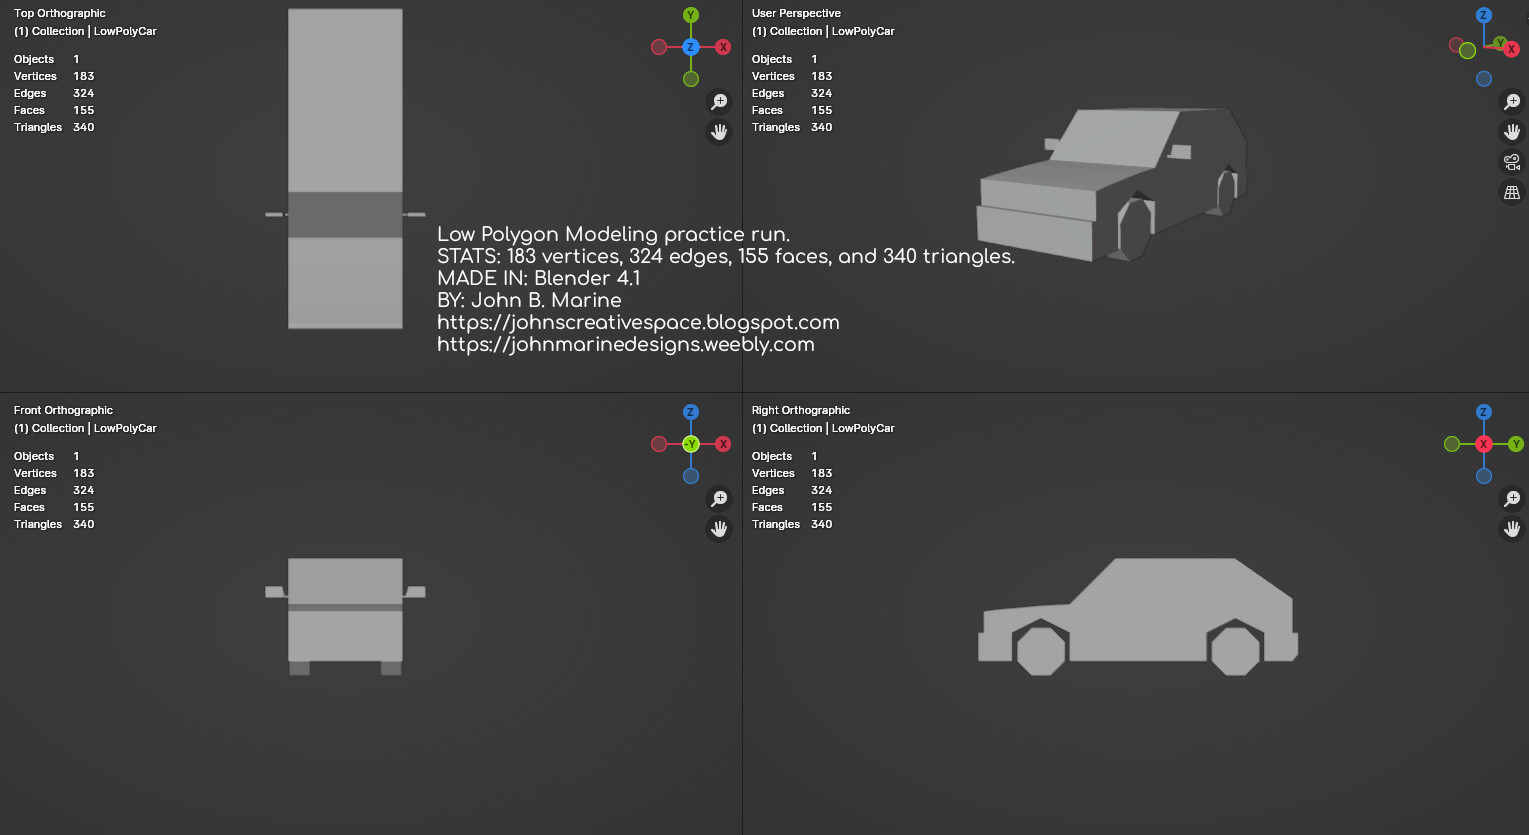
Previously, what was to be a low-polygon model ended up being something I further to being not low-polygon at all. One sports car model I developed in 2020 ended up with 2490 vertices, 1878 faces, and 4848 triangles. I made a low-polygon sport-utility vehicle (SUV) in 2021 that had 285 vertices, 221 faces, and 544 triangles. I surpassed both marks with a model I developed in June 2024. Here are the stats on my 2024 model: 183 vertices, 324 edges, 155 faces, and 340 triangles. The model I made in 2024 was a hatchback based on one of my old voxel vehicles. Here is a look at it:

low polygon hatchback
^ from: (my X/Twitter) - This was one of my best low-polygon efforts to date.

Trying to come up with as few polygons as possible but with decent detail is its own challenge. I made it happen, though.


Low Polygon With Pixel Textures.

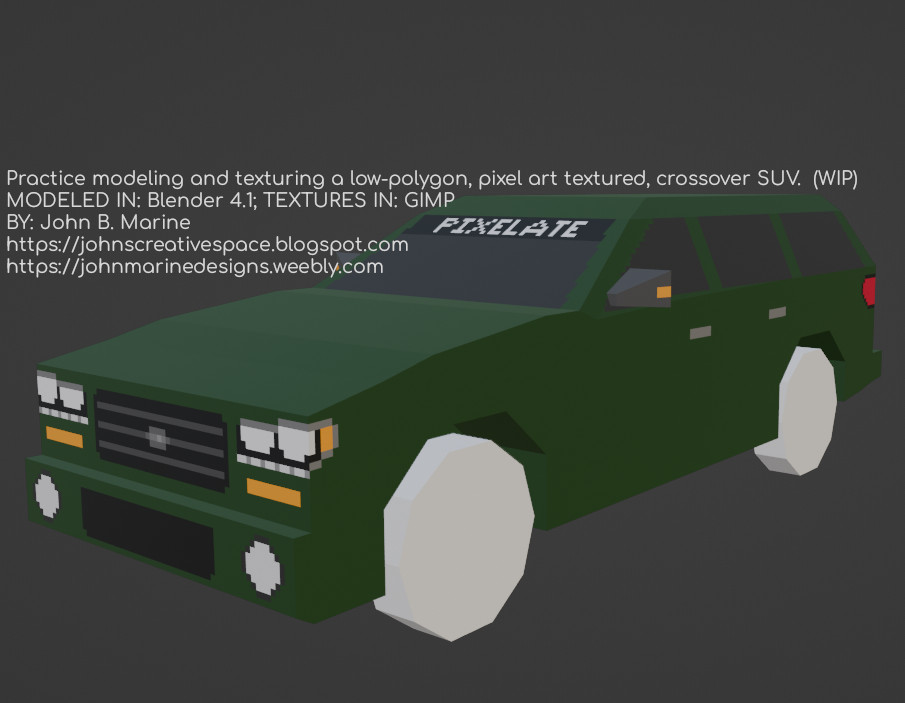
One of my best creations to date is another SUV I developed. The challenge was to make a vehicle and then it pixel art-style art. I still need to learn how to better detail things in pixel art. I actually thought of trying to learn how to bake lighting and shading into UV maps in Blender. I looked to old PlayStation 1 racing games for low-polygon insight. That is how I learned to make simple side-view mirrors. The work of about 3-6 hours to model and texture one vehicle led to this effort:

low polygon pixel textures
^ from: (my X/Twitter) - This was one of my best low-polygon efforts to date.

I had kind of a tough time thinking about how to texture this crossover SUV. I basically thought of it having a bold grill, lights with daytime running lights, and simple designs for the door handles and tail lights. I even had a bit of fun making a window banner saying "Pixelate." I used a blueprint of the 2006 Cadillac SRX in developing the side profile of it. Then, I used my imagination to make my own vehicle. This model is meant to be one of my 3D reimagined versions of one of my voxel vehicles.


My Latest Vehicle.

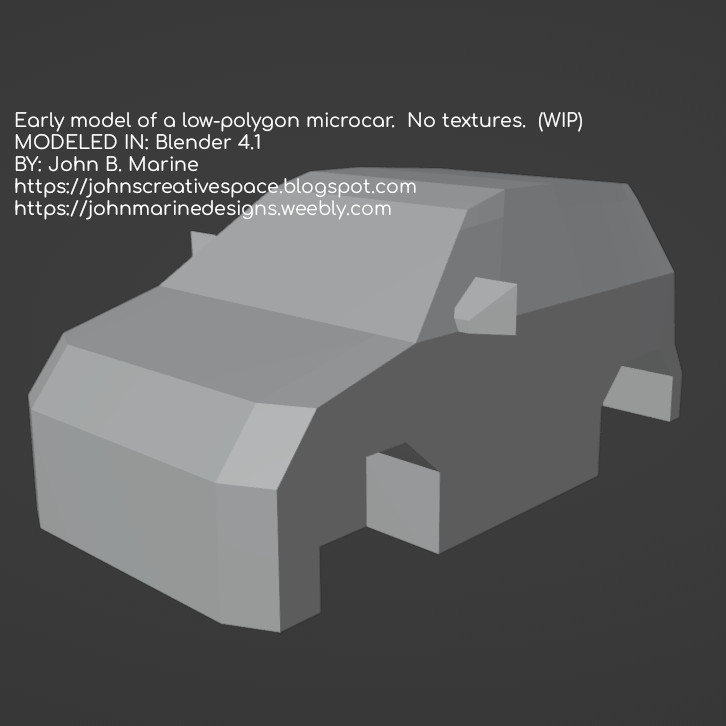
One vehicle I worked the past day or two (as of July 3, 2024) is this:

low polygon microcar
^ from: (my X/Twitter) - This microcar is one of my most recent works, and it is also one of my creations not based on any of my voxel vehicles.

This is a microcar I was working on. It is based on a blueprint of the 2015 smart fortwo. I did not complete a proper UV map for it, so that is why it has no texture to it.


Now that you have seen some of my latest vehicle work, I have to share what my plans are with these vehicles.


My Vehicle Plans


Originally, I developed these vehicles to be implemented into racing/driving games. I had the likes of GTR2, rFactor 1, and Assetto Corsa in mind. I may also just have them to be vehicles to use for nearly any game engine. The intent of these are to make vehicles that can be operated. However, I may develop some static vehicles that can be used as props.


TO DO.

I am slowly learning how to make better-quality 3D vehicle models. What I want to be able to do is develop vehicles with interiors as well as make vehicles with light housings. I have no plans to develop actual vehicles. My focus is on original, "generic" vehicles. Some generic vehicles of mine draw inspiration from actual vehicles while not being outright copies of them. Anyone who really knows vehicles may know what elements and machines my work spawns from.

Remember earlier I talked about making my custom vehicles for Unity car controllers? Well, one plan of mine was to take the Unity Skycar from their long deprecated Standard Assets Library and swap out the meshes to suit my vehicles. Doing this will allow me to tune the Unity Skycar code to fit any number of vehicles. It also means I get to be able to have engine sounds and braking sounds implemented. What I COULD do is learn to swap out meshes for Edy's Randomation Vehicle Physics, but I am not so sure that would work too well.


What I Want For My Supporters.

If you have ideas of having vehicles you can control for games or media projects, just know I have you covered as best as I can. I want to provide such products to the public-at-large. While I may not have complete material immediately, I will work over time to improve my skills and make better material for you all.


Wait, John... What About These "Blueprints" You Speak Of?

Oh, I downloaded a bunch of blueprints from a site called "The Blueprints." I have to do some adjusting to build them to a proper scale, but they have been a big help in modeling. Take a look at the blueprints offered in regular images and in vector images here: www.the-blueprints.com. Maybe you can create your own lovely vehicles with these blueprints! :)


That's all for this blog post. I hope you got some insight from me. Stay tuned to my creative works to see what all I have for you! Subscribe/Follow my blog(s) in any capacity if you love my work. Share my blog post(s) with others if you enjoy my work. Support me further by connecting with me on social media; and if you are inclined, feel free to donate to me (donations are voluntary but would be appreciated). Thank you for reading! Take care and be well.

Visit my JohnMarineDesigns Weebly site, subscribe to My Blog(s), and/or Follow on Bloglovin! Let's connect:
Contact Me via E-Mail Contact Me via Discord

(tips/donations are voluntary)
Visit and Subscribe to My Blogs...
Subscribe to John's Blog Space (JBS) Subscribe to John's Creative Space (JCS) Subscribe to John's Race Space (JRS) Subscribe to StyleSpace (SS) Subscribe to John's Life Space (JLS)
Get Social With Me!
Facebook (Friends) Facebook (Fans) Twitter YouTube
Pinterest LinkedIn (professionals only) Discord ???
Support My Creative Works!
JMDesigns John on Envato
Patreon Soundcloud Bandcamp
Twitch OpenGameArt TurboSquid
read more...

Thursday, February 29, 2024

3D Modeling Asset Breakthrough

John B. Marine | 4:56 PM | | | | Be the first to comment!
Of late, I had a breakthrough in testing 3D assets for games. Using GZDOOM for DOOM and JFDuke3D for Duke Nukem 3D, I finally found a way to test out my 3D assets. I learned to import my creations into these ports. The impact from my first successful 3D model importing is me trying to make more models to replace some of the sprites in such games. This blog post is a look at some of the creations I made and what I replaced some graphics with.


3D Modeling Asset Breakthrough


Most of what I have created was done in GZDOOM. I used Duke Nukem 3D also because it is my favorite first-person shooter. GZDOOM, though, was easier to import and implement my creations. JFDuke3D was more of a pain to get my models into the game. I still succeeded.


Model Showcase.

Here are samples of the 3D models I worked on...

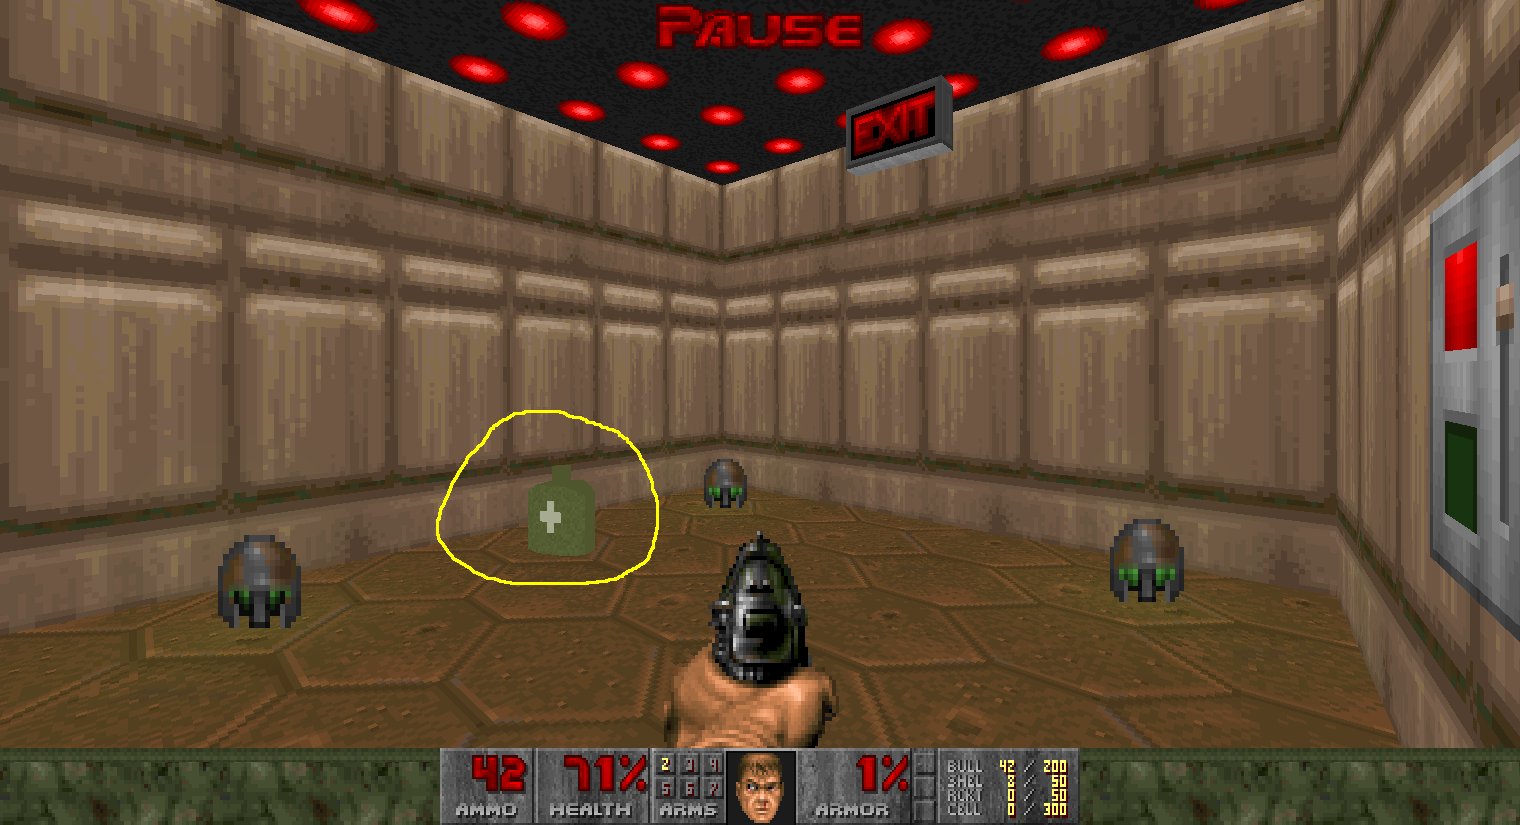
3d canteen DOOM
^ from: (my X/Twitter) - Carry around a canteen to hydrate while on duty.

3D canteen DN3D Duke Nukem 3D
^ from: (my X/Twitter) - My Canteen, in Duke Nukem 3D.

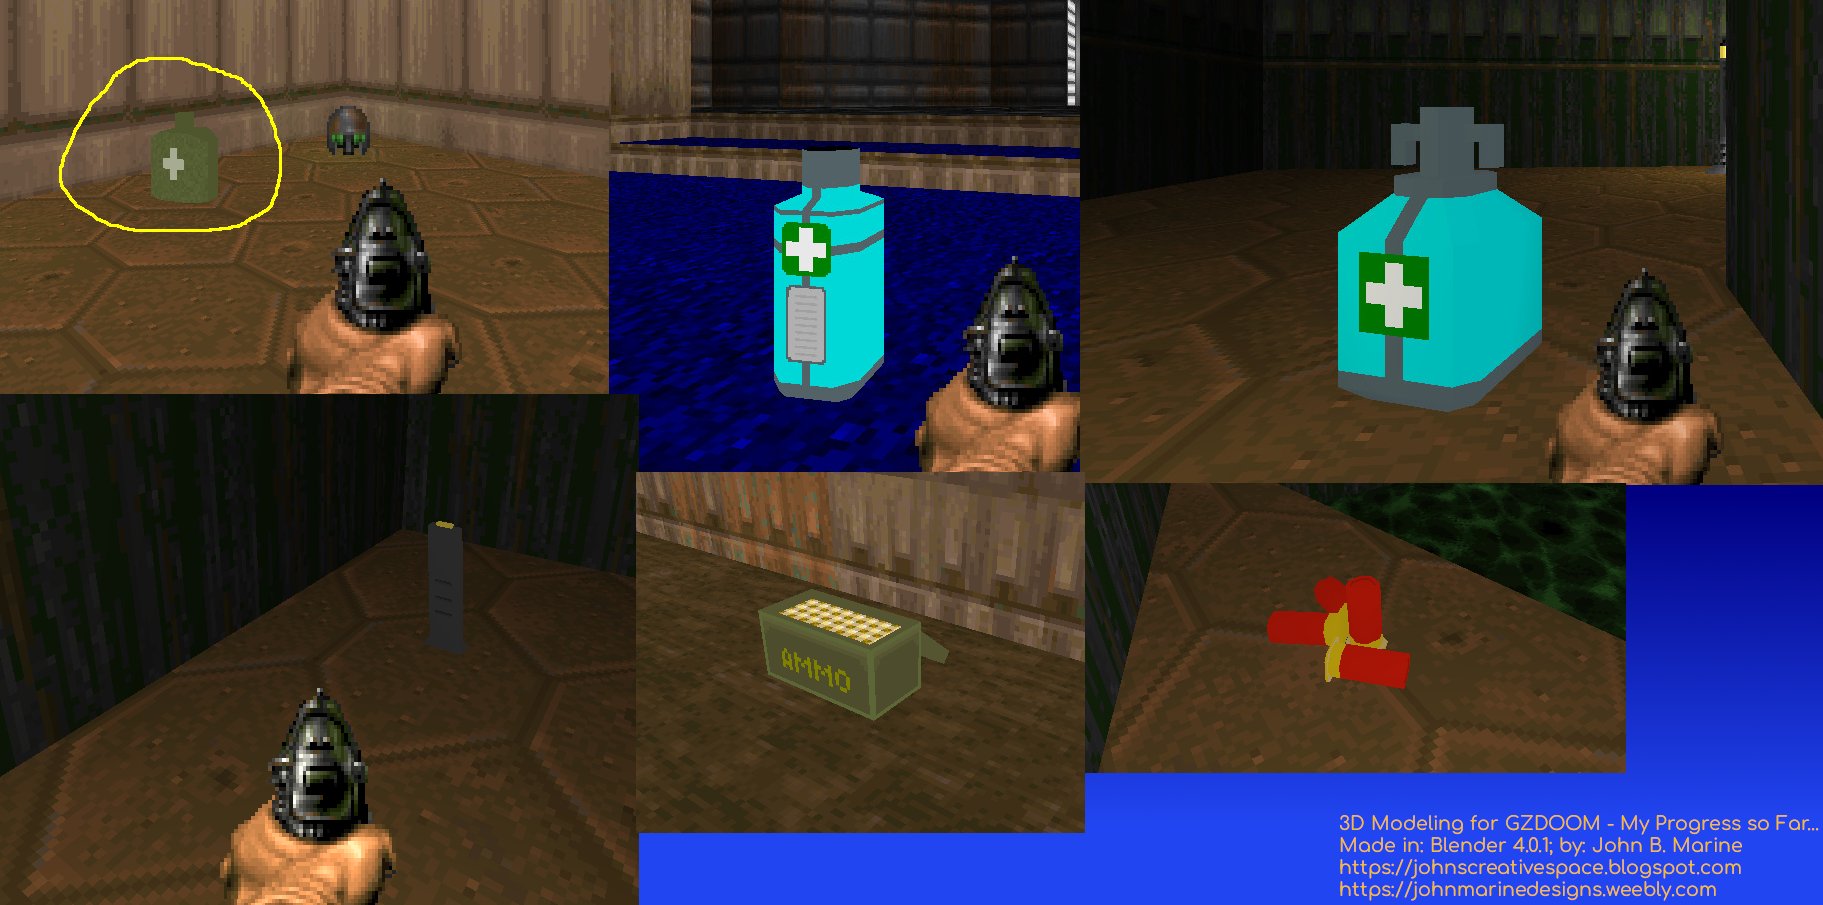
classic DOOM asset collage
^ from: (my X/Twitter) - This is a collage of assets in DOOM I developed. From left to right, top to bottom: canteen, small sci-fi healing kit, large sci-fi healing kit, pistol clip, ammo box, and four shotgun shells.

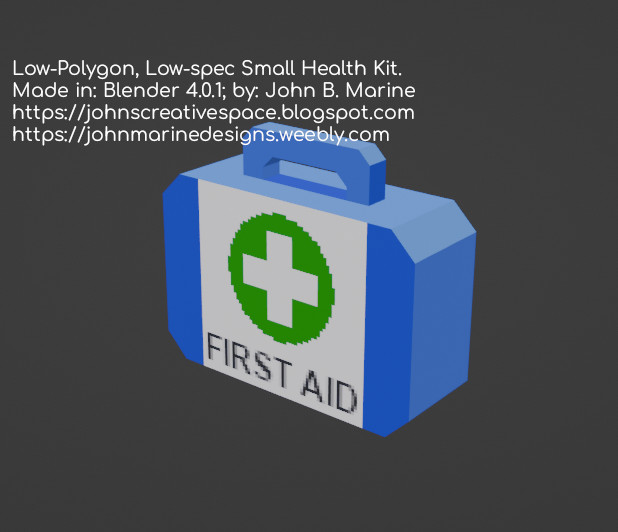
small health kit
^ from: (my X/Twitter) - This is a small healing kit. It will recover minimal health in a game.

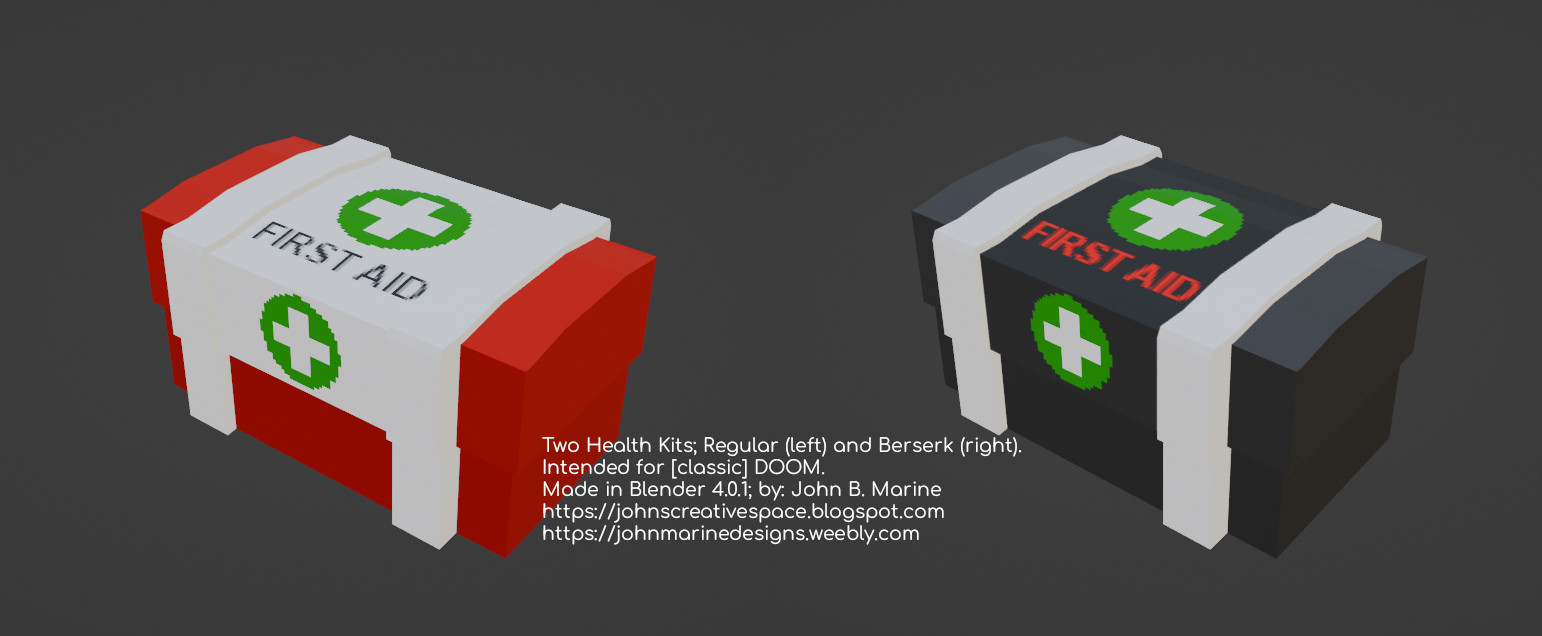
large health kit and berserk (DOOM only)
^ from: (my X/Twitter) - On the left is a large health kit, and on the right is a berserk health kit meant to be used in DOOM. The large health kit will recover a moderate amount of health. The berserk operates as it does in DOOM- full health and a damage increase.

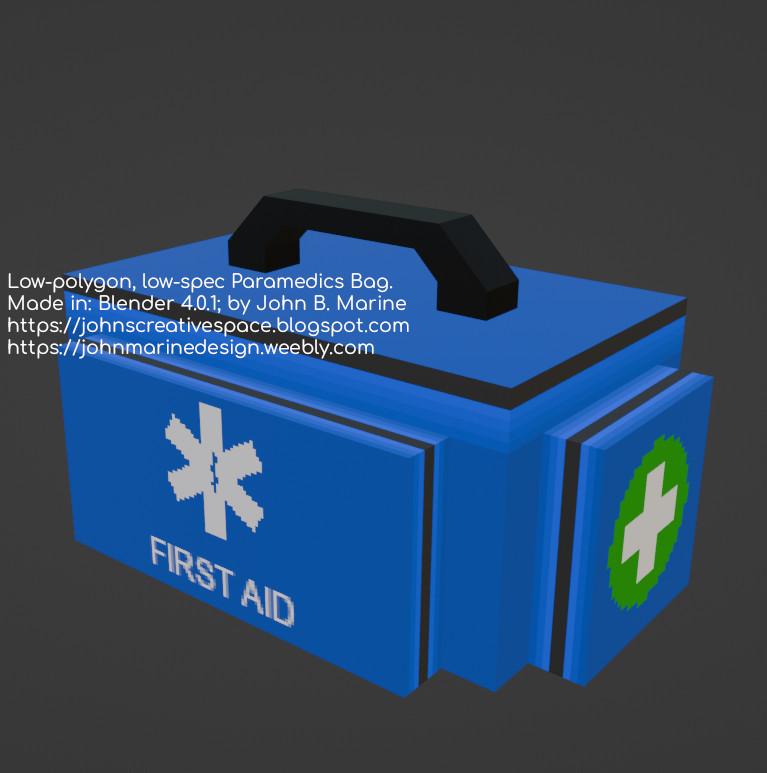
paramedic bag
^ from: (my X/Twitter) - This is a Paramedic bag. Depending on the game, this item restores a massive amount of health, grants full health, or takes your health a level above full health.

These are only a handful of game assets I developed. I may go back and edit some of the other game assets I worked on previously.


My Workflow Explained.

My workflow consists of using Blender to make the topology for my models. I use GIMP for texturing my models. I export a map (as well as a UV layout) from Blender to aid in trying to develop UV mapping for my models. Once that is done, I export my models to FBX.

I only exported selected objects and the animation and geometry data. From what Blender considers forward (-Y), I change Forward to "-X Forward" and Up to "Y Up." Other options: Apply Unit enabled, Use Space Transforms enabled, Apply Transforms enabled, triangulate objects, and bake animations.

I use a program called Noesis to convert my FBX to either MD2 or MD3. I had some better luck with MD3, so that is what I use for my exported format from FBX. What I do in Noesis is rotate the model 90 degrees. If exporting to GZDOOM, I use an Advanced Command of "-scale 0.5") or something so the model doesn't look massive in GZDOOM. The original FBX size of my models seem just fine for Duke Nukem 3D in most circumstances.


Struggles Implementing Models.

GZDOOM has been rather simple to implement models into. The one problem I run into is forgetting to put my creations into my own custom PK3 file. I realize why I don't see updated material because I fail to update my PK3! So if you're importing 3D models and textures into GZDOOM, remember to implement them into the PK3. It is recommended you use SLADE for editing PK3s, and also get ZDL to load up DOOM or DOOM2 using a custom 3D PK3.

I struggled so much with Duke Nukem 3D because I had trouble setting things up in DEF files. What makes DN3D easier, though, is that while you have the High Resolution Pack (HRP) installed, you do not need to compile everything into one file like with GZDOOM. The big problem with me is that the MD3 files I've used do not have animation frames to use. So when you define a model, you have to leave the part blank about certain animation frames (the "definemodelframe" property) if you're using a static model.

While I haven't tried out importing models for "Cube Engine" or "Cube 2 Sauerbraten," they were two other options I considered for making 3D models for. The process is rather difficult doing so. I also considered trying out my 3D assets in "Quake 3 Arena" or "OpenArena."


Future Plans.

I hope to be able to develop models that can be animated. I am looking at GZDOOM, Duke Nukem 3D, and even Cube 2 Sauerbraten for animation of MD3 models. GZDOOM seems the easiest to implement animated models, so most of my early attempts could be with GZDOOM. I am going to offer models anyways that will not be rigged or have any animations for those who want to use Mixamo or something for animating models. They will be offered in Blender format along with GIMP's XCF files. The benefit to this? You save money! That is... unless you prefer to subscribe to an *industry standard* at exorbitant prices...


That's all for this blog post. Thanks for checking out my creative work blog, John's Creative Space! Subscribe/Follow my blog(s) in any capacity if you love my work. Share my blog post(s) with others if you enjoy my work. Support me further by connecting with me on social media; and if you are inclined, feel free to donate to me (donations are voluntary but would be appreciated). Thank you for reading! Take care and be well.

Visit my JohnMarineDesigns Weebly site, subscribe to My Blog(s), and/or Follow on Bloglovin! Let's connect:
Contact Me via E-Mail Contact Me via Discord

(donations are voluntary)
Visit and Subscribe to My Blogs...
Subscribe to John's Blog Space (JBS) Subscribe to John's Creative Space (JCS) Subscribe to John's Race Space (JRS) Subscribe to StyleSpace (SS) Subscribe to John's Life Space (JLS)
Get Social With Me!
Facebook (Friends) Facebook (Fans) Twitter YouTube
Pinterest LinkedIn (professionals only) TikTok Discord
Support My Creative Works!
JMDesigns John on Envato
Patreon Soundcloud Bandcamp
Twitch OpenGameArt TurboSquid
read more...

Thursday, December 8, 2022

Voxel-Inspired Modeling

John B. Marine | 9:30 PM | | | Be the first to comment!
As a veteran of voxel modeling, I felt I have tried to find way to make models out of 3D pixels. It was recently I adopted a newer strategy of 3D modeling. I basically have given up on trying to be highly realistic models and instead will focus on low polygon modeling. Part of that appeal goes with modeling using a simple cube followed by lots of extrusions (and maybe some duplications). So for this blog post, I figured I will focus primarily on this approach to modeling and what I could accomplish with this method. Come along, and let's get modeling!


Before I Begin...

The methods I express here are with my experiences using Blender 2.79b. You will need to adjust my methods for any other 3D modeling program you may use besides Blender if you plan on following my lead.


Voxel-Inspired Modeling


Voxels are essentially 3D pixels. Whereas a simple pixel has x and y dimension, a voxel adds z dimension. Porting over raw voxel information often results in a 3D mesh you can manipulate if your heart desires. The blocky nature of these models is often apparent in games such as Minecraft.

Discovery and Analysis.

I discovered through editing in Magicavoxel about the size of a single cube when I saved a model in PLY format and imported it into Blender. I noticed a single voxel is 0.1 in Blender Units. You could say it is 0.1 meters, since the Blender units are close to metric units. The size of 0.1 Blender Units seems just right without the model looking extremely large or extremely small.

In preparing this blog post, I tried a different size of a cube to make a more precise pixel-perfect size cube. A pixel-perfect cube is 0.0625 in Blender units. This is nearly 40% less of size of a cube at 0.1 Blender units. However, I found it harder to snap to the grid with equal size using 0.0625 as my size and increments. I probably could set up Blender to snap to these pixel-perfect measurements, but I found sticking to 0.1 Blender unit increments works much easier.

Because these models using this voxel-style method are essentially still cubes, it is possible to make them no longer "voxels." In fact, I could refine the models to basically enhance these rough drafts of 3D models. That was part of the plan as I was thinking about doing these voxel-type models from start-to-finish in Blender.


Some Voxel-Inspired Models of Mine.

Since I thought it would be too complex to share my workflow, I will instead share models I have created. So take a look:


^ I re-created one of my past voxel vehicles cube-by-cube.


^ This is a barbecue ham I modeled in Blender.


^ I modeled this blocky ham thigh in Blender.


^ Hungry for a slab of steak? I modeled one in Blender!


^ This is a re-creation of a model I intended to be a Minecraft mob. In a future blog post, I will share more renders and a story on this model. Stay tuned to John's Creative Space!


^ Three health kits were modeled by me here. Since these were intended to be game assets, I put in their healing values in the overlay. These could be offered for sale/download in the future.


So now you've seen some of the blocky modeling I have worked on of late. I will try to make as many of these models as I can while I still have this burst in creative energy.


If you enjoy my work, please Subscribe/Follow my blog(s) in any capacity if you love my work and want to support me any way you can. Share my blog post(s) with others if you enjoy my work. Thank you for reading! Take care and be well.

Visit my JohnMarineDesigns Weebly site, subscribe to My Blog(s), and/or Follow on Bloglovin! Let's connect:
Contact Me via E-Mail Contact Me via Discord Donate to Me (voluntary)
Visit and Subscribe to My Blogs...
Subscribe to John's Blog Space (JBS) Subscribe to John's Creative Space (JCS) Subscribe to John's Race Space (JRS) Subscribe to StyleSpace (SS) Subscribe to John's Life Space (JLS)
Get Social With Me!
Facebook (Friends) Facebook (Fans) Twitter YouTube
Pinterest LinkedIn (professionals only) TikTok Discord
Support My Creative Works!
JMDesigns JMDesigns on Payhip John on Envato
Patreon Soundcloud Bandcamp
Twitch OpenGameArt TurboSquid
read more...

Saturday, November 12, 2022

Voxel Character Evo Project

John B. Marine | 1:35 PM | | | | Be the first to comment!
For years, I have contemplated what to do with my voxel model characters. I felt it wouldn't really be enough just to have voxels in the raw. So for this blog post, I will discuss my plans with my voxel models. You have an idea of what it is by the blog post name, but you don't know about my full plans until you take a look at this full post. Read on to find out about my plans!


Voxel Character Evo Project


About as far back as 2014, I developed a series of voxel model characters. I spent the better part of about a month to develop five different sets of voxel characters. I made a total of 43 characters including a handful of extra characters. I therefore made about 50-60 characters total. The base 43 characters, though, are what I am primarily focused on in trying to breathe new life into my voxel model collection.

Wait- what "new life?" Well, I have a bunch of static voxels. You can only do so much with a set of static models. I decided to re-do my voxel models through a combination of Magicavoxel and Blender. What I intend to do is take my voxel models and break them up for animation. This will allow for people to either rig the models themselves or look to a service like Mixamo for animation.

It is that simple, right? Well, no. I feel my voxel characters will have to be extensively modified and enhanced to make them better for animation. That is where the "Evo" part comes in for my models. "Evo" is short for "evolution." Whereas most people will immediately think of Minecraft or something for pixel-perfect or blocky voxel models, I need to make these voxel characters different but still retain a small semblance of voxel roots while not being hyper-realistic.


Project Inspiration.

A YouTube channel that has made animations of voxel-type characters has been one of my influences to work on my old voxel models. Even better, I saw a YouTube video that gave me some ideas on how to model voxels made in Magicavoxel. The channel in question with all the different 3D animated films is Zaminmation. Zamination is famous for their 3D animations based on "Minecraft" and the "Five Nights at Freddy's" series videos among others.


The Evolution Process.

A key in the evolution process of re-working these voxel models is in understanding the newer possibilities working with models in a unique way. Part of that involves considering things like how to enhance the models. I want to make the voxel models to be sort of textured. The way I seen my exports from Magicavoxel in PLY format, I could take the individual faces and maybe replace them with some textures I could make in a different program. Maybe I could re-do these voxels and take them beyond their voxel form without going overboard. Basically, I want these voxel models to be much more than voxel models.

Let me sort of explain the process in Magicavoxel...

• separate the feet, lower legs, upper legs, torso (including neck, just moving it), upper arm, lower arm, hands, and head
• separate accessories and certain long hair pieces
• add some extra voxels to the lower legs, the upper legs, the lower legs, and some of the torso
• move all parts of the body backwards except for the lower legs and the feet
• move the neck, head, upper arms, and lower arms forward
• clean up any painting errors

At best, this process can take about 10-15 minutes for each voxel model in Magicavoxel. It can take hours to do the whole process with about 43 of my voxel models. The point of the Magicavoxel work is to prep the modified model to be modified further in Blender for refinement and animation.


Once I start making certain things available, I will share my process and maybe some sample animation tests from Blender. So stay tuned for that! For now, though, here is a picture preview of what I am doing with my voxel character models:

voxel character evo project
^ Here is a preview of what I am working on towards enhancing my voxel character models.


If you enjoy my work, please Subscribe/Follow my blog(s) in any capacity if you love my work and want to support me any way you can. Share my blog post(s) with others if you enjoy my work. Thank you for reading! Take care and be well.

Visit my JohnMarineDesigns Weebly site, subscribe to My Blog(s), and/or Follow on Bloglovin! Let's connect:
Contact Me via E-Mail Contact Me via Discord Donate to Me (voluntary)
Visit and Subscribe to My Blogs...
Subscribe to John's Blog Space (JBS) Subscribe to John's Creative Space (JCS) Subscribe to John's Race Space (JRS) Subscribe to StyleSpace (SS) Subscribe to John's Life Space (JLS)
Get Social With Me!
Facebook (Friends) Facebook (Fans) Twitter YouTube
Pinterest LinkedIn (professionals only) TikTok Discord
Support My Creative Works!
JMDesigns JMDesigns on Payhip John on Envato
Patreon Soundcloud Bandcamp
Twitch OpenGameArt TurboSquid
read more...

Wednesday, September 8, 2021

Going Low-Polygon, Low-Resolution 3D Modeling

John B. Marine | 5:39 PM | | | Be the first to comment!
Low polygon and low resolution usually are not what most modern 3D types are like. However, those who model in the vein of Minecraft or PS1/N64/Saturn find a unique attraction to low-polygon work. I figured I'd join this realm myself. The reason why is because despite my best efforts to make 3D that can be well-loved and utilized, I never fully succeeded with many models I am proud out. So I figured I'd try to lessen my focus while still trying to find high quality in my low-spec work. I am also focusing in on a 3D modeling method I have adopted and practiced. This blog post is a look at my low-polygon, low-resolution work. It represents what I have worked on and what potentially may come in the future.

I can't believe I haven't updated this blog in almost a full year! That changes with this new blog post on "John's Creative Space!"


Going Low-Polygon, Low Resolution


While impressively realistic 3D rules the roost, some fancy lower-spec 3D. Mostly the reason lies in the simplicity of basic 3D models. Some even enjoy older 3D for the aesthetic. One thing I am realizing is that I am not a good digital artist or a good 3D modeler. Therefore, I am concentrating most of my artistic efforts towards low-polygon and low-resolution art. There is still a unique charm to doing this style of 3D work, and I look to try to capitalize on that.


Learning the Tiling Method (Through Blender).

Let me explain the method I am using as best as I can.

Although Blender has an add-on that allows you to make 3D models from a tileset or palette called Sprytile, I am doing my work without it. Sprytile actually originates from an older 3D modeling software via tiling called Crocotile 3D. What I define as the tile method is when you try to make models out of a series of plane meshes. One of the advantages of this is that you can apply a UV map to it easily to handle your art. What you do is make one plane and then duplicate it a lot to set up great art pieces. You will need to choose the proper sort of UV mapping to a tileset as you need to. Once you get into the process, it provides a nice challenge to 3D model. Having something like Sprytile and Crocotile 3D are not bad at all, and I am not opposed to financially supporting either program. My only thing is that I am learning of how to do those techniques without needing either tool.

The first thing to take note of is to build a texture atlas. If you already have a texture atlas to use for your work, disregard this section and move on to the next paragraph. A texture atlas combines all of the needed graphical assets into one image. Especially if you will be tiling art, it pays to build a texture atlas to contain everything. I am also trying to practice pixel art. So therefore, most of the textures I've developed in my art appear rudimentary. You can use whatever paint program you like, but I am using GIMP (one of many free art editors). For pixel art types, Aseprite is popular. I later learned that you do not need to necessarily have all tiles the same dimensions. In fact, the tiles don't even need to be powers of 2 in size (2, 4, 8, 16, 32, etc.). For example, I saw a texture atlas for a track for the PlayStation 1 game "Rage Racer," and it used a variety of different texture sizes to pack in this texture atlas. So sort of draw out and prototype the different tiles you want to use for your modeling project. You're going to be editing things again and again. If you are using Blender, you will need to constantly update the image you are using for your texture mapping. This means pressing Alt + R in the UV/Image editor panel (at least in Blender 2.79b).

The next step is to simply add a mesh plane in Blender. Make a new Material for it. Go to the Texture panel and choose "Image or Movie" for the texture type. Load in the texture atlas or whatever image you are using. Unwrap the plane mesh. To make your efforts much easier, enable "Snap to Pixels" in the UV/Image Editor panel. You can then take the vertices of each plane and adjust them accordingly to whatever tile(s) you are trying to connect to. Once you have one plane set up, you're going to do LOTS of duplicating to get the desired model you are trying to create. Duplicate as many different planes as possible to construct the scene. Afterwards, keep adjusting the UV mappings to whatever image you want a plane to show. Keep going until you complete the model you want to create. It is best to try to keep things connected. If you can, use a combination of holding down Ctrl and even Ctrl + Shift to properly move about faces. It also helps to go into individual views in orthographic mode for some movements of planes.

Once you are happy with the final model you've created, there are a few important things you need to know. I would recommend you save a copy of your finished work in Blender before doing anything else in this paragraph. It is important to select all of the planes and Remove Doubles. That means Alt + W (Blender 2.79b). Removing doubles reduces the number of vertices while also allowing you to properly manipulate the individual pieces of your model. If you need to adjust it again, it will be easier to do

My 3D Tile Modeling Runs.

Here are some of my practice runs of trying the tile modeling technique.

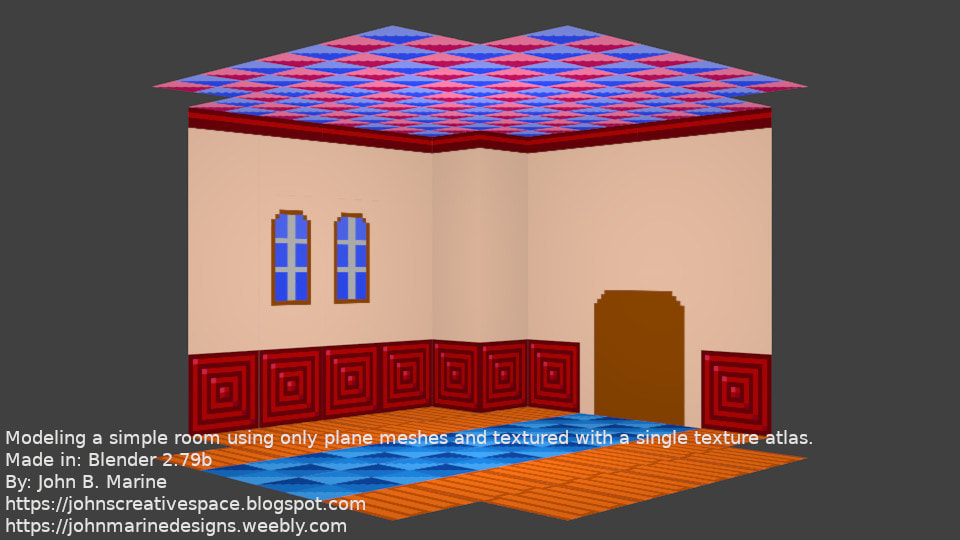
• Tiling a Simple Room
The point of this was to practice simply making a room. Only the floor, two walls, and the ceiling were modeled. I had to learn some of the ins and outs of trying this method out. All pieces were 16x16 tiles except for the windows. What I struggled most was trying to get sufficient lighting to the scene. Here is what I came up with:

simple room rendering

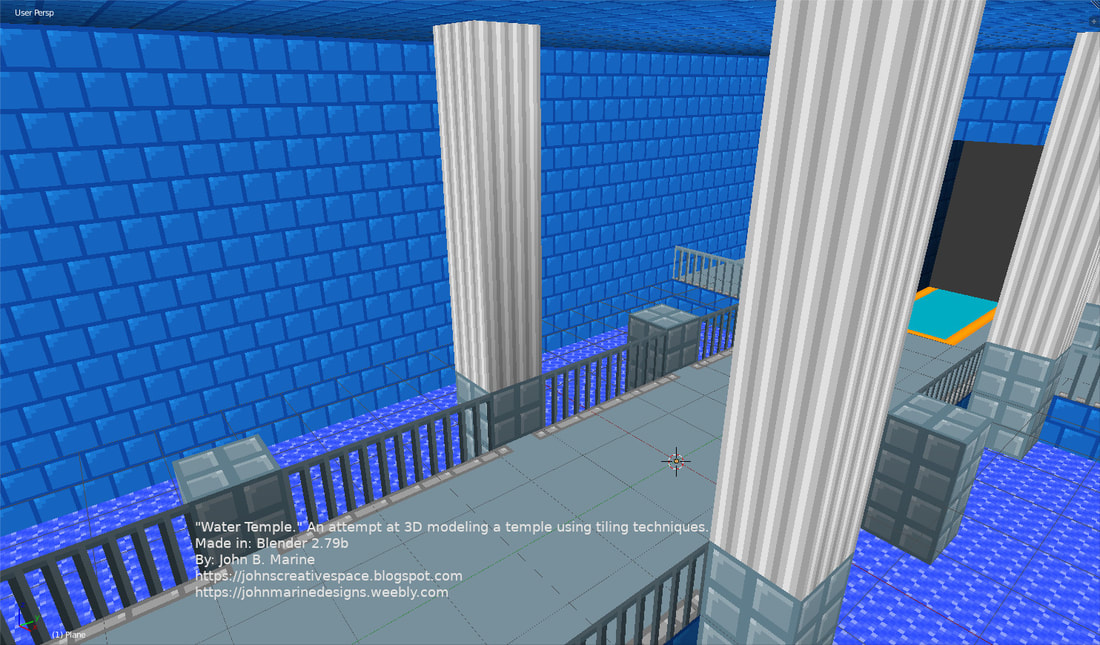
• Water Temple
This more complex interior modeling job really tested my patience. Originally intended to be a modeling of two different rooms, I basically went with just one. I left out the throne room of this temple and just modeled the hall leading to the throne room. The way to the throne room can be seen with the blue carpet. I had to properly adjust the individual tiles to get them the proper lighting. I also needed to adjust the alignment of the UV texture atlas to get some of the planes to display the correct UV mappings. I was still pretty pleased with my work that I decided to close this modeling run.

water temple rendering

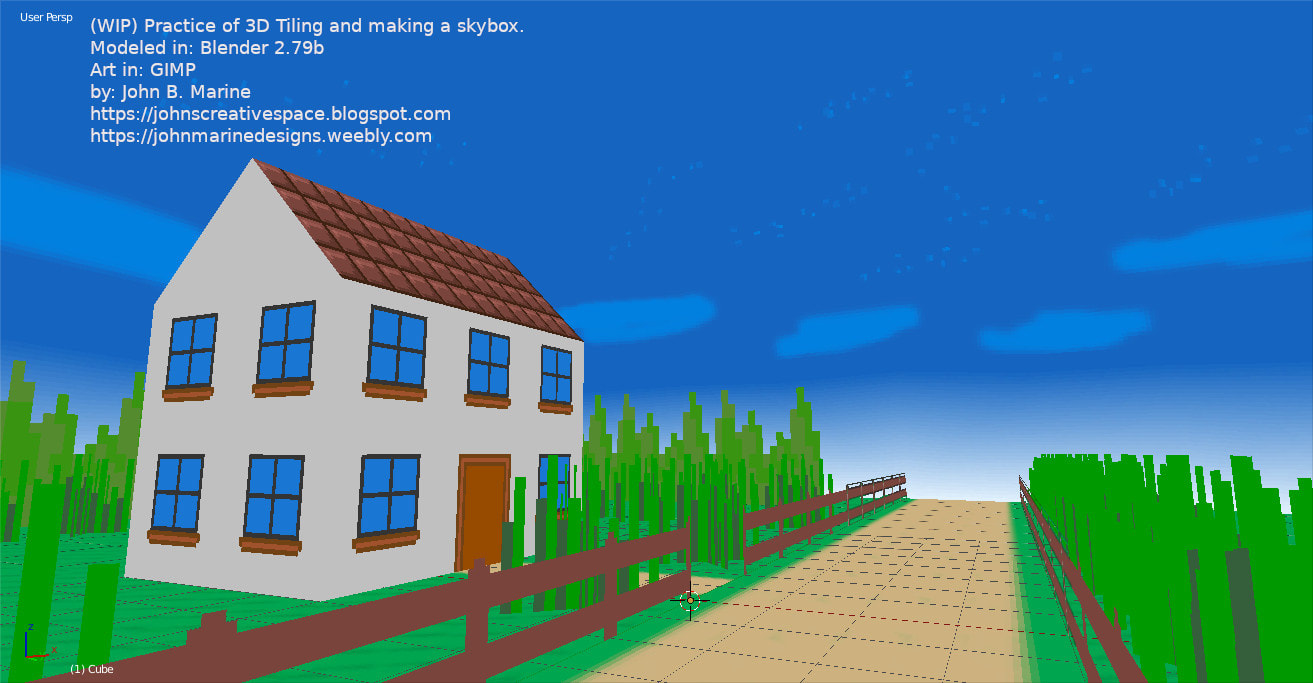
• Outdoor Scene
This was a challenge. The sky was not a tile challenge; instead, it was trying to model a skybox using a cube. I learned in one YouTube video how someone used a cube rather than a sphere to make a sky. The cube was made big enough to house the scene, and then the cube was given a Subdivision Modifier. I found out at least level 2 of the Subdivision Modifier is good enough to properly portray a sky. A skybox is easier to work with than a sphere, especially when UV mapping. I needed to adjust the alignment of the UV map for the faces of my sky when I was preparing my skybox.

I began to realize two important parts of the 3D tiling method. First off, these tiling models are done using shadeless settings. I prefer to work in Blender Render (nowadays called Eevee). I didn't learn to do this in Cycles yet. The second thing I learned was to turn off backface culling. If you enable backface culling, certain faces will not show from certain angles. I modeled my material more in the vein of Minecraft. That means a lot of boxy models. Here, however, I tried modifying the planes to try diagonals and even simulate things in Minecraft like tall grass. My only regret was maybe not adding variety to my pixel art grass and trees.

This was the final result after all of my modeling attempts:

outdoor country scene


I hope to make more material like this and practice more modeling in this style. I'll keep practicing and show you my best work in the future. Stay tuned!


It is really sad I haven't updated this blog in almost a full year. "John's Creative Space" is back, though! It will really be back when I keep making more content to share. Be sure to Subscribe/Follow if you enjoy my work. Thank you for reading! Take care and be well.

Visit my official website at johnbmarine.com, subscribe to My Blog(s), and/or Follow on Bloglovin!
Subscribe to John's Blog Space (JBS) Subscribe to John's Creative Space (JCS) Subscribe to John's Race Space (JRS) Subscribe to StyleSpace (SS) Subscribe to John's Life Space (JLS)
Support My Creative Works!
JMDesigns Patreon Soundcloud Bandcamp Twitch OpenGameArt TurboSquid
Get Social With Me!
Facebook (Friends) Facebook (Fans) Twitter YouTube Pinterest LinkedIn (professionals only)
Questions or Comments? Contact Me (serious inquiries only)...
Contact Me via E-Mail
read more...

Monday, June 1, 2020

3D Model and Showroom Plans

John B. Marine | 4:16 PM | | | | | Be the first to comment!
Making skins for vehicles in games is cool and all, but I have lately had interest in designing my own original vehicles all skinned up. Actually, I have wanted to develop my own models and my own showrooms. It was a dream for a long time to develop my own showroom for vehicles for games. As I started getting better with Blender, I am having more realistic visions of developing the sort of showrooms I want to develop. Allow me the opportunity to express myself. Okay? Good! Let me begin...


3D Model and Showroom Plans


I feel the need to develop even more original content. So I want to share plans I have in regards to various 3D models and showroom plans. Take a look:


3D Plans: Models.

My main areas of concentration for 3D modeling include vehicles and characters.

Vehicle Plans
On the vehicle front, I am starting to gain a new sort of direction towards how to model vehicles. The main concentration lies in low-polygon vehicles. I want to make low polygon a quality thing. This could even evolve into trying to refine them for other projects. This is actually a plan of mine of late. As I am starting to better use Blender, I feel I could master some techniques to at least attempt high-quality vehicles.

Previously, I noted that I had no interest in high-quality 3D vehicle models. I've learned some techniques that make me think otherwise in recent times. One of the most important things I am coming around to is that I do not need to put everything into one single mesh. In fact, some high-quality designs are a combination of separated objects. So a headlight assembly could be the main casing and all the individual lights that make up that headlight case. You also could independently work on a certain object of a full model. The one thing I always fear is that I may make a lot of changes that somehow will require me to do extra merging so that the model remains as complete topology-wise. It seems like a daunting task to make a high-quality vehicle. However, part of me says it is doable without stressing too much over certain details.

I also previously did not have interest in re-creating actual vehicles. That has changed... to an extent. I am not seriously considering completely accurate models. At the same time, though, I don't want to make any models of actual vehicles that seem overly cheap. I need to be careful on this front because some legal clearances have to be granted to make 3D products of actually-licensed vehicles available and can be used. I am not sure if I want to develop such vehicles for free for game mods, or if I want to offer vehicles for rendering. I still prefer doing original designs, but I am somewhat open to modeling actual vehicles.


Character Plans
I have not yet attempted any original characters. On one end, I have thought more along the lines of avatar-type models. I am talking about mostly humanoid models that you could freely customize as opposed to some completely original characters. I have not yet found any true inspiration to make this happen. However, I do have some ideas by following a bunch of different videos. No concrete plans have been considered as of yet. If and when I do get around to developing characters, expect a mix of freely-customizable characters and original characters.


Other 3D Models?
I have considered locations as 3D model projects. Namely, I have thought of things like buildings, some light scenery, and some light terrain. I also want to develop things like motor racing tracks. For race tracks, I am slowly looking at trying to develop in the mindset of Assetto Corsa. Assetto Corsa prefers you measure things in meters. So to that end, I will have to learn to put things into meters for measurement.


3D Plans: Showrooms.

No 3D model(s) will ever be worth showcasing if you lack a proper way to market them. So as I make skins for games like Assetto Corsa and Automobilista among others, I feel I have to develop a showroom to nicely showcase my 3D models. A showroom doesn't have to a "room." It can, in fact, be an outdoor scene stylish enough for showcasing work. One idea i seem to like is that Blender can handle HDRI images. For the uninitiated, an HDRI image contains color information within the image that can serve as the lighting and color for any given scene. Usually, some of these HDRI images can be pretty big files. I tend to like decently-sized images that won't beat up my PC in trying to render. Blender rendering through HDRI images is only done in Cycles Rendering. I will need to practice Cycles Rendering to be able to come up with great renders.

While showrooms suggest indoor scenes, showrooms can really be indoor or outdoor scenes. While I don't want the showrooms to be the focal point of my work, I do want them to serve as stylish 3D locales for which to display my work. I am gathering ideas for which to think about what kind(s) of showrooms I want to make. Because Cycles Renders allow you to develop a vast amount of ideas, I want to be able to make the best renders I can make regardless of my PC's power to create them masterfully. In fact, I dream of making certain render scenes that would be great for Assetto Corsa, since the majority of my renders are for Assetto Corsa. I have used custom showrooms for vehicles in rFactor. So I have a general idea of the importance of making quality showrooms for any set of vehicles for almost any racing/driving game.

Other than vehicles, I want to make some stylish showrooms for characters and other things. Imagine stylish scenes for which a character can be showcased. For example, imagine a stylish young lady at a stylish restaurant on a date night. Certain props or game assets can also be stylishly shown off in some kind of showroom. I haven't yet thought of any interesting showroom concepts to make these visions happen.


Now you know about some of my 3D plans. We'll see what materializes from my work in the future.


Thank all of you who love and support my work! I hope I can keep bringing the awesome that I can provide. Thank you for reading! Take care and be well.

Visit my official website at johnbmarine.com, subscribe to My Blog(s), and/or Follow on Bloglovin!
Subscribe to John's Blog Space (JBS) Subscribe to John's Creative Space (JCS) Subscribe to John's Race Space (JRS) Subscribe to StyleSpace (SS) Subscribe to John's Life Space (JLS)
Support My Creative Works!
JMDesigns Patreon Soundcloud Bandcamp Twitch OpenGameArt TurboSquid
Get Social With Me!
Facebook (Friends) Facebook (Fans) Twitter YouTube Instagram Pinterest LinkedIn (professionals only)
Questions or Comments? Contact Me (serious inquiries only)...
Contact Me via E-Mail


read more...

Wednesday, February 12, 2020

Does Blender Get the Respect it Deserves?

John B. Marine | 8:31 AM | | | | Be the first to comment!
(UPDATE: February 13, 2020)

#Blender3D is a free and open source program for 3D modeling. Everything from videos to intricate 3D models can be produced with Blender. Game developers even use Blender for assets and even complete games. However, Blender does get a bad rap from some people for a number of reasons. Even still, what you can accomplish in Blender goes far beyond what most other 3D modeling software can do. So I decided to blog about Blender and show some respect for it. Does Blender get the proper respect? I will explain why you should care (or maybe not) in this blog post here on "John's Creative Space!"


Before I Begin...

This is my first JCS blog post of 2020. Happy new year!


LATEST UPDATE(S)/REVISION(S):

FEB 13 2020 - added some extra details


Does Blender Get the Respect it Deserves?


Allow me to discuss Blender to you all.

Blender 3D logo
^ from: (Pinterest) - The Blender logo. Does Blender get the respect it deserves? I explain in this blog post.

Blender's history dates back to 1994, and its initial release dates back to 1998. What you can accomplish in Blender for development of media is astonishing. Many people look up to programs like 3D Studio Max as the gold standard of 3D modeling. It is a top-tier industry standard in regards to 3D modeling. Blender, however, is sometimes criticized for a number of reasons. People say the interface and UI are not very charming. Blender also has a seemingly steep learning curve. As someone who has not had much success making proper 3D models, even I am more comfortable using a program like Wings3D (which is also free) for 3D modeling. Maybe even another reason people discredit Blender is because it is free and open-source, usually meaning that free programs don't have the same level of quality compared to the top-level programs. When you finally learn and master Blender, you can do almost as much as you can with the more popular 3D programs like 3D Studio Max, Maya, Cinema 4D, and more. Blender makes you able to make impressive material without needing to stick to a payment schedule or subscription like most of today's 3D modeling powerhouse programs. You can use certain renders outside of Blender's own render engine to produce your images. These include the likes of the Cycles Renderer and the Eevee (not to be confused with the Pokémon Eevee) engine. While you can make 3D models, you can even do simple video editing as well as create entire videos and films with Blender. A popular example of a Blender film is the 2008-released film "Big Buck Bunny." Blender is free and always will be free unless someone buys Blender and cheapen the Blender experience entirely.

It took me over 20 years to make a 3D model I could be proud of when I made my first true Blender creation back circa 2016. My 3D skills are still subpar, but I have tried especially recently to learn Blender and utilize it. A handful of YouTube videos on Blender have helped me to develop my 3D modeling skills in Blender. I slowly tried to develop and practice using Blender techniques to produce 3D models. I still have a lot to learn, but I feel I can do a lot to try to master using this program.

One reason I have tried to learn Blender better is because I am offering my material for sale through sites like Turbosquid and Envato's 3D Ocean. Surely the latter is one of the different programs you can share as being the program you made models in. As of the time of this initial blog post (February 12, 2020), these are the accepted programs for which you share as being what 3D model was made in:

--- 3DOcean Accepted 3D Modeling Programs ---
• 3D Coat
• 3D Studio Max
• Autocad
• Blender
• Cinema 4D
• Lightwave
• Maya
• Moda
• SoftImage
• Vue
• ZBrush

You can still use whatever programs you like to 3D model in, but that is pretty much a list of top-level 3D modeling programs for you to sell your models on sites like 3DOcean. Blender even has a suite where people can sell their Blender 3D creations on called Blender Market.

One must also consider using Blender for more popular applications. For one, there is the crowd of using Blender for virtual reality and augmented reality. VR/AR has its own specifications and considerations when modeling. Blender can be a good enough program to use for VR or AR if you know what you're doing.


Blender for Gaming and Game Development.

Blender was made in C++ and Python. If you have skill in using Python, you can make simple games in Blender using Python code. Blender has had its Blender Game Engine (BGE) serve as the gaming base for those who develop games using Blender. Of late, however, Blender has dropped support of the Blender Game Engine. A program that maintains the appeal of the former BGE is a program called UPBGE. UPBGE stands for "Uchronia Project Blender Game Engine." Many of the features that made BGE an excellent suite for gaming and game development can be had with the UPBGE package.

While Blender could be used to develop games, some people ranging from hobbyists to various independent (indie) developers make assets in Blender to be used in programs like Unity3D and Unreal Engine. People who compete in game jams use programs like Blender for simple modeling of 3D models. Such people even do as great of a job with modeling 3D assets in Blender as almost anyone could with popular paid 3D modeling software.

Blender can also be used for programs like Armory3D. Armory3D is a 3D framework that integrates into Blender. So using a combination of Armory3D and Blender can work perfectly fine in the development of 3D games. So everything from a casual game project to a AAA-quality game could be made with a combination of Blender and Armory3D. You can use a number of other 3D frameworks and interfaces to use in game development with Blender, but Armory3D is a popular option.


Blender for Web Development.

Did you know you can build 3D websites with Blender? People use programs like Blender to build things such as 3D stores and various configurators of products. You could see 3D material with Blender with items ranging from fashion goods to even building your own car. I am mostly positive this suite for Blender mostly pertains to front end development and not much about front end and back end web development. There are people who model through Blender for website development to packages such as WebGL, Blend4Web, and Verge 3D.

Even I have thought of practicing making a 3D environment people can use to navigate for material I've created. Though, I haven't made anything cool enough to warrant any sort of attention. Stay tuned to "John's Creative Space" if I do develop some kind of 3D online environment for you to explore.


Blender for Video Production.

Let's face facts. Blender will NOT replace or substitute programs like After Effects, Premiere Pro, or Vegas. A lot of the videos and video effects you can make in most popular video programs can be done in Blender. If you were to try to upload your creations to video sites like Envato's Videohive, you can't say you created the video material in Blender. So you may need to find some other programs for which to produce videos with. I haven't had too much video experience with Blender, so I will leave my discussion there.


Since I mentioned Blender in a number of lights, does this program get the respect it deserves? Here are my final thoughts...


Does Blender Get the Respect it Deserves? - Final Thoughts


Just because something is free doesn't mean it lacks the quality of more established programs. Really, Blender has become its own established program throughout its development. Some people don't want to commit to a subscription service just to use a high-quality 3D modeling program. Those who don't want to do so have limited options for which to 3D model with. Therefore, Blender and its free nature is a boon to the 3D modeling community. Just because not many people look to Blender for quality 3D modeling doesn't mean there is no reason to use Blender. The interface may be tough, the learning curve may be steep; but once you master using Blender and learn many techniques to model with Blender, it becomes apparent this program is just as good... if not better... than most of the top-level, *industry standard* 3D modeling programs. You can always make Blender better if you develop scripts and add-ons to enhance the capabilities of Blender. Just because Blender is free doesn't mean it lacks the quality and polish of other top-level 3D modeling software. You can always make sacrifices if you feel Blender is somehow not good enough to meet your standards of 3D modeling.

So if you are on the fence about Blender, give it a chance and try to learn to use Blender. Try to master using Blender even if you are more comfortable using other 3D modeling software. Blender actually deserves more credit than most people give it. At least... to me.


For More Information...

Learn more about Blender by going to www.blender.org. Find more 3D resources I've curated by visiting my Creative Resources page.


Those are my own thoughts on Blender. Let me know what you think...

Do you think Blender gets the respect it deserves?

Be sure to Subscribe/Follow my blog(s) to keep up with my latest material. Visit my other blog posts to see more of my work and more of my thoughts on a variety of issues. Thank you for reading! Take care and be well.

Visit my official website at johnbmarine.com, subscribe to My Blog(s), and/or Follow on Bloglovin!
Subscribe to John's Blog Space (JBS) Subscribe to John's Creative Space (JCS) Subscribe to John's Race Space (JRS) Subscribe to StyleSpace (SS) Subscribe to John's Life Space (JLS)
Support My Creative Works!
JMDesigns Patreon Soundcloud Bandcamp Twitch OpenGameArt TurboSquid
Get Social With Me!
Facebook (Friends) Facebook (Fans) Twitter YouTube Instagram Pinterest LinkedIn (professionals only)
Questions or Comments? Contact Me (serious inquiries only)...
Contact Me via E-Mail


read more...
JohnMarineDesigns on TurboSquid

Would you like to donate to support my creative work? If so, please show your support using this PayPal item:
I am now on Patreon! Support my creative work on Patreon today at: www.patreon.com/johnbmarine!
 
Copyright © 2015 John's Creative Space • All Rights Reserved.
Template Design by BTDesigner • Powered by Blogger