


Recent Character Work
I will share my recent work and prototypes later in this blog post. For now, though, I will provide you some background.
Character development has been a very tough thing for me to try to work on and develop. I designed characters in voxel form long ago. You can look in this blog or on my Weebly page to see the full array of my work.
Why develop characters? Well, you want to be able to have characters become their own stars of games or media projects, or you may want certain characters to fill spaces and bring life to scenes. How you develop characters and what kinds of characters go a long way towards building your portfolio. It also helps establish yourself as a designer. No one obviously wants to see created characters not be utilized proper.
One of my plans was to finally make something a long time coming- take my voxel model characters and evolve them for use in 3D modeling software, games, and media projects. I looked back at my original 43 voxel model characters and thought about how I could bring them to life and enhance them from voxel form. At the moment, most of my designs are in the prototype phase. I will improve them over time using different techniques and learning new techniques. A lot of the low polygon techniques are from studying 3D models from older games and less-intensive games. Mostly, these are models from the PlayStation 1, Nintendo 64, and SEGA Saturn era.
The Low-Polygon Technique.
What has become my method for a lot of my modeling of characters has been a grid-like system. Through Blender, I have had a habit of setting up front-facing square planes of 10 centimeters length. I try to rough out the model I want to create through these grid-like meshes. I may keep them like their grid form, or I may refine the models to make them more realistic. I do want to keep everything low-polygon. Because I want the models to be animated, I tried learning... actually, re-learning how to rig models. This meant I had to allow enough geometry for which animators can properly animate models. Since I am not going to make the models intensely realistic, I can actually get away with some 3D modeling styles that still allow for low-polygon, low-spec 3D modeling.The Minecraft (and Some ROBLOX) Influence.
When most people think of low-spec 3D, a lot of people look to Minecraft, once the greatest independent/indie games of all-time before being sold to Microsoft. Minecraft is absolute simplicity in regards to 3D and 3D animation. Only six cubes make up a Minecraft player. They then have small PNG files as textures. Minecraft is the bare minimum for some low-polygon or blocky work.Did you know my original voxel model characters were meant to be used in Minecraft? Minecraft never happened for those models. One of the things I was thinking about was making the re-made voxel models to have the six-bone style setup. Minecraft player models have animations for the body, head, both arms, and both legs. The human models I developed have kind of the six-bone human setup.
ROBLOX had two different character styles for their Robloxians. The ROBLOX R6 model is highly like a base Minecraft player with its six-bone setup. That explains the "6" in R6- nearly the same six-bone armature setup as a Minecraft player: torso, head, both arms, and both legs. Later, ROBLOX would release the ROBLOX R15 model. As its name suggests, the R15 has a 15-bone setup: two torso bones, each shoulder, head, two bones for each arm (upper arm and lower arm), two hip bones connecting to the legs, and two bones for each leg (upper leg and lower arm). The initial goal of my reworked voxel characters is to give them a 15-bone setup. What I started off with is trying to give them a six-bone setup. Once I learned some newer techniques, I decided to try my hand at a 15-bone setup for my characters.
Now that I have filled you in, I will go ahead and share some of my latest work.
Recent Character Work: Character Prototypes
Let me show you a lot of what I have worked on in regards to developing my low-polygon characters. Some of these pictures can also serve as previews of future characters I plan to release or want to release. So what you are getting here are possible previews of what I will offer across a number of different 3D model stores. If you are ready, please keep reading.
Shaka.

^ from: (my X/Twitter) - This is Shaka, a protagonist to an unnamed project of mine.
I have no name for this project, but its main character is named Shaka. As I practiced making my prototypes for my enhanced voxel character models in Blender, I did this sort of one-off 3D model representing the hero of this project. I had to move around some mesh parts to make this character look good.
(Potentially Renamed Female Series).
These are some of the 3D characters for a past game project. The tentative name of the project is "Top Diva," but I may change it to something else. That is why I am labeling this as "potentially renamed female series." Each featured model is shown in the order of which ones I worked on least recently going to most recently.
^ from: (my X/Twitter) - This is Suzie, a French teenager.
When I first created Suzie, I realized I haven't developed any 3D character since January 2024 when I made this model for late July 2024. So imagine my happiness when I developed Suzie here. I did not know how I wanted to design the hands. I had loose hands in mind rather than clenched hands. I specially designed the cuffs for Suzie's shirt and her wool shorts. I used some good imagination to try to design her ankle boots in a stylish way.
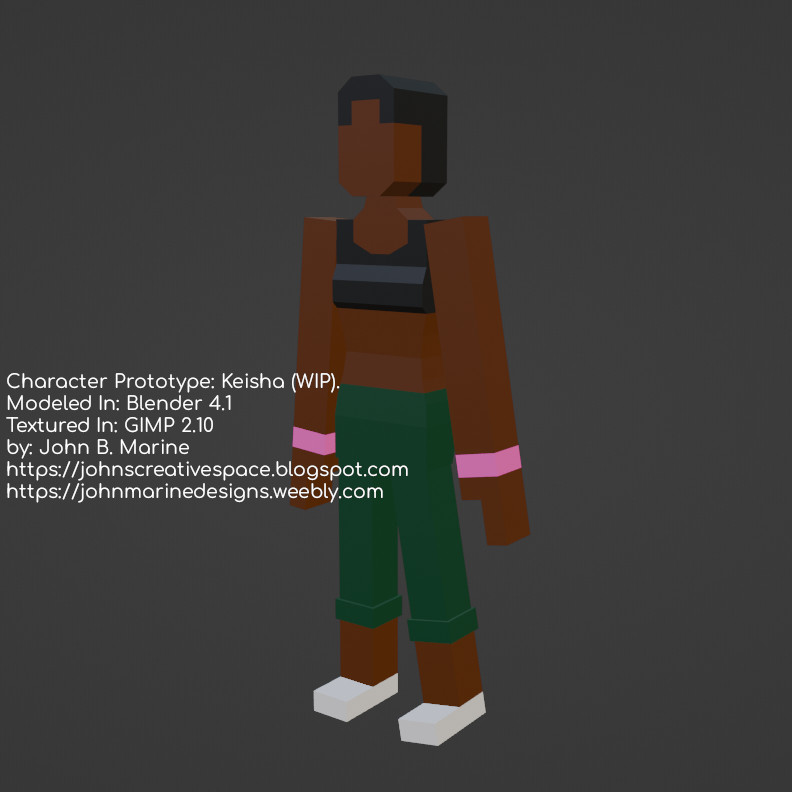
^ from: (my X/Twitter) - Keisha is an athletic American dancer.
The original prototype for Keisha above has kind of the loose hands I thought of. However, no thumbs were modeled for those hands. I cuffed Keisha's pants. What I was going for is an urban girl with a little sportiness. I have made a duplicated mesh for testing making clothing designs. What this would present is the possibility of allowing a person to put one's own T-shirt designs or messages on it. That duplicate mesh layer is only one millimeter apart from the main mesh. Around the time of this model, however, I was unable to find out how to make transparent textures remain transparent.
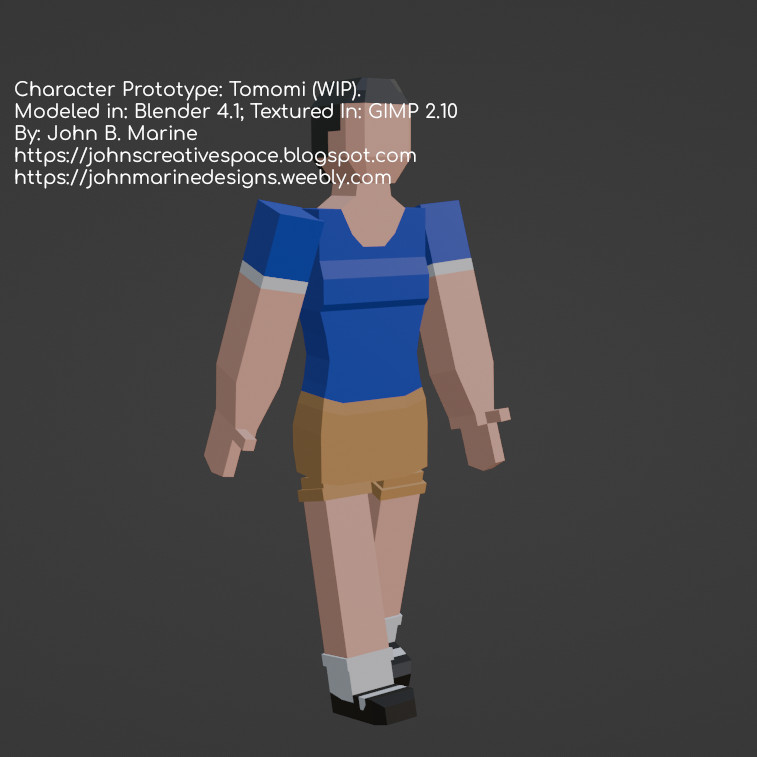
^ from: (my X/Twitter) - Tomomi is a Japanese teenager who stands only five feet tall.
Tomomi was my third design using the character style I've adopted for this series. I tried to design various elements through meshes rather than with textures. I also developed Tomomi with a hand model I developed that I was starting to like.
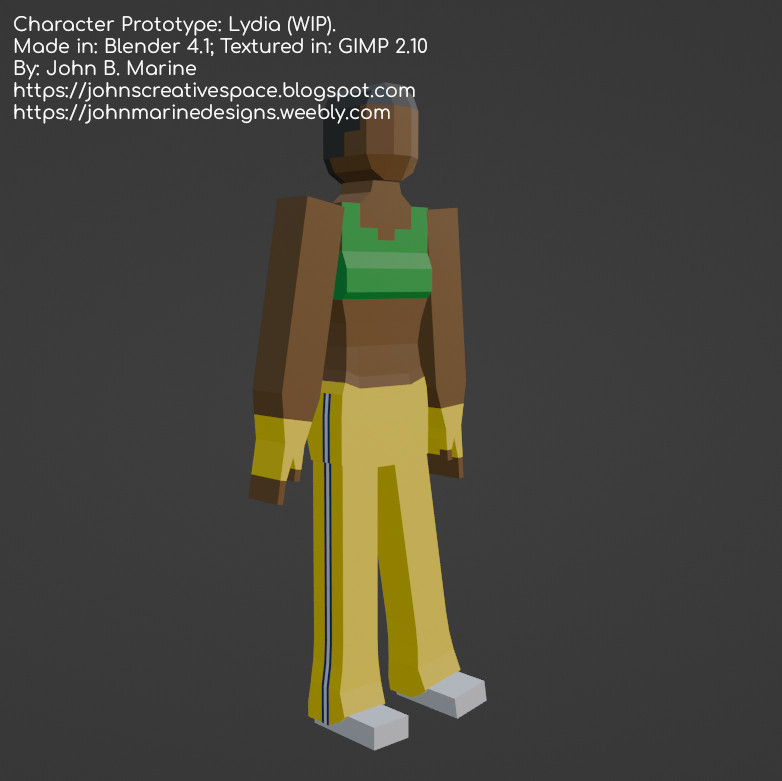
^ from: (my X/Twitter) - Lydia is a Brazilian woman with a finely built body.
Because I developed Lydia to be a bit different with her pants, I kind of went the difficult route of designing Lydia and then texturing her from the stripes on the sides of her pants. I also went with a different hand design along with making her gloves.
2D Facial Rigging Prototyping.
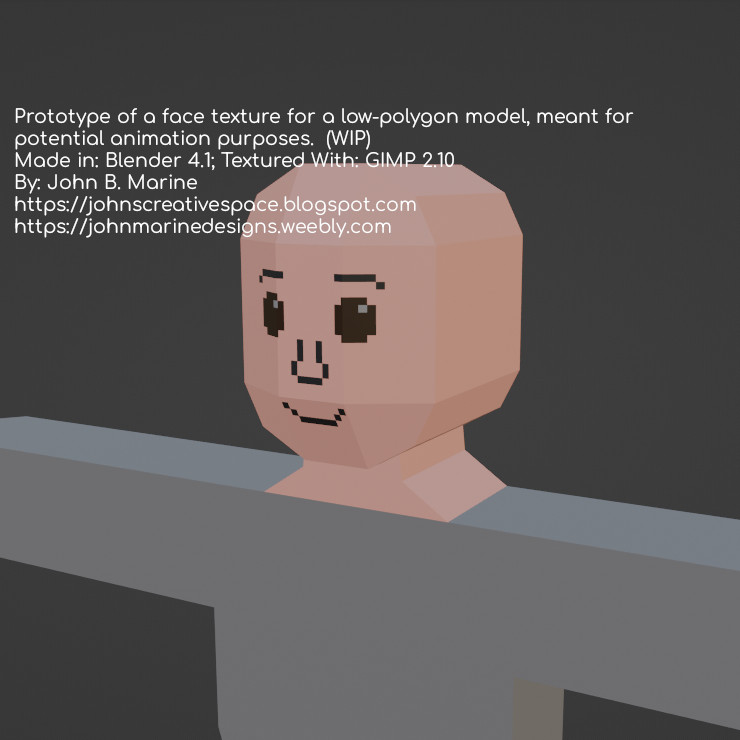
^ from: (my X/Twitter) - A duplicated mesh positioned a millimeter away from its face makes up this mesh. The intent is on 2D facial rigging through textures.
I had facial animation in mind when I worked on this prototype. Originally, I did not know how to make transparent textures or pictures with alpha parts appear transparent. I then learned how to use Shader nodes in Blender to allow for the use of transparent images and alpha images. I had to change up a few Shader notes and change the alpha type from opaque to Alpha Clip. Later on, my face image for the model became transparent! While I haven't learned how to implement 2D facial rigging, at least this was a step in the correct direction towards eventually making 2D facial rigs or even animating textures for 3D models.
I will now be looking at breaking down the models you've seen in this section.
Low-Polygon Model Breakdown
I will use this time to discuss the finer details of my 3D modeling of these characters.
The models I made for Blender follow nearly the same front dimensions of my original voxel models. For more ability, I made their legs one or two bits longer. I have not truly developed a hand style I want to develop for all characters. The head style is a mesh grid of three squares horizontally and four squares vertically. If there were parts that I wanted to be implemented with making textures that can be changed, I duplicate those parts of the mesh and then position them slightly away from the main mesh.
From the textured parts, the second, third, and fourth rows were used for facial rigging. I use Blender's "Projection From View" to map out the facial texture. I do the same by picking a row of vertices to use for designs for a shirt or some other details. Since my models were low-spec, I had to find a good enough texture size to allow for words to be put on an outfit. I found something like 128 pixels across to be a good start. Later, 256 pixels across for outfit graphics would be good. I want to learn how I can implement 2D facial rigging or even setting up animated textures for models.
Implementing armatures involves me learning how to set up armatures along with weight painting. I felt the best method of armatures was to use Armature Deform With Empty Groups. Only recently I learned of a better weight painting method that works well for my models. All I had to do was change one of the Weight Painting options to where the falloff is linear or constant. It quickly painted the mesh parts I wanted to weight paint properly.
As of this moment, where I struggle is finding a style to properly animate the arms and the legs. I made the upper arms and upper legs shorter than the lower arms and lower legs. However, I am not certain how I want to structure some models. So I am drawing more inspiration from other early 3D models to help construct my characters.
Rest assured that if/when I create models ready to be animated and utilized, I will share them on as many different 3D stores as possible. That means Turbosquid and Envato's 3D Ocean currently. I also will be looking for more platforms; such as (but not limited to): CGTrader, SketchFab, (maybe) ArtStation, and more. Stay tuned to my blog and my other social content for more information!
Now I want to make note that if I work on my individual characters, I will make blog posts as well as add to my Github personal page. I want to keep you entertained and engaged. It is the least I can do. The rest is up to you. Subscribe/Follow my blog(s) in any capacity if you love my work. Share my blog post(s) with others if you enjoy my work. Support me further by connecting with me on social media; and if you are inclined, feel free to donate to me (tips/donations are voluntary but would be appreciated). Thank you for reading! Take care and be well.
| Visit my JohnMarineDesigns Weebly site, subscribe to My Blog(s), and/or Follow on Bloglovin! Let's connect: | ||||
|---|---|---|---|---|
| Contact Me via E-Mail | Contact Me via Discord |
(tips/donations are voluntary) |
||
| Get Social With Me! | ||||||
|---|---|---|---|---|---|---|
| Facebook (Friends) | Facebook (Fans) | YouTube | ||||
| LinkedIn (professionals only) | Discord | ??? | ||||
| Support My Creative Works! | ||||||
|---|---|---|---|---|---|---|
| JMDesigns | John on Envato | |||||
| Patreon | Soundcloud | Bandcamp | ||||
| Twitch | OpenGameArt | TurboSquid | ||||


0 comments:
Post a Comment