


^ from: (my 3D modeling portfolio on JMDesigns) - I consider this work to be my best effort at 3D human modeling.
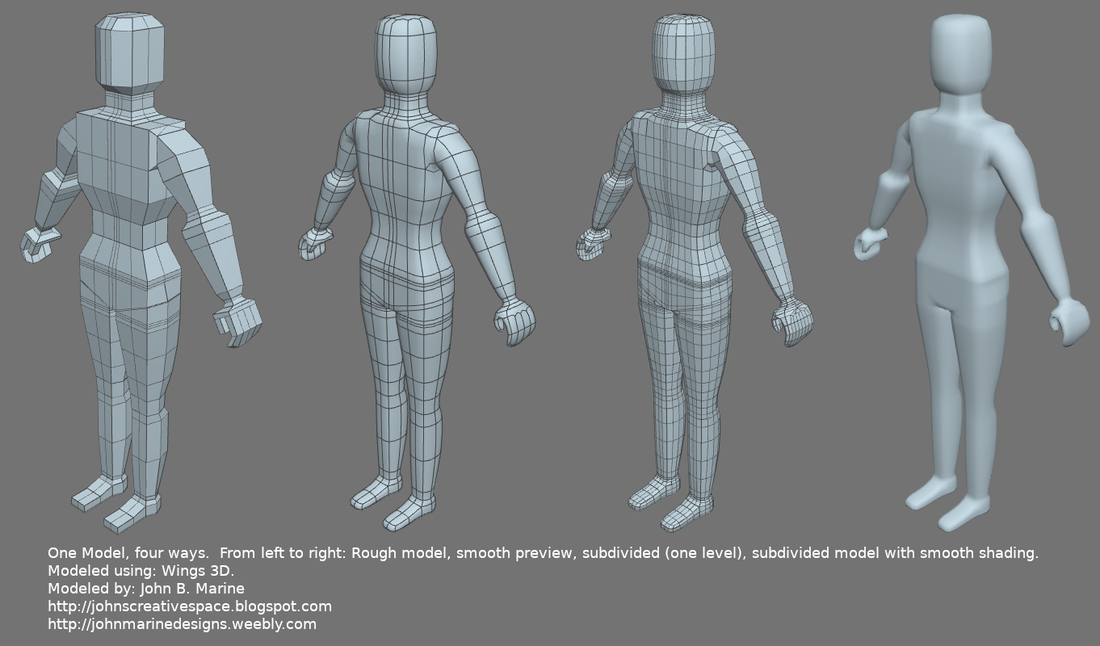
This is a human character I practiced making. It was meant to be a female model. It basically ended up being a basic model of a human model rather than something exclusively feminine or masculine. I actually had to re-do this model because when I tried to edit it in the future, I had some messy geometry that was tough to remove. So I started over.
What I found to be important in the design is in trying to get a proper center line to be able to cut the model in half and mirror for easier and faster development. One of the first things I struggled with early on was trying to properly model the lower back and the abdomen. I wanted a proper transition from the groin and buttocks to the abdomen and lower back. Speaking of the groin, I noticed how there was a lot more curvature and extra edge loops in modeling the groin area and the buttocks. I will employ a different technique to model out the groin and buttocks in future practice attempts.
Limbs and Body.
One thing I realized in modeling out the legs and feet is how the size shrinks between the legs and the feet. Prior to any plans to further sculpt a rough model, I applied a Scale Uniform operation to shrink the edge loops around the legs and the ankles. I need to have some kind of edge loops and extra geometry to define the knees. I haven't yet found a method I was comfortable with, so the knees don't look properly defined from the base image I've provided in this blog post.As for the arm itself, it was outside of my comfort zone because I modeled it as an extrusion of the shoulders as opposed to making it its own object and then attaching the geometry to my model's body. The object still came out well, but I was slightly not satisfied with how the fingers (or would-be fingers) ended up after I started modifying them. More on the fingers in the next section.
Hands and Feet.
My first attempt trying out hands and feet were mostly basic. I don't feel as content with my hand effort because I tried to move edges on the hand to a real low-polygon effort. If I were to try a more detailed effort, I feel I know a way to properly model out fingers. Rather than design a hand as a separate object, I took the arm and at the wrist, extrude an extra piece. I then added some extra vertices so that I could attempt to extrude some extra pieces to set up the thumb and a basic profile of the other fingers. Since low polygon is my aim, I avoided trying to make the model overly detailed with fingers. What I DID do, however, was try to model out a certain profile of the fingers. So I ended up moving up some of the edges to the length of some of the fingers.The feet are very basic. Overnight as I was thinking about how to define a more realistic foot. A realistic foot has curvatures from the sides and at the bottom. From the base image I have provided, one thing Iv'e surely tried to do is define the ankles properly by adding extra edge loops and setting them up as close as possible. I also made sure to produce edge loops close to the bottom of the feet so that the feet don't appear curved at the bottom. One thing I hope to do is make a low polygon-type foot to make some toes. I will use some of the same techniques I did for the fingers to use for the toes in preparing for refinement.
The Head.
Of all elements of a human body or maybe a character, the head is the most complex to create. You will need many edge loops to properly define every possible element of the head including the eyes, nose, and mouth. This is important if the intent is to make it available for rigging and animation. I even tried to learn how to design the head. Thing is, I still have a lot to learn in head modeling. Rather than make a realistic head, I basically modeled a basic head.Any Plans for This Model?
I had plans to basically make these available either for animation or for games. I could design a less intense model meant for gaming. Also, the low-spec models could be the early entry for me to create my own original characters.Want to See More of My 3D Work?
To see more of the 3D material I have created, please visit my 3D portfolio on JMDesigns.I'm glad you found my blog and read its content. I hope you enjoyed this post and got a feel for some of my talent in 3D modeling. It isn't the best, but it's better than nothing, and I am always learning and dreaming. Maybe I get better and really come around with something better than before. Never know... Anyhow, thank you for reading! Take care and be well.
| Support My Creative Works! | ||||||
|---|---|---|---|---|---|---|
| JMDesigns | Patreon | Soundcloud | Bandcamp | Twitch | OpenGameArt | TurboSquid |
| Get Social With Me! | ||||||
|---|---|---|---|---|---|---|
| Facebook (Friends) | Facebook (Fans) | YouTube | Google+ | LinkedIn (professionals only) | ||
| Questions or Comments? Contact Me (serious inquiries only)... |
|---|
| Contact Me via E-Mail |


0 comments:
Post a Comment