Friday, October 24, 2014

My 2nd Voxel People Set

John B. Marine | 12:52 AM | | | Be the first to comment!
After making one set of voxel people in MagicaVoxel, I made another set. I figured I'd share with you wonderful people more of my work. What is different about this set is that I made a bunch of characters with no facial features and with a set palette. I started to create characters using an edited palette to have better color options, especially with skin color. So you will get to see this new set and be introduced to each new character I created within this blog post.


--- My 2nd Character Set ---

Here are three views of my latest voxel people creations:

2nd set MagicaVoxel voxel people
^ This new set features the same body as the previous set of characters. However, unlike the previous set of characters, this set features a new head devoid of facial features.

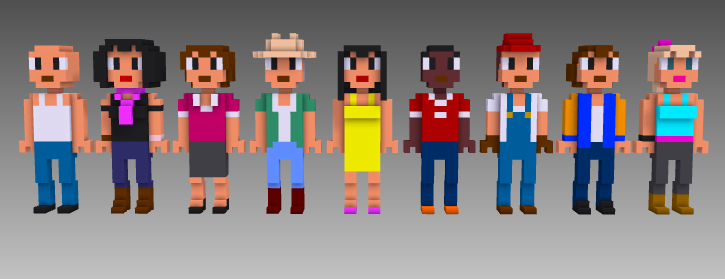
2nd set MagicaVoxel voxel people front
^ Here are all of the characters in this new set from the front in a group picture. The base model used in creating these characters is the one on the far left.

2nd set MagicaVoxel voxel people rear
^ This is a group view of this character set from the rear. The base model used in creating these characters is the one on the far right.

Let me talk about the characters you've noticed in this post.


Creating the Characters.

The new set of characters I created was part of an experiment of having faceless characters. It was kind of the intent to make generic people for various media projects. As an interesting twist, I designed the models to where if they were to talk, you could actually see their mouths open. This is made possible by erasing two different voxels on the lower part of the heads. In addition to these heads not having facial features, this new head design has more realistic heads than the more cartoon-like heads of the previous set of models. There is a bit more realism here. Though there is realism, it is certainly possible one could take the new heads and put them onto the previous set of models for a more realistic head on the previous models.

This new set was actually created as a prototype character I modeled after creating my own Minecraft-style character. I took the resulting character after loads of editing and then practiced making the more realistic heads. I then applied that head to my original model human. This would be the birth of another alternate model.


Purpose of the Characters.

The characters all are to populate a number of scenes which I hope to create in the future. Each character I created is just a standard set of voxel assets I created for which to be used in a variety of media projects. None of these characters have any specific names. In fact, I named them according to the order I created them. That same order explains which character appears before another from left to right. So with this said, you can see I created the woman with the sweater blouse and skirt after I made the girl with the pink scarf.

I tried a number of different style touches to the characters. If the previous set seemed more generic, there is a little more personality to most of the characters I created in this second set of voxel people.


Explaining the Characters.

Now that you've read everything about the creation of these characters, it is now time for me to introduce you to this new set of characters. Each description with each bullet will be a basic introduction of each character I created. The order of each featured character is from left to right. Here is an introduction to each character.

• 1.) Base Model
Nothing special about this character except for the new head. This character has the same outfit as the base model for the first set of characters.

• 2.) Older Woman
Here is an older woman, preferably 40 or older. She wears a baseball T-shirt, cuffed capri jeans, and silvery metallic sandals. This is a blonde-haired woman who wears her hair with a ponytail at the back.

• 3.) Night Out
Here is a character perhaps between the ages of 18-35. She wears a stylish, Cobalt Blue, high-low/mullet dress. Her hair is styled nicely as well.

• 4.) Classy Male
This male character wears a fine suit. He wears a stylish suit jacket along with a stylish button-down shirt. Also worn by him is a classy pair of pants along with some dress shoes. This person is incredibly handsome with his style.

• 5.) Childish Adolescent
This young (at least 18 years old) girl dresses childishly. Her hair has some highlights of light blue and neon pink. She wears a short-sleeve baseball T-shirt, a black tulle skirt with black polka dots, and a tall pair of neon pink sneaker boots. This outfit was designed to be girly and childish.

• 6.) Groovy
This is a Black male wearing a sleeveless shirt and some dark jeans. He has somewhat of an afro as well as a chunky gold necklace with a medallion. He was basically designed to be one cool dude.

• 7.) Preppy Pretty
This girl is perhaps in the age range of 18-25. This is a blonde with short hair and wears a hot pink shrug over a basic white T-shirt. She wears a pair of cuffed, cropped jeans as her bottoms, and they are topped off with a pair of tan boat shoes. It is a cute outfit that is quite comfy.

• 8.) Androgynous Dancer
This unique male is at least 21 years old and wears an outfit that a girl would look appealing in. However, this male with an incredibly feminine body is wearing this unique outfit. He wears a crimson cropped vest over a light blue cropped shirt. His bell bottom white jeans are complimented with a neon pink sash belt. On his wrists are a pair of neon green wrist ties. A pair of honey brown shoes complete the look. This fellow is proud of his looks and his deliciously sweet body that he decided to show it off in this way and wearing an elaborate outfit.

• 9.) Classy Sexy
This woman is based on an actual character I created. Only this character is a generic version of her. The woman is at least 30 years old in age. She wears a fedora hat. Also, she wears a red blouse with a rather deep neckline, a pair of white flared pants, and some dark brown shoes. On her right wrist is a stylish watch.


And that explains each of my characters in this new set. In case you want a complete collection of characters I've created so far, I created this picture:

MagicaVoxel voxel people both sets
^ Both sets of characters in one picture. The latest set is on the bottom in this picture.

You can spot the differences among the characters. Since the characters have the same body model, I could easily work on changing up the first set of people with the heads of the second set. MAYBE I'll do that. Then again, I may just keep everything as is.


Please Subscribe and Follow my work online to keep up with the latest material. I thank you for visiting "John's Creative Space." Thank you for reading!

"Like" me on Facebook, Follow JCS, and/or Contact Me via E-Mail!
Subscribe to John's Blog Space (JBS) Subscribe to John's Creative Space (JCS) Subscribe to John's Race Space (JRS) Subscribe to StyleSpace (SS)
read more...

Monday, October 20, 2014

My Voxel People Set

John B. Marine | 12:23 AM | | | Be the first to comment!
Making voxel people in MagicaVoxel has been quite fun. I have felt the desire to make these models to start making art and animations. I decided to share my work with my global audience. So what you will see here is a look at the nine characters I created. You will also gain some insight as to the creation process and how I created these characters. I hope you get to enjoy this blog post as I share some more of my works with you all.


--- My Character Set ---

Let me provide for you three views of my voxel character creations:

MagicaVoxel voxel people
^ I created all of these human characters in MagicaVoxel. All of them stem from one base model, which is the person on the far left. Sing along, everybody! "We are the world..." :)

MagicaVoxel voxel people front
^ Here are all of the characters from the front in a group picture. The base model used in creating these characters is the one on the far left.

MagicaVoxel voxel people rear
^ This is a group view of this character set from the rear. The base model used in creating these characters is the one on the far right.

Let me talk about the characters you've noticed in this post.


Creating the Characters.

All of these voxel characters were designed by me through MagicaVoxel. The character models I created were primarily meant for easy editing and the most detail for small-scale scenes and animations. I drew inspiration from a number of different popular games with voxel models. Two inspirations of my voxel characters are from two of the most popular independent/indie games today- Minecraft and Ace of Spades ("Build and Shoot" nowadays). I adopted the sort of square head of Minecraft models, and I adopted the bent legs of the Deuce characters from Ace of Spades. The hand designs, however, are my own creation. I wanted the characters to have a realistic set of hands. You can somewhat say that I adopted the hand designs from stuff like LEGO characters or from certain Roblox characters.

Though I am proud of my creations, there are a number of disadvantages. Having the characters in equal proportions by powers of two makes the characters simple to create. It is possible to cleanly be able to cut the model in half for easier editing overall. However, such a combination isn't very good especially for feminine models. I think about things like properly modeling certain proportions of female human characters. Because certain clothing items or physical features aren't possible or as well-executed with such even models (and details are a huge part of my creation of things), I feel I can't properly re-create certain features with the sort of accuracy and the sort of freedom as I could with more evenly-proportioned models. The goal for me is to create models and such that are as detailed and can be well modified as possible.

"Simply detailed" is what I aimed for with these created voxel models. It can be a bit tough trying to model flyaway items like coats or skirts/dresses, so for the one in the skirt and the one in the dress, the front of the skirt/dress is modeled onto the front of the legs.

Each of the characters were modeled with dimensions that are somewhat inspired by old RPGs. The dimensions of some characters in some old RPGs mostly are either 16 x 16 or 16 x 24 in dimensions. I had to add a little more height to my base character model once I tested it against some other voxel models I created. I wanted the proportions and dimensions to be realistic and useful with various props I created in addition to my characters.

This gives you insight on creating these characters.


Purpose of the Characters.

The characters all are to populate a number of scenes which I hope to create in the future. Each character I created is just a standard set of voxel assets I created for which to be used in a variety of media projects. None of these characters have any specific names. In fact, I named them according to the order I created them. That same order explains which character appears before another from left to right. So with this said, you can see I created the woman with the sweater blouse and skirt after I made the girl with the pink scarf.


Plans on Using the Characters.

I have created these characters primarily to feature in possible artwork and even for animations. I am going to have a real problem using these characters, however, because unless I edit the models to be properly used for animations, the models are going to be deformed once I rig the models with armatures in Blender. MagicaVoxel currently does not allow for voxel models to have separate limbs and such with just one model.

Let me give you an example of using these characters in an animation or a slide to an animation:

animation dialogue mock-up sample
^ from (my Facebook profile) - This picture is a mock-up of a sample dialogue that I may implement in making videos.

This is among a number of different ways I plan on using these characters.


Explaining the Characters.

Allow me to describe the nine characters. Each description with each bullet will be a basic introduction of each character I created. The order of each featured character is from left to right. Here is an introduction to each character.

• 1.) Base Model
The first model is the base model that was extensively developed by me to design each of the characters in this set. A number of touches were made to make editing this model easy. This is a male model wearing a tank top undershirt, a basic pair of jeans, and black shoes. Since this is a base model that could be outfitted in any number of ways with editing, this character basically has no personality. He does boast SOME toughness with the tank top he wears. Other than that, he'll take on any personality based on how you outfit him.

• 2.) Fashionista
This character is a fashionable young female, preferably in the age range of 18-25. She has big hair, wears red lipstick. Her black top has the shoulders cut out for a chic touch. The jeans she wears are dark rinse skinny jeans tucked into knee-high brown boots. As the whole outfit is primarily dark-colored, she adds a bold pop of color with her neon pink scarf. She wears a fashion leather watch on her right wrist and has several bangles on her left wrist.

• 3.) Secretary
This character was primarily designed as a modest woman preferably age 35 or older. This woman is willing to help others and is genuinely sweet. She will be willing to help others and teach others as long as you remain respectful to her. Her hair is done up modestly. Her outfit consists of a sweater worn over a blouse. That sweater and blouse combination is paired with a mid-length skirt and black pumps.

• 4.) War Veteran
At somewhere 45 or older, this man has served in war and lives his life to educate others. He is a proud American and will passionately tell you what it is like serving on the front lines in battle. This man also praises and preaches hard work. He wears a button-down T-shirt that is open, and underneath the button-down is a simple white T-shirt. He wears faded blue denim jeans tucked into a pair of cowboy boots. His outfit is topped off with a straw hat.

• 5.) Daisy
Somewhere between the ages of 18-25 is this fashionable adolescent. She wears a yellow sundress that is a bit higher than the Secretary's skirt. She wears red lipstick to go with her outfit. Her hair has a bold set of bangs as well as two long bits of her hair that accent either side of her face up front. She wears a pair of neon pink pumps on her feet.

• 6.) City Boy
Dressed casually in the city, this is a male character somewhere between 18-30 years old. He wears a football jersey, dark jeans, and a pair of work boots. This male is basically the quintessential urban male.

• 7.) Worker
A hard-working male at least 30 years in age is this Worker character. He wears a basic T-shirt, overalls, some work boots, a baseball cap, and a pair of leather gloves. The personality of this person is basically that of one not afraid of hard work. While he wouldn't mind spending his Sundays watching sports and working on his car, he lives to work.

• 8.) Student
This 18-25 year old male is more like the popular fellow at school. He is either a popular High School student or a college Freshman. This fellow is probably what would be defined as a "cool kid." With his flowing short hair, he also wears a T-shirt, a varsity jacket, dark rinse jeans, and some black shoes.

• 9.) Sporty Girl
A girl like this is probably in the range of 15-25 years old. This character has blonde hair and green eyes- two qualities none of the other characters have. Her hair is secured with a hot pink bow, and the back of her is done in a ponytail. She wears lipstick in a bubblegum pink color. The outfit she wears is what a number of females in her age range would consider cute or comfy (or both). Her outfit consists of a tank top, gray/grey yoga pants with a neon pink waistline, and her pants are tucked into a pair of cozy sheepskin boots (commonly called UGGs, even though UGG Australia isn't the only designer of such boots). On her right wrist is a sporty watch. This young lady will probably tell you that she loves her yoga pants and her sheepskin boots even if you dislike this fashion combination. She's dressed for comfort and doesn't exactly care what others think about her, including any social stereotypes about those who dress the way she does.


And there you go. You can go to the next section or skip it entirely.


--- A Special Question... (BONUS SECTION!) ---

Let me ask my loyal readers something. Would you mind if I created these voxel models... and offered these assets online for you to download? Would you perhaps even pay for such assets of mine? I could try to create 3D material for people to offer online on reputable sites like TurboSquid.

If you think I could get more attention and offer quality material elsewhere online, let me know. It may be something I want to do to push my content further and make it all more viable to my loyal and respectful audience. Let me know if you think I should create material to submit to certain websites or maybe offer material for a price.

I've made human characters already. If possible, I want to try to make other voxel models like animals, automobiles, structures, maps, and more.


The main point of this blog post was to showcase some of my voxel art with you all. I hope you enjoyed this blog post, and I also hope you enjoyed your visit to my creative works blog. Make sure you Subscribe and Follow my work online to keep up with the latest material. Thank you for reading!

"Like" me on Facebook, Follow JCS, and/or Contact Me via E-Mail!
Subscribe to John's Blog Space (JBS) Subscribe to John's Creative Space (JCS) Subscribe to John's Race Space (JRS) Subscribe to StyleSpace (SS)
read more...

Wednesday, October 15, 2014

My First MagicaVoxel Scene

John B. Marine | 6:00 PM | | | | | Be the first to comment!
Using MagicaVoxel, I made my first scene of any kind last night. I designed a scene with two models I created in MagicaVoxel. The important thing in all of this is learning how to use the Pattern brush. Through this blog post, I will share what I learned so you can design your own scenes using MagicaVoxel. I intended on making this blog post mostly as a tutorial for MagicaVoxel as well as to simply share my latest work through MagicaVoxel.

If you are new here, welcome to my creative works blog- "John's Creative Space!"


--- Making MagicaVoxel Scenes ---

Take a look at this scene I created:

MagicaVoxel scene
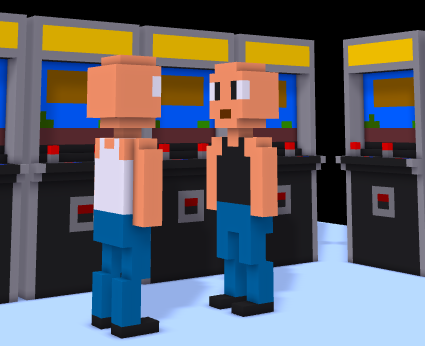
Here is the first scene attempt I made using MagicaVoxel. Just for fun, what do you think these guys are talking about in this scene? CAPTION THIS! :)

Once you learn to use the Pattern brush, it is possible to create scenes or even larger models. I used only two models I created to compile this scene. All I did was change up the color of one of the guys by making his shirt black. Other than that, I used only two models. The other model I used is a single vertical arcade unit. If you want to set up your own scenes in MagicaVoxel, let me share with you some tips.


Making Scenes in MagicaVoxel.

You could use a program like Blender to make scenes and to properly animate scenes. However, if you just want to make a scene through MagicaVoxel, let me explain how I got to learn making scenes in MagicaVoxel.


• Setting Up the Scene
First, you are going to need to set up a large-enough scene for whatever scene you are coming up with. Just set up the dimensions to be as large as you want them to be to fill in the space. If you are unsure as to what is an acceptable size for your scene, you may want to use some of the larger default models in MagicaVoxel (such as "nature" or "room"), make a new model based on the dimensions, and click on "Zero" from the Edit - Tool menu. Make sure to save your scene under a special name if you want to save your work. A helpful hint would be to turn on the Frame feature from the "Line" menu. Turning on the Frame feature (the "F" in the Line section) will allow you to see the ground arranged in a grid layout. Pay special attention to two menus: "Shape" and "Pattern."


• Find the Pattern Brush in the "Shape" Section
In the column with the Brush menu is the "Shape" feature. Click on the Shape section and click on "Pattern." The Pattern brush will allow you to import MagicaVoxel models into your scene. The models can then be rotated and such to your liking as you place them into the scene.


• Find the "Pattern" Section; Using the Pattern Brush
Below the Model menu featuring all of the models, there is a menu called "Pattern." Click on "Pattern" to view all of the models. The Pattern menu allows you to add models into your scene for when you use the Pattern brush from the Shape Menu. Find a MagicaVoxel model you want to use and click on it. Using the Shape - Pattern feature, you will be able to add your voxel models into the scene. You can rotate the pattern models you put in by pressing the "-" and "+" keys (not the ones on the keypad). You can move pattern models up and down (respectively) using the Page Up and Page Down keys. You can reset all parameters of an imported pattern model by pressing the "0" key (the number pad; not the keypad). Models placed are rooted to the ground. You can stack imported pattern models on top of each other if you choose.


• Building the Scene Itself.
Once you start to practice putting multiple models into one scene, you begin to grow confident in building scenes, maps, and even creating larger models by piecing together multiple smaller models. So the Pattern feature can be very useful and beneficial for scenes and larger models. Take advantage of this feature like I did to create amazing scenes.


• Photography
All that basically remains is you taking pictures of your scene.

Use a combination of the mouse wheel to zoom in and out as well as clicking and holding the right mouse button to rotate around the scene. Once you find the angle or angles you wish to use you are free to take snapshots.

From the Edit - Export section, look for the "Snap" tool. There are a few things you must take note of before snapping pictures of your scene. First of all, if you click on Snap (or press F6 or CTRL+F6), everything enabled in the main window will be saved into a PNG format picture. So turn off certain features if you want a clean-looking view of your scene. You can collapse some of the extra menus to get a wider shot of your scene if you wish to make wider snapshots. Click on "Snap" from the Export section or press F6 or CTRL+F6 to save screenshots. All exported screenshots can be found in the "Export" folder of your MagicaVoxel folder.


I hope this is helpful for you in making scenes with MagicaVoxel. You can still use programs like Blender to animate your models and make all sorts of other effects, but I wanted to simply mention making scenes and importing multiple models into one scene in MagicaVoxel. In the future, I may create some extra material just to demonstrate making different kinds of scenes or even showing that it is possible to make larger models by simply making good use of the Pattern brush. Enjoy what I've created for now for you, though.


Being able to make a scene in MagicaVoxel has given me some new confidence in possibly making animations and other material. If I do create something interesting, I will be sure to share my work with all of you. Thank all of you for reading my blog post here on "John's Creative Space." I hope you continue to stay with me to see more of my work. Maybe I can inspire you to create your own material if you enjoy my work. Thank you for reading!

"Like" me on Facebook, Follow JCS, and/or Contact Me via E-Mail!
Subscribe to John's Blog Space (JBS) Subscribe to John's Creative Space (JCS) Subscribe to John's Race Space (JRS) Subscribe to StyleSpace (SS)
read more...

Monday, October 13, 2014

Making Templates

John B. Marine | 8:38 PM | | | Be the first to comment!
To make work easier, making templates can help you create assets better by sticking to a more one-size-fits-all approach. Nothing fuels the fire of a creative person than to have a solid base for which to work with. Especially more novice types can enjoy starting with a base template before having the courage and experience to create more advanced material. If you are the one who spends money on creative work, certain templates can even save you and/or your group money.

To show you what I mean in regards to making something to serve as a base, let me show you this picture below:

Making Templates
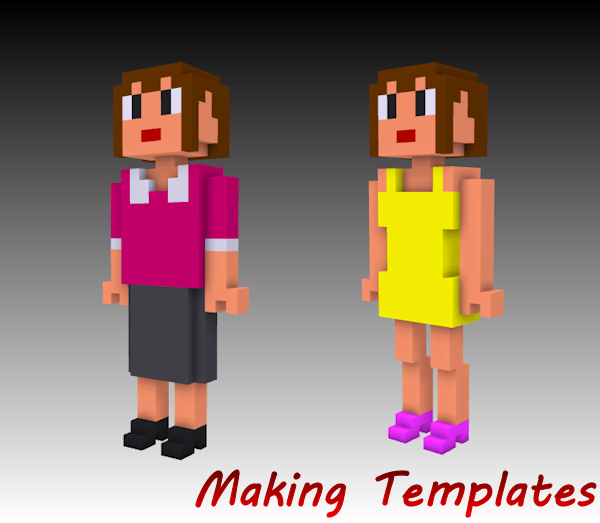
^ Made with MagicaVoxel, this is a voxel model of a secretary. I took the same model and (with modifications) created a separate model. IN CASE YOU'RE INTERESTED: My blog post on MagicaVoxel- "MagicaVoxel" (John's Creative Space).

I probably could have created one model and quickly decide to make one more model from scratch. However, I took an existing model, made a duplicate, and edited the duplicate. The differences between the two models shouldn't be hard at all to sort out. The left model wears a sweater underneath a blouse, a mid-length skirt, and some black pumps. The right model wears a short yellow dress with pink pumps. Both have the same body, only that I erased a few voxels on the body of the yellow dress model to create a nicer effect for it. It is possible I could have even taken the same model and made several more models. All I know is that starting with a solid base can lead to developing many more models. So consider something like bases and templates to effectively and efficiently make the most of your time developing assets for media projects.


Limitations of Template Use.

Some designers of creative works will allow you to use their works if you want to. However, it is important you credit the original creator if you do so. Another thing to be wary of is that you want to try not to rely too much on certain templates. When too many of your works seem to be based on one little template, it does get a bit stale, and you do need to maybe create something a bit different just to remain fresh.


It's up to you and how you want to do things. It's just that if you want to make more efficient use of making models, it is best to start with a template and use that template as a basis for your creative work.


Remember that I am using "John's Creative Space" as a platform for my own creative work as well as to offer my own thoughts on certain aspects of developing creative work. So if you enjoy my work, make sure you're Subscribed and Followed to this blog and my others. Thank you for reading!

"Like" me on Facebook, Follow JCS, and/or Contact Me via E-Mail!
Subscribe to John's Blog Space (JBS) Subscribe to John's Creative Space (JCS) Subscribe to John's Race Space (JRS) Subscribe to StyleSpace (SS)
read more...

Friday, September 19, 2014

Asset Development

John B. Marine | 9:35 PM | Be the first to comment!
When you develop a media project, assets are important. How you develop and produce such assets is key in the creation of your work. You may even find free or paid assets online for your work. If you are the giving type, you may even sell assets you've created to any number of services online, like TurboSquid or 3DOcean for 3D models. This blog post simply discusses asset development and some of the different nuances of asset development.


--- Asset Development ---

Everyone with creative ability wants to be able to create items for all sorts of projects. Whether it's the next piece of visual goodness or the possible next best game, it is important to develop your assets and then fine-tune them to make them better than good.


Asset Development Considerations.

When developing assets for media projects, it is important to consider your audience, your skill level, and the amount of detail to your material. You want to design something you feel will be special and unique in what you create. You may specialize in Gothic style art or in gritty urban locales. So the best way to develop your assets in those departments is to style things the way you want things to be styled. Perhaps you fancy colorful and cartoonish material. Be sure to design something that nicely reflects your colorful style. You might even (for any females reading this) love designing girly, cute things. You obviously want to create something beautiful and fun if this is what you fancy.

No matter what your level of creativity and the kind of material you enjoy creating, develop assets to the best of your ability using your own style. Don't feel pressured to try to be better than most other people in the same field- just try to work to your level and even put your own special twist on your work. Some people and groups even develop assets with the task of low-resource or high-resource creation in mind. Think of certain 3D developers who create 3D assets using as few polygons as possible or even using voxel models. Some others will seek high-polygon, ultra-detailed models. Develop assets to a level you are comfortable with.

Another thing you want to consider in asset development is a level of detail. Having something more in the vein of cartoons or in pixel art is usually less serious. Making something of a Triple-A Hollywood movie will require more intense detail. Work to your skill level and try not to stress yourself too much in designing your assets for your media work. It helps to be efficient in making whatever it is you want to make. Even the best work can take loads of time. Some people can create certain assets in minutes to a few hours. Some even take days, weeks, even months to complete certain assets for projects. However long it takes and whatever you are trying to create, keep working to make something special.


Should You Sell Your Assets?

You should only consider selling your assets if you feel you made something others can benefit from. Some people develop assets only for themselves and their work. That is perfectly fine. If you feel you can make material others can use and utilize, then you should definitely consider selling your assets to others. Especially if people enjoy your work and want to draw inspiration from your work, it would be very cool for you to offer your assets either for free or for a price on certain websites. Think about giving others your material to possibly help others produce better content.

There is but one important thing to remember when trying to sell your assets online- copyrights. For example, you may create a 3D model of an automobile from Toyota. Certain assets you sell online may require certain legal clearances, especially in regards to licensed and copyrighted material. You can still sell your Toyota 3D model asset online, but because you're making assets based on a licensed product, the kinds of legal clearances will make it a bit tough for some people to fully utilize and share your material. In these cases, you are probably better off making certain parodies or fantasy material that doesn't purely copy or mimic something purely licensed. You also want to be careful in making material that may violate the copyright aspect of making things in the likeness of others. You really need to be careful in this department.

IMPORTANT: Always be sure to inform people to give credit back to you so that you don't feel like people are plagiarizing your work.


--- Asset Development: Final Thoughts ---

Work hard in developing whatever assets you are trying to create. But of course, be sure to have fun and remain focused on creating quality material for your media projects. Developing assets can take on a few hurdles that may hinder your progress. Even still, the most important thing you want to do is make assets to hopefully help your media projects be successful. Be sure to develop assets based on your skill level and to a level of detail you are happy with. If you feel wanting to help other people by offering your assets online, you can on a number of reputable services that allow for assets to be sold either for free or for a certain price. It is all up to you. No matter what, be focused and concentrated in creating quality assets for your media projects.

Most of all... I wish all of you the best of luck in your creation of media work. I am even working on a lot of asset development in making videos, 3D art, and more. Stay tuned to JCS for more!


That's it for another "John's Creative Space" post. If you want to start a discussion, let's do so! Here's my question for you all:

What do you consider important in the creation of assets for media projects?

To increase the array of topics and appeal of this blog, I not only will offer my own creative work, but also make discussions like this to service my audience. So you're getting a lot out of my blog that I hope will benefit you as someone into creative works. Please Subscribe and Follow my blog(s) if you enjoy my work. Also, don't forget to GET SOCIAL WITH ME! Find me almost anywhere on social media. Thank you for reading!

"Like" me on Facebook, Follow JCS, and/or Contact Me via E-Mail!
Subscribe to John's Blog Space (JBS) Subscribe to John's Creative Space (JCS) Subscribe to John's Race Space (JRS) Subscribe to StyleSpace (SS)
read more...

Tuesday, September 2, 2014

MagicaVoxel

John B. Marine | 9:11 PM | | | | | Be the first to comment!
(UPDATED: January 5, 2018)

Besides Qubicle Constructor, MagicaVoxel is a competent voxel modeling program. It certainly has garnered great attention as being a free alternative to Qubicle. Some developers and artists are even using MagicaVoxel to design voxel models without feeling the need to buy a license to be able to take part in commercial gaming projects or being able to properly sell your voxel assets. Not many resources online are offered on MagicaVoxel. While I can't help usher in a generation that uses this program besides any other, what I CAN do is offer my commentary on MagicaVoxel. That is why you're here- to see what I think about MagicaVoxel and if it is something you should consider if you want to make your own 3D assets and such with this program.

NOTE: My look at MagicaVoxel is based on the latest version of this program. The version here is MagicaVoxel 62.50, which is the version I am basing this post on.


LATEST UPDATE(S)/REVISION(S):

MAR 28 2015 - multiple edits; added a Suggestion

Thank You For Making This Post Popular! A Suggestion...

This post has become popular thanks to you. Despite this post's popularity, I ask of you to please support my work any way you can. Follow me on social media or consider making a donation. Do not just come in and increase the view count for this post (or any of my others- show your support financially or through social media. All I ask is you support my work any way you can if you enjoy it. Read the material at the conclusion of this blog post for more ways to support my work. Thank you for your cooperation. Now please enjoy this blog and this blog post.


About the Label: MagicaVoxel

There are not a lot of resources outside of MagicaVoxel's website regarding MagicaVoxel. Even if this is an effort to get more views to this blog, I will try to offer resources and highlights on MagicaVoxel. Look for posts under the "MagicaVoxel" label to where I discuss this program and even share certain voxel art I've created with this program.


MagicaVoxel


MagicaVoxel and its development date back to 2012. It was designed as a voxel editing program. This program saves files in VOX format. However, it is not the same format as the popular VOX format used in Voxlap games such as Shadow Warrior or Ace of Spades (which is nowadays "Build and Shoot"). One of the advantages of MagicaVoxel is in the usage of palettes for items. So if you wanted to build voxel models for games that enable them, you can import in certain palettes to help make the building process easier.

What about the voxel building process itself? It may lack the Paint-like accuracy and power of Qubicle Constructor, but you could have greater efficiency in designing voxel models by using MagicaVoxel. Let me show you a screenshot I took using MagicaVoxel:

MagicaVoxel
^ from: (my Facebook profile) - This is a screenshot of MagicaVoxel. The model I was working on was a car I was designing for practice.


Using MagicaVoxel.

Now let me show you how to operate MagicaVoxel. I won't teach you everything, but I can give you a few basics.

• If you want an easier way of knowing where everything is and what each function does, click on the "i" icon with the main editing window. The "i" I am referring to is to the left of the "console : enter commands" display below the main editing window.

• Building models can be quite simple with a three-button mouse. Use the left mouse button to execute a certain function. Hold down the left mouse button and move around the mouse to create or erase parts of your model (depending on which action is selected). Use the scroll wheel to zoom in and out on the model you are working on. Hold down the right mouse button while moving the mouse to rotate around the object.

• All voxel models created follow a pattern of width × depth × height (or L×W×H). So if you created a model in MagicaVoxel, those are the dimensions you will work with. You can change the dimensions of any voxel model by going up to the top of the main editing window and look for the three numbers to the right of the model's name. If you were to change the dimensions from "45 45 45" of the default model to "10 20 30," you will get a voxel model that measures 10 units from left to right, 20 units deep from front to back, and 30 units high from top to bottom.

The maximum dimensions allowed by MagicaVoxel are 126 × 126 × 126. If you're trying to create more complex models, the best practice is to break up your big model into separate pieces and combine your models into one big model using some other program.

• The Brush Menu offers tools to build your voxel. You can attach new voxels to the model by having Attach enabled. Erase voxels by having Erase enabled. Paint over existing voxel colors by enabling Paint. By having Loop enabled, you can freely move around your voxel model.

• The Voxel Edit (or "V" in the Brush menu) lets you add and remove voxels at will. You can fill the editing space with voxels by using the Fill (or "F" in the Brush menu) feature. The Box feature ("B" in the Brush menu) allows you to edit voxels based on blocks. This method is the most efficient to me in designing voxel models, and it is the one I use the most to edit my voxel models.

• Pick, remove, or replace colors in the palette using the Color feature.


(ADDED: October 14, 2014)
• You can attach, remove, or paint primitive items using the Shape brushes.

- The Line brush feature allows you to draw a voxel line along the ground.

- Use the Cube brush feature to draw a cube on the ground.

- Click on the Sphere brush tool to draw a small sphere on the ground.

- If you want to add models created in MagicaVoxel to one scene, use the Pattern brush. You need to click on the "Pattern" section below the "Model" section on the right-hand side of the MagicaVoxel program. Click on any of the voxel models to set the model to use as a pattern. You can rotate any pattern selected in the "Pattern" section along the vertical axis by using the "-" and "+" keys (not the keypad ones). You can move the pattern model up and down the Z-axis by pressing either the Page Up (to go up the Z-axis) or Page Down (to go down the Z-axis) keys. Reset all parameters of imported models by pressing the "0" key along your number pad. To avoid models with strange colors, make sure each imported model has the same palette.

The use of Patterns can be useful in developing scenes in MagicaVoxel. So if you're building scenes through MagicaVoxel, you may want to consider using this feature. It can be very useful in building things like cities or certain scenes. It is also possible to create larger models in a piece-by-piece basis by breaking up individual pieces and adding them as patterns to build models. So you have a number of options as to how to use the Pattern tool.


• To make fine touches to your model, use the Edit features.

The TOOL feature allows you to clear the model (Zero), fill the model in one color (Fill), cover the entire editing bounding box in one color (Full), double the model's size (2x), invert the solid and empty space (Inv), and expand the size of the model (Exp).

Use the rotation (ROT) tools to rotate your model across any of the three axes- X, Y, or Z.

Flip the model across any of the three axes using the Flip feature of the Edit menu.

The LOOP feature allows you to move your model one unit across any of the three axes. This is especially helpful if you're trying to center your model.


• You can use the AUX feature to alter your voxel model in a number of ways. I wouldn't recommend any of these unless you actually know what you're doing or trying to do.


• Models can be exported to any number of formats. The Export tool allows you to export your work to whatever format you select. Exported models can be saved in the following formats: OBJ, XRAW, 3DS, SLAB, PLY, QB, TGA, SNAP (saves a snapshot in PNG format), ACT, and 2D. All exported material can be found in the "Export" folder where the MagicaVoxel folder is located on your PC.


• The Model menu features all of the voxel models in the native VOX format. Click on the floppy disk to save your file under the name given to it (the name of the model is to the left of the model dimensions from the main editing window). Click on the paper to make a new model. Click on the paper with a plus on it to make a duplicate of the model you are currently working on. Be careful trying to save models in that you avoid overwriting any current model you are working on.


That is a basic look at MagicaVoxel and editing models with it.


MagicaVoxel vs. Qubicle Constructor


How does MagicaVoxel compare to Qubicle Constructor? Here are a few talking points:

• I think MagicaVoxel has the advantage out the box with the palette options. I love the color choices early on with MagicaVoxel compared to the set you're given with Qubicle Constructor.

• Even though MagicaVoxel doesn't have the Paint-style accuracy of painting voxels, Qubicle Constructor offers a more powerful and easier interface. However, Qubicle Constructor can be a good bit buggy and flawed. Both still sort of allow you to make a model properly and successfully.

• You can properly render special views with MagicaVoxel unlike with Qubicle Constructor. QC allows you to render an animation of a model on a turntable. MagicaVoxel has models with a visible shadow. This one is more along the lines of personal preference.

• Qubicle Constructor is much better than MagicaVoxel in helping you keep track of each of the faces. You may be editing a model in MagicaVoxel, but be unsure of if you are actually viewing the front of the model. You can properly select viewing the model from the front in QC. You can select sides easily in QC compared to in MagicaVoxel. When you load any model in MagicaVoxel, you automatically view it from the front when it loads.

• The editing tools and options are more powerful in MagicaVoxel than in Qubicle Constructor. You have so many options for which to make and edit voxel models with.

• From my usage of both programs, MagicaVoxel runs smoother than Qubicle Construtor.

• MagicaVoxel allows you to export in three key formats: OBJ, PLY, and 3DS. Qubicle Construtor doesn't have any useful formats from its free version you can export to unless you purchase a license. Using Blender, I noted that while texture information doesn't immediately show up in OBJ models exported from MagicaVoxel, the models do render well in Blender. 3DS exports from MagicaVoxel come at a nice scale, but color information gets lost. The PLY format is like the OBJ format, but color and texture information doesn't show up in initial renders. PLY also has the largest file size. So really... if you are going to export models with MagicaVoxel, I recommend you use OBJ. OBJs exported with MagicaVoxel have the smallest file size and nicely uses textures.


Maybe the most important thing to some people...

• Because MagicaVoxel is free, you don't feel the need to have to buy a license or anything to be able to make 3D assets with MagicaVoxel compared to having to buy a Master license for Qubicle Constructor (which can cost upwards of $80 USD). QC's Master license will allow you to make and sell 3D models for money. You can also use creations in QC with Unity 3D if you're a game developer. Anything you make in QC that you sell or plan to sell, you need to purchase a Master license. I recommend you purchase the Home edition of QC if you are wanting to export your models to the versatile OBJ format. As for MagicaVoxel, it is free to use for projects ranging from adding material into computer games or for making models for commercial projects.

Qubicle Constructor is a professional-style program for making voxel models. So many people and teams have made proper voxel models for projects ranging from 3D models to games. The problem with MagicaVoxel (in my view) is just that not as many people really believe in it or give it much of a chance. But considering this program is offered for the absolute low price of free, this program is at least worth a try.


MagicaVoxel: Sample Models


(added: September 19, 2014)

Here are a few sample models I've created with MagicaVoxel. These are nothing special. I am just here to demonstrate sample models I've created with this program. Have a look:

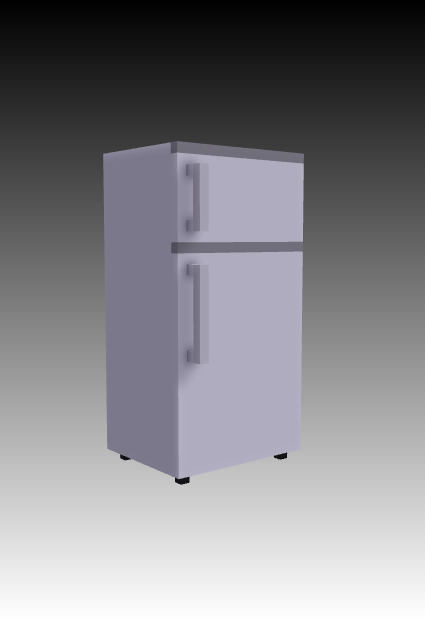
refrigerator
^ This is a voxel model refrigerator I created.

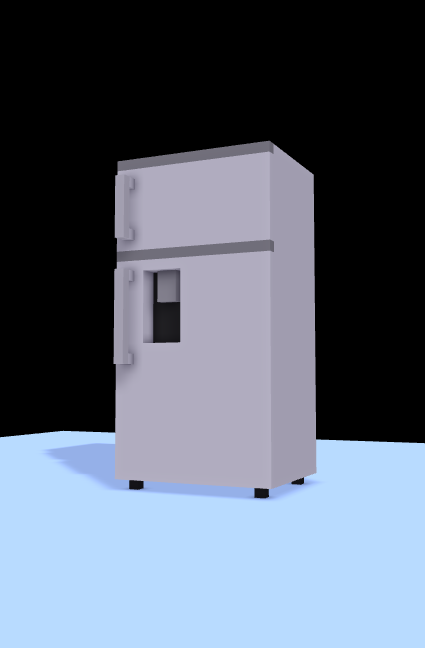
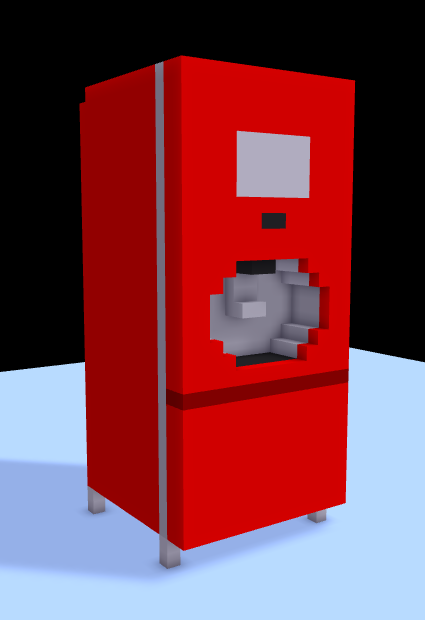
refrigerator with dispenser
^ The is the same refrigerator, but with an ice dispenser.

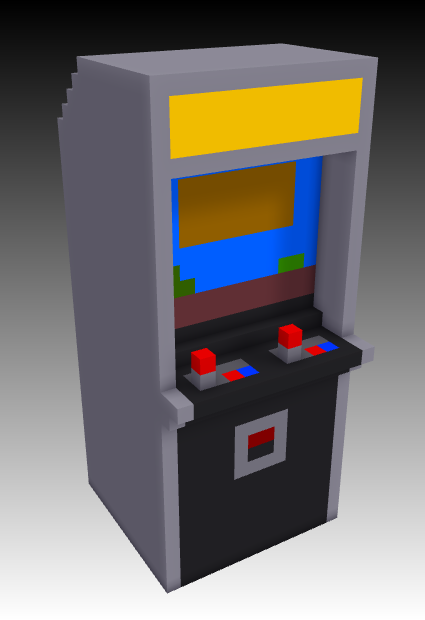
upright arcade
^ The image you see here is an upright arcade unit. Many of us gamers spent our youth dumping coins into these things.

Coca-Cola Freestyle drink machine
^ This model is my voxel interpretation of the Coca-Cola Freestyle drink machine. To learn more about it, I blogged about this machine in my main blog: Coca-Cola Freestyle Drink Machine (John's Blog Space)

(DISCLAIMER: Coca-Cola is a registered trademark of the Coca-Cola Company.)


Again- nothing real special. I just wanted to demonstrate some of the models I created for fun using MagicaVoxel.


MagicaVoxel: Final Thoughts


MagicaVoxel is an absolutely worthy alternative if you want to make voxel models. You don't get a lot of the Paint-like functionality I've discussed with Qubicle Constructor, but what you DO get with MagicaVoxel is enough to make you feel like you can do almost whatever you want without feeling like you have to buy anything just to commercially use material you create. If there was a better suite of material for MagicaVoxel to make for models or gaming, I swear to you that MagicaVoxel will be the new king of voxel-editing software. Even the size limits of 126×126×126 shouldn't be a serious deterrent for anyone trying to make models with MagicaVoxel. The editing tools and all you can do with this program are completely justifiable for downloading. With patience, it is possible to create models more efficiently and with few bugs (if any) with MagicaVoxel than you could ever make with Qubicle Constructor. So go ahead and download MagicaVoxel, and let your creativity come alive!


For More Information...

You can learn more about MagicaVoxel and download it by visiting ephtracy.github.io.


I hope I have shed some light on MagicaVoxel and introduce it to you all. Best wishes to you in making your own voxel model creations. This concludes another post here on "John's Creative Space"- my blog concerning creative works of mine and of other creative elements. You want more of my work here? Subscribe and Follow in some capacity! While you're doing that, thank you for reading! Take care and be well.

Subscribe to My Blog(s), and/or Follow on Bloglovin!
Subscribe to John's Blog Space (JBS) Subscribe to John's Creative Space (JCS) Subscribe to John's Race Space (JRS) Subscribe to StyleSpace (SS) Subscribe to John's Life Space (JLS)
Support My Creative Works!
JMDesigns Patreon Soundcloud Bandcamp Twitch OpenGameArt TurboSquid
Get Social With Me!
Facebook (Friends) Facebook (Fans) Twitter YouTube Instagram Google+ LinkedIn (professionals only)
Questions or Comments? Contact Me (serious inquiries only)...
Contact Me via E-Mail


read more...

Wednesday, August 20, 2014

Blender

John B. Marine | 11:28 PM | | | | Be the first to comment!
The Blender Foundation created one of the single most powerful freeware modeling software dating back to 1995. Blender is capable of so much that novices up to professionals use Blender for modeling and movies. It has been a great alternative to 3D Studio Max, which can be quite expensive. Blender has also been quite challenging to grasp and understand for rookies. Even I can attest to not knowing the first thing to do when attempting to model something. Regardless, when you gain a general understanding of what all Blender has to offer, you will see that it is one of the single most powerful 3D modeling programs either free or commercial.

There are even tutorials online on how to use and utilize Blender 3D to your liking. For instance, I've seen a handful of videos on how to create various effects or enhance your modeling skills. I learned today about separating and merging models. If you know where to look, you can find some great tutorials. Some people do a great job teaching the ins and outs of Blender. Later in this blog post, I will share a few links you can visit to help enhance your skills in using Blender. This blog post is my "John's Creative Space" contribution to the amazing program known as Blender.

For more information on Blender, please visit Blender's official site. Even though the most recent version of Blender is Version 2.71, I am using Blender 2.69 for my own Blender work. That is the version for which I am basing my material on.


--- Blender Talking Points ---

Before I go into any detail discussing Blender, let me show you a demo reel provided by Blender to show what is possible with Blender (if you can not view embedded media, click on the link below the video to view in YouTube):


^ "Blender Demo Reel 2013"

Now for a few talking points on Blender. I won't explain everything, but I will attempt to give you a basic introduction to some of Blender's many functions. Read on...


Gaming With Blender.

You already read that Blender is a great modeling program. However, is that ALL it can do? No! Blender also has a suite designed for gaming. It is possible to make your own games from start to finish through a combination of modeling and coding with Blender 3D.


Animating With Blender.

While Blender won't exactly replace Sony Vegas (or whatever you consider a great video-making program), you can make animations and such with Blender. You can render animations after setting up various aspects of models.


Methods of Modeling.

The two main forms of rendering are with the Blender Render and the Cycles Render. The Cycles Render system can perform more complex and more impressive renders than the internal render provided by Blender. Some renders and render effects can be better accomplished with the Cycles Renderer than with the Blender Render. For example, you can make a beautiful and realistic render of a car through some rendering with the Cycles Render as opposed to the Blender Render. The Cycles Render even requires you to add some more material to scenes to make them impressive.


The Compositor.

More advanced effects require you to use Blender's awesome tool known as the Compositor. By connecting nodes and editing more options, you are able to come up with many kinds of unique effects and settings. I personally have no knowledge or experience with the Compositor except for trying to introduce myself to it.


Force Fields.

Blender won't make a shield to protect you from disaster, but you can use certain force fields to enact certain real-world features, such as wind simulation and soft body physics. These can be powerful in delivering nearly movie-quality effects for animations.


There are so many other things Blender is capable of. I'll leave it up to you to discover what all Blender has to offer and what you can actually take advantage of to make your own amazing works with Blender.


--- My Blender Experience and Ambitions ---

I hope to use Blender to try to create models and animations. On an incremental basis, I am learning various techniques as to how to use Blender. I have actually had Blender for a few years. Unfortunately, I never created anything special with Blender in my time, and it has been only recently that I decided to learn how to use Blender to make all sorts of unique effects and such. I do not intend on being any sort of professional with Blender. However, I do want to create items and assets that I can use and utilize to make all sorts of material. I may even elect to offer my assets to others through a service like TurboSquid.

Learning various editing and modeling elements were made possible through lots of YouTube video watching and even using Blender's site for manuals. Little by little, my confidence grew until I felt as if I could possibly and easily make material in Blender. There is still a lot for me to learn. However, I feel I am learning just enough to where I feel the least bit comfortable in designing material for Blender. For me, this is just the traditional baby steps before walking or running, so to speak. Again- this is the most confident I've ever felt in trying to make 3D models as well as learning to make other sorts of effects.

If I do make interesting material for you all, you will see it either in videos, maybe on some other sites (like deviantArt), or here on "John's Creative Space."


--- Blender Resources ---

If you want to enhance your skills using Blender, I have compiled this list of sites and YouTube videos for which you can visit for help in creating your own masterpieces with Blender. Have a visit to these links. If you want to suggest to me and my readers/visitors any Blender resources, please contact me online, and I will be sure to give your site a visit to see if it can benefit my readers and visitors. This section may be updated further to include more material, so check for updates.


Blender Resources: Sites.

For more information on Blender, please visit www.blender.org. Now, look at these sites for more detailed material that may help you:

• Blender Cookie
• Blender Artists - an online community for Blender artists


Blender Resources: YouTube.

Here are some recommended YouTube channels that provide some great YouTube insight on Blender. Many of these are channels I've visited whose videos have helped me to better understand Blender:

• BornCG
• ianscott888
• VscorpianC
• Sci Fi Animator
• Andrew Price

WARNING: One important thing I want to note to you all... some of the tutorial videos offered by YouTube channels depend entirely on what version of Blender is being used. For example, a tutorial about how to make something in Blender could be with (for example) Blender 2.4x. If you have a version of Blender beyond the tutorial's version, you may need to consult other versions of Blender on how to make certain effects.


Other than that, these sites will help you get started in your Blender adventures.


I hope all of you can enjoy and use Blender to the fullest. Best of luck to you in creating any sort of masterpiece you put your mind and heart into. Model and create to your heart's content. Or if you're a gamer, use Blender to create that awesome game that people will enjoy. No matter what... use Blender and use it masterfully. Thank you for reading!

"Like" me on Facebook, Follow JCS, and/or Contact Me via E-Mail!
Subscribe to John's Blog Space (JBS) Subscribe to John's Creative Space (JCS) Subscribe to John's Race Space (JRS) Subscribe to StyleSpace (SS)
read more...

Wednesday, August 6, 2014

Creative Inspiration

John B. Marine | 11:53 PM | Be the first to comment!
Almost anything can inspire creative works. Life experiences, cultural events, even random thoughts can inspire wanting to create any kind of media. Where you draw your inspiration makes a big difference in creating anything from your mind and heart. Some of the most extravagant pieces of work can stem from very simple sources. You may just have drawn something on a piece of paper, and it may end up eventually making you an icon in any given field. You never know where inspiration can take you. If you enjoy any sort of creative works, you will likely find inspiration to create things based on your heart and your energy.

The most important part of any creative work is to have inspiration. Without inspiration, you have a hot mess of ideas with no coherence or flow. Everything I do- even my blog posts- all have some sort of inspiration or driving force to them. It runs my life and my actions. Inspiration is a huge part of creativity and creative works. Anyone truly into expression does so because he/she/they drew inspiration from any number of sources. For one to create any amazing piece of creative work, one must be inspired. So if you feel like designing something, it is because you know in your heart that you can make something special. All that remains is completing the package and coming up with something special to share with others.

Go ahead- dream. Gain inspiration. Put together your dreams and thoughts. Most importantly... work to create that creative work you so wanted to unleash! But before you can create that masterpiece, one must have inspiration and enough energy and creativity to make something special.


About the Label: "Advice and Commentary"

Besides sharing any creative works, I simply provide commentary to people like you. These posts simply are my own comments and thoughts about various things. I may even offer some advice to share with all of you. These posts are simply just me talking (not literally) with you.


Discussion time! When it comes to inspiration...

Of what importance is inspiration to you in coming up with creative works?

I know I haven't been updating this blog a whole lot, but this blog is anything but dead. Also note that I run other blogs as well. I actively try to create content for each one. I hope you support this blog and my others. Follow and Subscribe to keep up with the latest content from me. And remember- this blog is not dead. I just haven't come up with a lot of material to keep this blog active. I hope to change this any chance I get. Until next time, thank you for reading!

"Like" me on Facebook, Follow JCS, and/or Contact Me via E-Mail!
Subscribe to John's Blog Space (JBS) Subscribe to John's Creative Space (JCS) Subscribe to John's Race Space (JRS) Subscribe to StyleSpace (SS)
read more...

Saturday, June 28, 2014

Formula Prototype

John B. Marine | 10:24 PM | Be the first to comment!
Formula 1 and sportscar racing- two of the most sophisticated racing disciplines in all of motorsport. This unique idea I had conceptualized is the case of answering questions never asked. It also is a unique racing story of something realistic in racing. What would happen if you could combine both the intensity of Formula 1 and the grueling team-based survival games of sportscar racing with cars that combine elements of both forms of racing? You get the unique Formula Prototype! This blog post introduces you to a most unusual motorsports concept I had in mind.

NOTE: This initial blog post only contains storyline data. This post may be updated with art content to compliment the story. Check for updates.


--- Formula Prototype ---

This section contains a look into the main storyline and some of the different elements of the storyline.


Inspirations.

Here are some of my inspirations for this storyline and some of the items involved:

• Formula 1 racing
• sportscar racing
• the BAC Mono
• the DW12 IndyCar
• Red Bull X prototypes (like the Red Bull X cars in Gran Turismo 5 and Gran Turismo 6)


The Story/Background.

One day, there was a debate as to which is the better form of racing- Formula 1 or sportscar racing. Some proclaimed F1 was better with sophisticated technology and exceptional driving talent on some of the world's most challenging courses in lovely locales. Sportscar racing fans argued that sportscar racers are under greatly challenging conditions in long races. Sportscar racing fans even argued that sportscar racing even exemplifies the team aspect more than Formula 1 does. The debate among racing fans would persist in cyberspace for a good while.

Despite the intensity of this argument, the end result was that both forms of racing were amazing in their respective rights. That ended the online arguments for quite some time. This ultimate decision to this debate didn't sit too well with some people, however. So while some people felt F1 and sportscar racing needed to battle each other head-on to determine the better of the two categories of racing, a unique idea was once pitched- give both F1 fans and sportscar racing fans the best of both worlds! Offer the sophistication and drama of Formula 1 races with the pure performance and grueling intensity of sportscar racing. Provide the best of these worlds with racing machines that combined the best aspects of Formula 1 race cars along with the best aspects of sportscar racing prototypes. Build cars that combined both features while also merging the two forms of racing into a unique series. You could even say these can be like Formula 1 race cars with lights and bodywork similar to most modern open-top sportscar racing prototypes.

The marriage of both of these categories of motorsport would become a unique new series. It would be a racing series that will be its own World Championship of racing goodness featuring two of the toughest forms of racing. This series would come to be known as...

Formula Prototype!

Upon the announcement of this concept, some of the world's finest racing teams agreed to partake in this series by building race cars up to the specifications of Formula Prototype while also finding some of the finest racing drivers in the world to push these cars (and themselves) to the limit in becoming World Champion and even Constructors' Champion of Formula Prototype. World-renowned manufacturers, illustrious racing constructors, and even a handful of underdog and independent teams all put together money and resources to become champion of this series that merges F1 racing and sportscar racing.

Only those who wanted the challenge and drama of Formula 1 racing with the intensity and scary performance of sportscar racing need only apply. Race constructors were challenged to build race cars that combined the sophistication of Formula 1 with the intense performance and durability of sportscar racing prototypes. Races could last as long as an F1 Grand Prix and as long as some of the greatest sportscar racing endurances. Drivers have to endure for the length of a standard F1 Grand Prix while also having to make driver changes. Events take place around the world with a combination of typical F1 Grands Prix and usual sportscar racing endurances. Unlike in sportscar racing where there are prototypes and GT cars, Formula Prototype races feature ONLY the main Formula Prototype machines and no other racing machines on the track.

Who will win this Formula Prototype World Championship featuring these unique racing machines and drivers talented enough to pilot them? Only time will tell...


And that is the story of Formula Prototype.


--- Formula Prototype: Extra Commentary ---

As much as I would like to maybe make this about something completely futuristic, this concept is basically based on today's realm of Formula 1 and sportscar racing. I didn't come up with "Formula Prototype" on something futuristic, like F-Zero, Xtreme G, WipEout, Quantum Redshift, Fatal Inertia, or any other futuristic racing environment. Even the various venues are meant to be current. So nothing along the lines of multi-lane roads, stunt loops, anti-gravity roads, or anything like that are part of Formula Prototype. And also, NOTHING in the way of cars equipped with weapons or any sort of vehicular combat as part of Formula Prototype. This concept is only futuristic in the sense that elements of today's F1 racing and today's sportscar racing machines. To give you an idea, think of a modern F1 car with all of its sophistication with the technology and the performance and sophistication of some of today's sportscar racing machines like the Audi R18 e-Tron Quattro or the Toyota TS040 Hybrid. This was meant to be a conceptual, yet realistic form of racing. What would be surreal is if something like this actually comes across in our lifetime and that we're talking about real races here.

In case you're wondering, the head honcho and sanctioning body behind this Formula Prototype concept I put together are supposed to be a parody of Formula 1 supremo Bernie Ecclestone and a parody of the FIA (Federacion International d' Automobile).

That is my little story here.


Remember that I may edit this post or make extra posts to help further extend the storyline. So be sure to check for updates. Usually look for "UPDATED: (some date)" at the top of posts. Be sure to let me know what you think about what I put into my posts on here or in any of my other blogs. Until next time, thank you for reading!

"Like" me on Facebook, Follow JCS, and/or Contact Me via E-Mail!
Subscribe to John's Blog Space (JBS) Subscribe to John's Creative Space (JCS) Subscribe to John's Race Space (JRS) Subscribe to StyleSpace (SS)
read more...

Tuesday, June 10, 2014

My Minecraft Pictures

John B. Marine | 1:01 AM | | Be the first to comment!
Minecraft allows for creation of worlds and art or an intense game of survival. No matter what, Minecraft is one of the finest games today. Most of my Minecraft experience is through Creative play. That means you can take the world, reshape it any way you like, and make almost anything your heart desires. I want to share some of my own creations as I have mostly been playing around with the PC version of Minecraft recently. Here, you will get a chance to see some of my creations and how I am shaping the Minecraft world to my own.

BEFORE I BEGIN...

This post, like many of my others, may be updated regularly to reflect new changes. The pictures showcased here may be old and represent certain past versions of Minecraft. Some of the pictures were taken as I was developing my Minecraft worlds. Most of the featured locales represent differing levels of development of my Minecraft worlds. For example, there may be more buildings and features now in the worlds I've worked on now compared to what I created at the time of the featured pictures. Keep these things in mind as you view these pictures of mine.


--- My Minecraft Pictures ---

The creations you will see in my blog post here originate from my Minecraft photo album on Facebook. If you want to view my entire Minecraft album, links to my album will be provided within the captions of each picture. In fact, visit this link now to see my entire album:

my Minecraft album on Facebook


A Brief Look at my Minecraft Creations.

When I set out to modify my Minecraft worlds, I do so in the spirit of making RPG-type worlds with various cities and other structures. I mostly believe in modern-type cities while also mixing in some medieval style structures. Kind of think of my world creation more like the Final Fantasy series. What you will see in my blog post here is some of my many different creations through four different versions of Minecraft.


City Philosophy: General.

Because I am such a city person, I enjoy the allure of building cities within Minecraft. Certain points of my Minecraft worlds feature cities. These are locations I set up so that the traveling Minecraft player can find places to rest at and visit outside of the mean world Minecraft can be.
There are three variations of cities in my Minecraft world creations. They consist of:

• Villages - Villages are small and do not have inns to sleep at. You may, however, be fortunate enough to find someone's house or some other structure that may have a bed for you to sleep in.

• Towns - Towns cover more ground and have inns to them. A lot of the buildings aren't usually tall enough or large enough. These are still major locations for the traveling Minecrafter. Some towns may even have watchtowers where one can take a look at the city from atop and even look out elsewhere outside of the town. Some towns may be protected by Iron Golems.

• Cities - Cities cover the most ground and feature some of the biggest buildings and some of the tallest towers. The cities have either an inn and/or a hotel to sleep in. Most cities are noted for unique towers that define the city's skyline. A combination of small buildings and tall buildings populate cities. Since these are major cities, they have some of the fanciest things- including Iron Golems keeping the cities safe at night.

In addition to these cities, I've even created some abandoned cities before. I made abandoned cities that are either destroyed or very quiet.


City Philosophy: Structures.

• To breathe life into each city, the different cities all feature NPC Villagers. You can communicate with the Villagers to acquire items through trading.

• All or most cities have their boundaries defined by fences scattered across each city.

• I initially designed hotels to mostly have a lot of beds. However, I decided to restrict inns and hotels to having up to four beds. In addition to beds, inns and hotels also offer Crafting Tables and Furnaces for crafting on the go. Think of this more like my version of hotels offering free Wi-Fi. :)

• Some cities may have shrines or churches to them. A shrine is mostly basic as a place of worship and knowledge and usually are located either within a city or near any city. A church houses many more people and are a bit fancier in their design.

• Cities may have libraries to them. While you can't check out books or anything, they are certainly there as one of many different facilities as part of a city. Some cities and locations may have rooms or buildings that only have so few books... but may include an Enchanting Table. This is a chance for you to enchant your items.

• You may come across a Brewing place in some cities. These facilities allow you to craft various potions. Each Brewing building has a Brewing Station as well as cauldrons filled with water.

• Some cities may have buildings or rooms with an anvil. These anvils can be used to repair or modify enchanted items.

• Most cities have fields and fenced properties featuring both farmland and even passive mob animals. For the safety of the animals, the fenced sections have torches around them.


I hope you get to enjoy my work. Go to the next section to see my pictures and to get my commentary.


--- My Minecraft Pictures: A Photo Journal ---

Allow me to share with you some of my Minecraft experiences through pictures.

Minecraft Classic.

This was my first Minecraft image of any kind:

Minecraft Classic
^ from: (my Minecraft album on Facebook) - The first structure I've ever designed in any session of Minecraft.

The sad story about my Minecraft experience is that I have been unable for the longest to play Minecraft on my PC. So my first experiences had to come from Minecraft Classic. This is a browser-based version of Minecraft that I got to experience a long time ago. I had to change a number of settings to get Minecraft Classic to run smoothly on my PC.


Minecraft Pocket Edition.

When my PC was still unable to play PC Minecraft, I ended up getting Minecraft for my Android devices. Minecraft Pocket Edition is available for both iOS and Android devices. It has most of what PC Minecraft offers. However, PC Minecraft is much more deeper and detailed than MCPE. I still had my fine share of fun with MCPE. Unfortunately, this is the only picture I can provide of my MCPE experience, and this picture wasn't even taken with my Android device:

Minecraft Pocket Edition world layout
^ from: (my Minecraft album on Facebook) - This chunk map shows a general layout of my Minecraft world I created in Minecraft Pocket Edition.


Minecraft Console Version.

It used to be that the console version of Minecraft was exclusively for the Microsoft XBOX 360. 4J Studios is the studio behind taking Minecraft's incredible appeal from the PC version to a console-friendly version. It took a while, but Minecraft finally found its way to the Sony PlayStation 3 after hearing so long that it would eventually make it onto the PS3. I finally bought the Minecraft PS3 version when I had the funds to get the full version. I was not disappointed. As of this blog post, it was long reported that Minecraft will also be available for the Microsoft XBOX One and the Sony PlayStation 4. This is where I have had the most Minecraft experience. Through my time, I reshaped my Minecraft world (called "Adelphi") and tried to populate as much of that world as possible. What you will see in this part of this blog post is my Minecraft PS3 experience in pictures.

The version here is the PlayStation 3 version.


Minecraft Console Forest Temple
^ from: (my Minecraft album on Facebook) - This is the Forest Temple in my Minecraft world. As part of this world's storyline, it is the first temple the main character must visit.

Minecraft Console Empira Day
^ from: (my Minecraft album on Facebook) - The City of Empira is one of the major cities in my PS3 Minecraft world. Part of its inspiration comes from New York City, which is an obvious inspiration considering the name "Empira."

Minecraft Console Empira Hotel
^ from: (my Minecraft album on Facebook) - This is the hotel in Empira. What makes this place different from most other hotels I created is that this one has a ladder going up to rooms as opposed to a flight of stairs. To be more efficient in designing buildings that can actually be explored, I started to adopt making buildings with ladders to go up as opposed to stairs.

Minecraft Console Home Village Church
^ from: (my Minecraft album on Facebook) - The church in Home Village is here.

Minecraft Console Observation Tower
^ from: (my Minecraft album on Facebook) - Created at the geographic center of my Minecraft world, this Observation Tower was created. The actual midpoint of this tower is marked with a Glowstone block when you enter this tower. From the top of this tower, you can look out at the rest of the world.

Minecraft Console Desert Town
^ from: (my Minecraft album on Facebook) - This is a town built in a desert setting.

Minecraft Console Bayside
^ from: (my Minecraft album on Facebook) - This is the City of Bayside. My inspiration for this city was San Francisco, but it also has some inspiration of Kuala Lumpur with the twin towers in the backdrop. Bayside consists of two sides- West and East. The majority of this picture showcases East Bayside.

Minecraft Console Bayside Towers
^ from: (my Minecraft album on Facebook) - These are the Bayside Towers. Initially, I thought of a design similar to the Umeda Sky Garden in Osaka, Japan. Instead, I modeled these somewhat after the Petronas Towers in Kuala Lumpur, Malaysia.

Minecraft Console Nether Tower
^ from: (my Minecraft album on Facebook) - In the mountainous northern reaches of my Minecraft world, this Nether Tower exists. Inside this tower is a portal that takes you to The Nether.

Minecraft Console Water Shrine
^ from: (my Minecraft album on Facebook) - On its own island and covered in moss and sugar canes, this is the Water Shrine. The story of the Water Shrine is that while various cataclysms impacted the world during the earliest times of humanity, it was faith that kept this shrine from being destroyed. This shrine remains standing and is sturdy despite being decayed and smelling bad.

Minecraft Console Jungle Town
^ from: (my Minecraft album on Facebook) - This town is based around a jungle. It is a great distance away from the City of Empira.


Minecraft PC.

Even though I bought a gift card to play Minecraft PC back in June 2013, I was NEVER able to play Minecraft PC on my old computer. It wasn't until I bought a new computer to where I finally got to play what I've been trying to play for almost a full year. When I finally got to play PC Minecraft, I delved right in and tried to give myself experience. I started to explore my continually expanding world as I tried to explore the vast reaches of my Minecraft world. In the process, the world just got bigger and bigger. I tried populating my world with many different structures and cities. This section marks some of the many different experiences (all Creative) in my Minecraft experience. What experiences do I have to share with you all? Take a look at these pictures I've posted:

Minecraft PC Town of Kessington
^ from: (my Minecraft album on Facebook) - This is the Town of Kessington. It is the closest city to the spawn point of my Minecraft world. It is also the first city I've created in my Creative Minecraft PC world.

Minecraft PC Saffiyah Tower
^ from: (my Minecraft album on Facebook) - This tower is Saffiyah Tower. It is a tower built atop a stone mountain and serves as a place of worship. It previously had a Beacon atop it to mark its location.

Minecraft PC Iron Golem
^ from: (my Minecraft album on Facebook) - This is an Iron Golem going around the Town of Kessington. These Iron Golems are most useful at night as they help defend NPC Villages from zombie sieges.

Minecraft PC iron golem flower
^ from: (my Minecraft album on Facebook) - Iron Golems can be gentlemen, evidence shown here as this Iron Golem offers a poppy. I read the inspiration for Iron Golems offering poppies stems from the anime movie "Laputa Castle in the Sky."

Minecraft PC flower forest
^ from: (my Minecraft album on Facebook) - Flower Forest biomes in Minecraft can be absolutely beautiful. Many different flowers ranging from tulips to peonies to rose bushes dot certain Flower Forests.

- Town of Aquila
Minecraft PC Town of Aquila
^ from: (my Minecraft album on Facebook) - This is the Town of Aquila. It is a town built in a Flower Forest. The walled structure with the Emerald blocks was initially designed to be a cemetary. Instead, it is an indoor park called Enlightenment Park.

Minecraft PC busy streets
^ from: (my Minecraft album on Facebook) - NPC Villagers fill up the streets of one of my world's major cities.

Minecraft PC Flower Temple
^ from: (my Minecraft album on Facebook) - This is the Flower Temple in my Minecraft world. This temple was designed to maintain beauty and harmony and is situated midway between the Town of Kessington and the Town of Aquila. It is actually closer to Aquila than Kessington.

Minecraft PC Nether
^ from: (my Minecraft album on Facebook) - This picture shares my first Minecraft PC visit to The Nether.

Minecraft PC Village of Mica
^ from: (my Minecraft album on Facebook) - The Village of Mica was created in an open plains space surrounded by a Roofed Forest.

Minecraft PC City of Ednita
^ from: (my Minecraft album on Facebook) - This is the city of Ednita- a city that surrounds a circular beachfront. This is the view from the Coastal Shrine of my Minecraft world.

Minecraft PC NYC City
^ from: (my Minecraft album on Facebook) - New York City was the inspiration for this city in my Minecraft world. It is the only city I've created that has both Cobblestone roads and stone brick sidewalks. Sadly, I haven't named this city anything, and I don't want to use "Empira" for it even though it would be appropriate for this city.

Minecraft PC Rhodes Tower
^ from: (my Minecraft album on Facebook) - This is Rhodes Tower in my NYC-inspired city. It is the tallest building in the city and one of few towers I've created in any Minecraft that is 15 stories or more in height.

Minecraft PC Town of Chasity View
^ from: (my Minecraft album on Facebook) - The suburban Town of Chasity provides this view of my NYC-inspired city.

Minecraft PC Town of Trenita
^ from: (my Minecraft album on Facebook) - When I found Swampland in my Minecraft world, I went ahead and built this town. This is the Town of Trenita- a swampland town. All the buildings were constructed from jungle wood. Empira from my PS3 Minecraft world was built in a biome sort of like swampland. So Trenita is similarly built on swampland, only Trenita is not a major city.

Minecraft PC Town of Trenita Overhead
^ from: (my Minecraft album on Facebook) - This is an overhead view of Trenita. The building with the Diamond blocks on its roof is the Swamp Shrine.


And that concludes my blog post.


What do you think about my pictures? If you want to learn more about Minecraft, visit the offical homepage of Minecraft by going to www.minecraft.net. For more pictures of my Minecraft experiences that I couldn't show you here in this blog post, visit my Minecraft album on Facebook.


Just because I haven't made this blog more active doesn't mean I've necessarily disregarded it. I just haven't made too much content to keep it going. I still want this blog to be something special. Make sure you're Subscribed and Followed to this blog to keep up with all of my content. I thank all of you for helping contribute to this blog's success. Or at least... contributing to the potential for this blog to be successful. Thank you for reading!

"Like" me on Facebook, Follow JCS, and/or Contact Me via E-Mail!
Subscribe to John's Blog Space (JBS) Subscribe to John's Creative Space (JCS) Subscribe to John's Race Space (JRS) Subscribe to StyleSpace (SS)
read more...
JohnMarineDesigns on TurboSquid

Would you like to donate to support my creative work? If so, please show your support using this PayPal item:
I am now on Patreon! Support my creative work on Patreon today at: www.patreon.com/johnbmarine!
 
Copyright © 2015 John's Creative Space • All Rights Reserved.
Template Design by BTDesigner • Powered by Blogger