Tuesday, October 11, 2022

Air Fryer Grilled Cheese Sandwich

John B. Marine | 9:47 PM | | Be the first to comment!
A grilled cheese sandwich is nothing food-wise. However, it isn't a bad meal to start off with in using your air fryer. It is just two pieces of toasted bread with a slice of cheese in the middle. To introduce my first food-themed blog post to "John's Creative Space," I will share how to make a grilled cheese sandwich from the air fryer. Hopefully my blog post will give you a little interest in using an air fryer. Let's get it!


Air Fryer Grilled Cheese Sandwich


Let me offer up a grilled cheese image for you to set the mood...
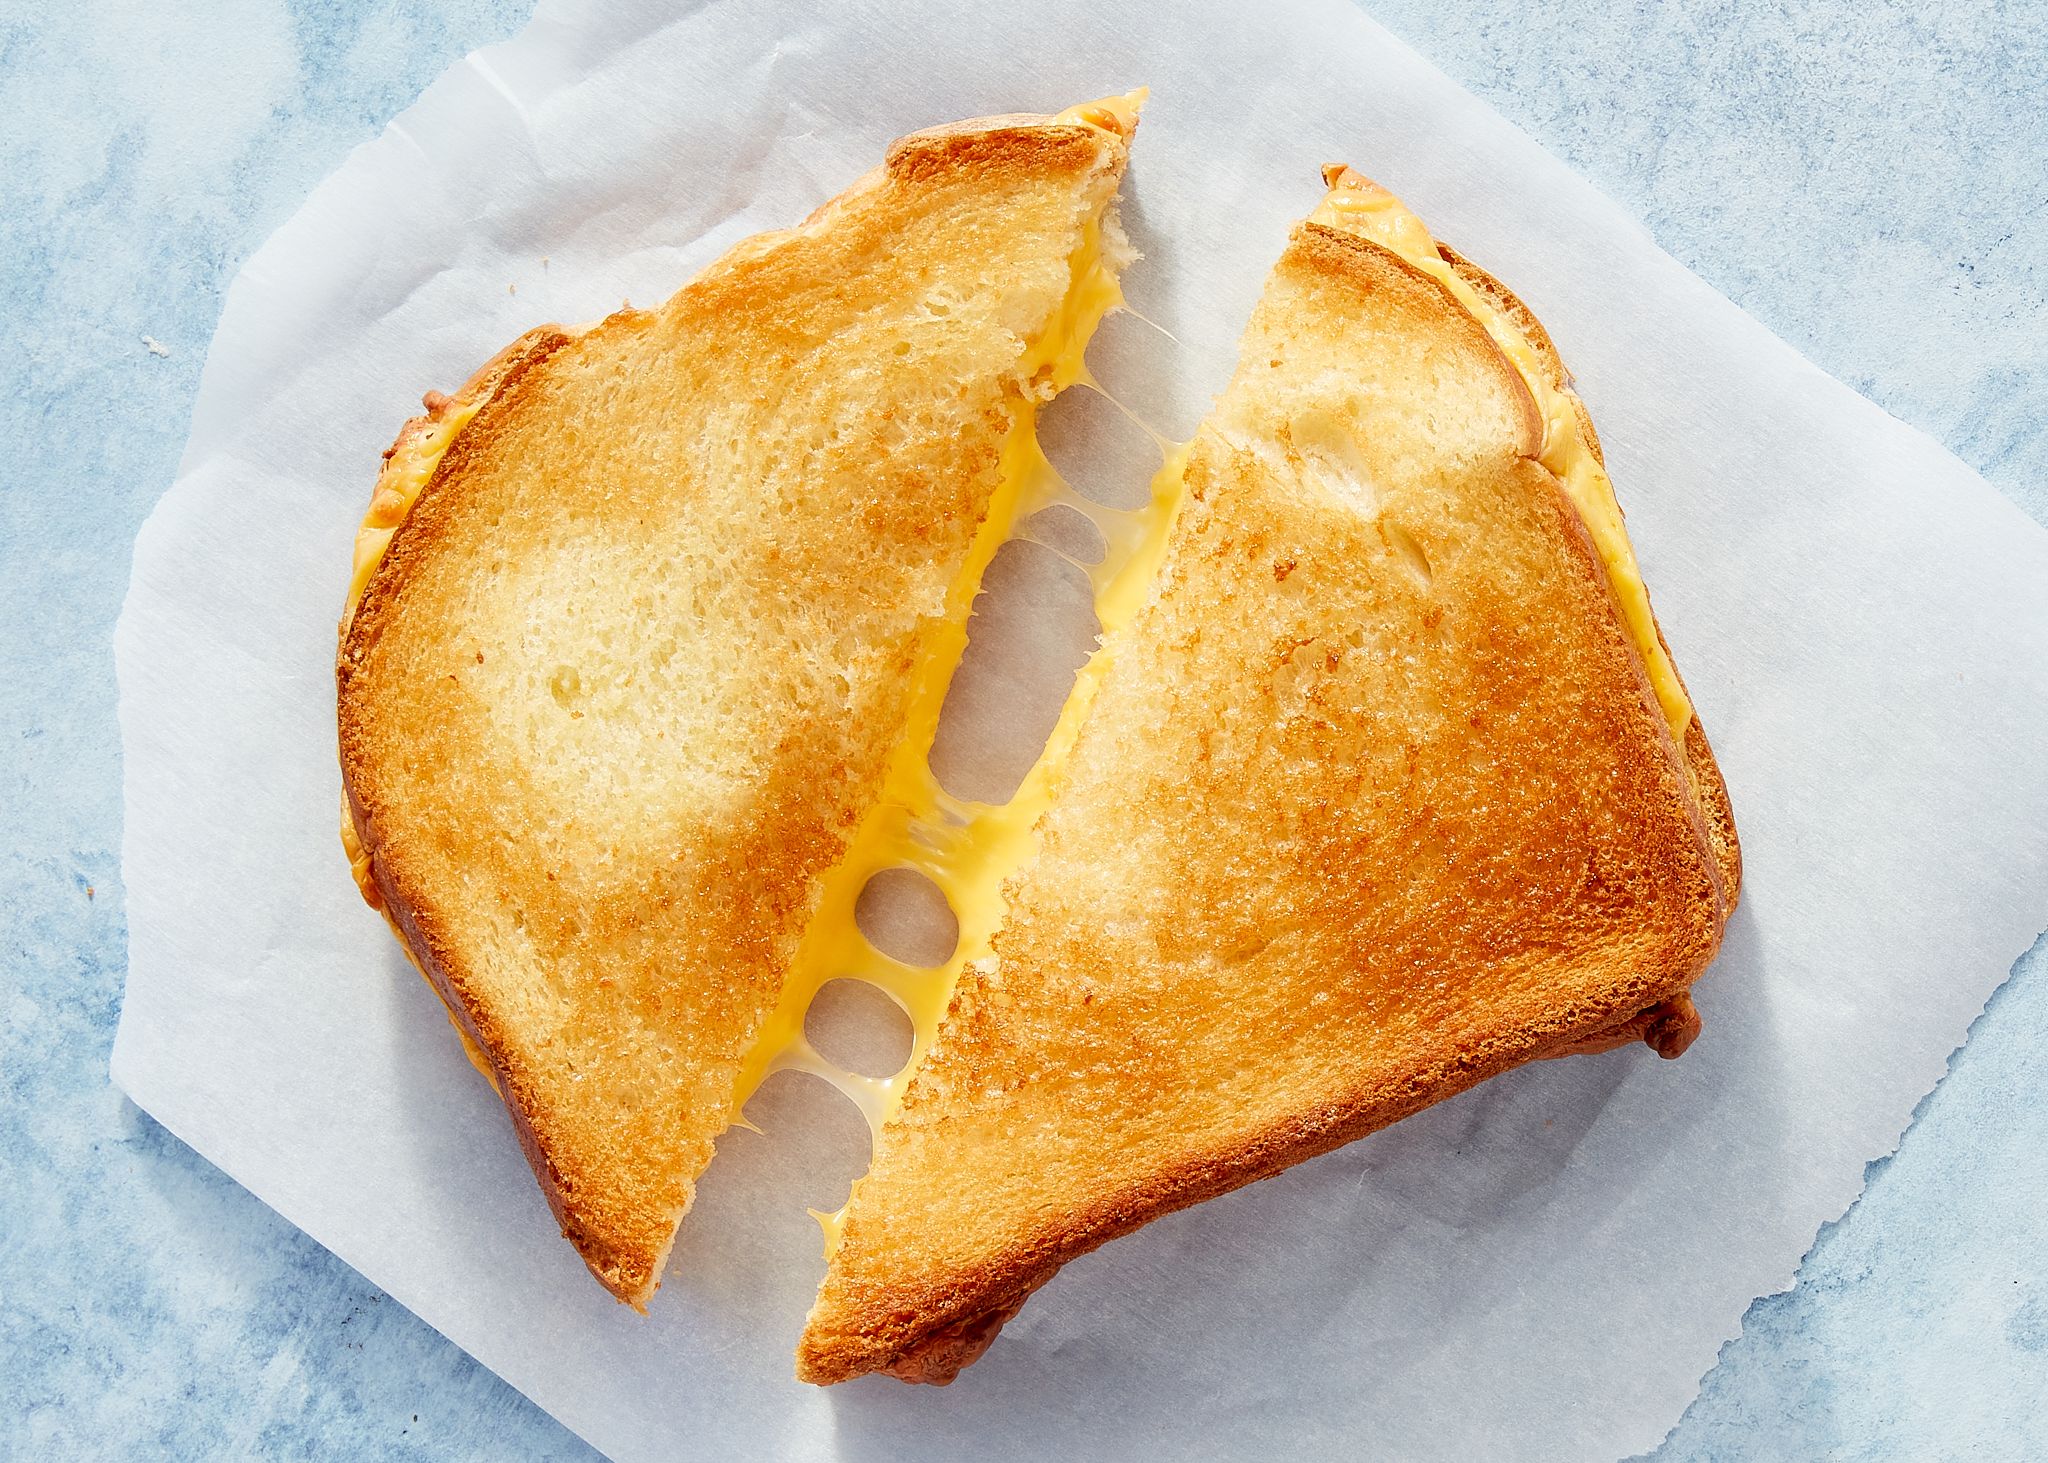
air fryer grilled cheese
^ from: delish.com - A grilled cheese is simple but is very tasty.

If you are fairly new to using an air fryer, it is best to start slow. So my first food/drink/cooking post on "John's Creative Space" involves a grilled cheese sandwich. I need to give you some back story before I share the cooking instructions.

I actually started to make a grilled cheese sandwich in a toaster oven before I tried making one in an air fryer. I followed instructions to an online video and applied them to the air fryer. I made two grilled cheese sandwiches in the toaster oven; one of them had bits of cocktail shrimp I chopped up. When I flipped over the sandwich that had the chopped cocktail shrimp, I had trouble flipping it over, and it came out wilted. It was still tasty.

I had used my PowerXL Air Fryer to make another grilled cheese sandwich. What I loved about the air fryer was that I could open the air fryer basket while it was cooking, and the air fryer would stop until I put the basket back into the air fryer. I also had to learn how to flip over the cooked food for meals that require flipping over or shaking the contents of the air fryer. One thing I learned about the air fryer is that it doesn't take long to toast bread. So some air fryer meals involving bread can be completed sooner than you think. As I became more experienced with the air fryer, I began being more fond of air frying food instead of microwaving them.

Now that you have some back story, let me get to the main point of this blog post. I am going to explain the main method followed by an improvised method.


Air Fryer Grilled Cheese Sandwich - Plain.

When making a grilled cheese sandwich from the air fryer, the key is to try to get the bread nicely toasted. A good way to add some flavor to the bread is to either spread mayonnaise on the bread or butter on the bread. I used butter in my cooking. Follow my lead.

INGREDIENTS NEEDED:
  • • two pieces of bread
  • • butter or mayonnaise
  • • a slice of cheese (your choice of flavor)
  • • (OPTIONAL) either aluminum foil or air liner paper - to make cleanup easy
  • • (RECOMMENDED) a spatula for flipping


INSTRUCTIONS:
1.) It is recommended to put in aluminum foil or air fryer liner paper for easier cleanup. So put in aluminum foil or air fryer liner paper in the inside of the air fryer basket. A lot of people suggest you pre-heat the air fryer. This recipe does NOT involve pre-heating the air fryer.

2.) The first part of this can be a bit sloppy as you prepare the bread to be toasted in the air fryer. Spread mayonnaise or butter on both sides of the bread- the bottom side and the top side. You are going to do this for both slices of bread. Place the bottom side of the bread into the air fryer basket.

2.) On the bottom bread slice in the air fryer basket, place a slice of cheese on top of it. Again- it is your call as to what flavor cheese slice you use. I used American cheese for mine.

3.) Place the top bread slice on top of the bottom side in the air fryer.

4.) Bread toasts fairly quick in an air fryer. Depending on your air fryer, your cooking times may be different from mine. This was one of my very first air frying attempts, so I went with a high temperature to cook at. I cooked my grilled cheese sandwich at 400°F for eight minutes, flipping halfway. At the halfway mark, open the air fryer basket. The air fryer will stop until you put it back in. While it is out, flip over the grilled cheese sandwich with a spatula. Once you flip it over, put the air fryer basket back into the air fryer to finish cooking. Be careful not to wilt the sandwich or make a mess trying to flip over the sandwich.

5.) Once the air fryer is done cooking the grilled cheese sandwich, lift it out of the air fryer basket using a spatula. Place it onto a plate or a paper plate and enjoy!


You can cut the sandwich in half with a knife or break it down the middle with your hands. You can sense the cheese strings if you pull the sandwich apart. The sandwich will be a cheesy delight for you to eat.


Air Fryer Grilled Cheese Sandwich - Tuned: Grilled Cheese Shrimp Sandwich.

Now let's improvise the grilled cheese sandwich recipe. You are applying the same method to making a grilled cheese sandwich, but you are also adding pieces of chopped meat to make it a more interesting grilled cheese sandwich. My first air fryer grilled cheese sandwich had pieces of chopped cocktail shrimp to it. You may also add something like chopped grilled chicken or maybe some small pieces of beef. However, to keep things simple, I will add cocktail shrimp to the recipe. I am adding this recipe to prove you can get creative with your meals. So enjoy this one!

INGREDIENTS NEEDED:
  • • two pieces of bread
  • • butter or mayonnaise
  • • a slice of cheese (your choice of flavor)
  • • cooked cocktail shrimp, preferably from a cocktail shrimp ring bought from a grocery store
  • • (OPTIONAL) your choice of seasoning for the cocktail shrimp
  • • (OPTIONAL) either aluminum foil or air liner paper - to make cleanup easy
  • • (RECOMMENDED) a spatula for flipping


INSTRUCTIONS:
1.) It is recommended to put in aluminum foil or air fryer liner paper for easier cleanup. So put in aluminum foil or air fryer liner paper in the inside of the air fryer basket. A lot of people suggest you pre-heat the air fryer. This recipe does NOT involve pre-heating the air fryer. Since this recipe involves cooked cocktail shrimp, it is best you refrigerate your cocktail shrimp and not freeze it. If the cocktail shrimp you are using is frozen, you will need to thaw it.

2.) The first part of this can be a bit sloppy as you prepare the bread to be toasted in the air fryer. Spread mayonnaise or butter on both sides of the bread- the bottom side and the top side. You are going to do this for both slices of bread. Place the bottom side of the bread into the air fryer basket.

3.) On the bottom bread slice in the air fryer basket, place a slice of cheese on top of it. Again- it is your call as to what flavor cheese slice you use. I used American cheese for mine.

4.) Take out some pieces of the cooked cocktail shrimp (I used four) and remove the tails of the cocktail shrimp. Then proceed to chop up the cocktail shrimp into pieces. Spread the chopped pieces of the cocktail shrimp on top of the cheese. If you want to season the shrimp, now is the time to do it. You can use any sort of seasoning you choose. Among seasoning options- salt, black pepper, lemon pepper, garlic powder, paprika, or whatever seasoning you prefer if you want to season the shrimp.

5.) Place the top bread slice on top of the bottom side and the shrimp in the air fryer.

6.) Bread toasts fairly quick in an air fryer. Depending on your air fryer, your cooking times may be different from mine. This was one of my very first air frying attempts, so I went with a high temperature to cook at. I cooked my grilled cheese sandwich at 400°F for eight minutes, flipping halfway. At the halfway mark, open the air fryer basket. The air fryer will stop until you put it back in. While it is out, flip over the grilled cheese sandwich with a spatula. Once you flip it over, put the air fryer basket back into the air fryer to finish cooking. Be careful not to wilt the sandwich or make a mess trying to flip over the sandwich.

7.) Once the air fryer is done cooking the grilled cheese sandwich, lift it out of the air fryer basket using a spatula. Place it onto a plate or a paper plate and enjoy!


Remember that this sandwich is the same as with the previous one but with cocktail shrimp. What you will get is not only the taste of the grilled cheese sandwich, but you also will be tasting shrimp with a cheese taste (and any seasoning you may have applied). Using store-bought material may seem cheap, but this is a simple way to level up a basic grilled cheese sandwich. This was meant to be a basic meal to prepare with a few advanced parts.


Other Considerations/Advanced Techniques.

If you become more advanced using the air fryer, you can try putting in something like grilled chicken pieces, beef crumbles, bacon bits, or anything like that to add to the grilled cheese sandwich instead of cooked cocktail shrimp. You may also want to try adding mixed vegetables if you are inclined. You be the cook- customize to your heart's delight!


This is my first cooking post on "John's Creative Space." I will learn from this and try to come up with more complete and comprehensive posts in the future when I discuss food recipes. I will end this post for now. If you enjoy my work, please Subscribe/Follow my blog(s) in any capacity if you love my work and want to support me any way you can. Share my blog post(s) with others if you enjoy my work. Thank you for reading! Take care and be well.

Visit my JohnMarineDesigns Weebly site, subscribe to My Blog(s), and/or Follow on Bloglovin! Let's connect:
Contact Me via E-Mail Contact Me via Discord Donate to Me (voluntary)
Visit and Subscribe to My Blogs...
Subscribe to John's Blog Space (JBS) Subscribe to John's Creative Space (JCS) Subscribe to John's Race Space (JRS) Subscribe to StyleSpace (SS) Subscribe to John's Life Space (JLS)
Get Social With Me!
Facebook (Friends) Facebook (Fans) Twitter YouTube
Pinterest LinkedIn (professionals only) TikTok Discord
Support My Creative Works!
JMDesigns JMDesigns on Payhip John on Envato
Patreon Soundcloud Bandcamp
Twitch OpenGameArt TurboSquid
read more...

Monday, June 13, 2022

New Life to Old Track Concepts

John B. Marine | 4:49 PM | | | Be the first to comment!
It was always a creative dream of mine to develop race tracks for games. While nothing has truly materialized into in-game works, I recently have taken hold of past projects for non-racing games. It was not possible for me to take levels from older games and give them modern 3D life. So therefore, I had to take my old concepts and then refine them. As someone who is into simulation-type racing games, I wanted to get into the style of thinking realistically about my older race track designs. This blog post will not announce any future plans or upcoming designs to share. It will, though, give you some early insight as to what I am working on as well as why now I am thinking of releasing some of my designs. So feel free to take a look at what I have to discuss here on "John's Creative Space!"


New Life to Old Track Concepts


I have been using Blender to try to 3D model. Let me explain something about past courses I made that I want to revive and bring to a modern world.


The Backstory of my Older Courses.

A number of older race courses I designed for games were mostly for a non-racing game. What game am I discussing here? Duke Nukem 3D. Since circa 1999, as I was learning more and more about motorsports, I wanted to take a concept of racing into my work. I would mostly set up bot multiplayer matches in Duke Nukem 3D (called DukeMatches). The only "racing" was that it was me going around the tracks defeating as many of the bots as possible. There were also competitions to try to score the most points during the course of a race. Races were limited to score counts or time. There were also pit stops for which to try to avoid being defeated. Since I was the only intelligent being against bots, I utilized pit stops to stay in the race.


Time is of the Essence.

On the basis of time, I have always been a fan of GT/Sportscar/Endurance racing. So I looked into a way to implement a sort of system to where time would change every so often. What I ended up coming up with is an animated sky that simulates time changes. To set the time distance apart, I had to make the time between frames rather long. I made two sets of animated skies- clear and cloudy. I also developed one set of skies for a 24-hour setting and then an "all-night" setting, which lasts from early evening of Day 1 to sunrise of Day 2. The cloudy sky animations were meant to simulate endurances either for cloudy days or for rainy (and even snowy) days. Because the animations would be a bit tough to follow, I set up timing gauges to let me know how much time is left in one phase of the day before going to the next.


Believable Race Tracks.

I was not very good at designing believable tracks, so a lot of my 3D modeling in Duke Nukem 3D was fairly basic. I did not utilize proper-looking curves in 3D modeling. A lot of the corners were mostly fake true curves. I had a lot of sharp corners also. The reason why tracks seemed so long was because I wanted the tracks to remain deathmatch-style courses. So to try to get away, blocking bits were used in trying to prevent the player to go out of bounds or to try to evade attackers.


Why NOW Trying to Update Past Concepts?

I felt a lot of my past race tracks designs deserve to be used for more modern applications and games. Also, I have had a tough time trying to play Duke Nukem 3D, my all-time favorite game, on a modern Windows 10 system. Rather than let old memories rot and die, I felt it was time to make my old concepts come alive in more modern forms. I also needed some practice to improve my 3D modeling skills.


I feel this is an opportunity to work closer towards one of my many different creative goals. It is just sad it has taken THIS long to realize this goal.


The Challenges Ahead


I now will share some of the things I am learning and hope to accomplish in providing these old concept tracks from Duke Nukem 3D. Please note that I am using a combination of Blender 3D, Unity3D's Skycar, and Edy's Vehicle Physics Pro (Community Edition).


The 3D Modeling.

All courses start with just the main road or roads. So when they are tested on, the challenge is to try to keep the car on the road and not fall forever if I drive off the main road. I am therefore careful driving my courses because of this situation.


The Realism Factor.

Many of the courses I created had a bunch of elements playfully added in. These even included a bunch of foolish-looking models and effects in levels. Essentially- eye candy. Because I have simulation racing games in mind, I have to think about how to make certain past ideas flow better in a proper sim racing game. It required me even to modify configurations to make them more believable. For one thing, some of my past courses had incredibly unrealistic elevation changes that would not even be completely possible in even the most decent simulation racing games.

One thing I want you to realize is that this not exactly a legacy project, but rather modernizing old concepts while not veering too far off course from previous styles. I had to lengthen old courses as well as add extra sections for multiple layouts. This was to provide much more usability and offer a handful more options for any player.

Another thing I was thinking about was trying to make tracks of a realistic scale. When I learned of unit scale in Blender, it opened my eyes to making my small-scale designs more realistic. What I did was put my measurements in Metric and used Meters. I found that using a unit scale of about 100.000000 was enough to make the roads wide enough and the overall map not feel so small without needing to scale up or down.

While this was great, I was still unsure as to how to properly measure my courses. One method I took was to make edge loops around sectors of my tracks. I would measure the distance from the start of one sector to the end of that sector. There are three sectors to courses I design. I would later take the sum of each distance and add them together to learn how long the courses are. However, most of the results I got seemed unrealistic. I felt my courses would have to be much longer than some of the unrealistic scale numbers I got. Basically, I felt like tracks long enough to host FIA Formula 1 or World Endurance Championship races were about as long as go-kart tracks from my measurements. For the most part, the tracks had the proper width and length of what I want to accomplish.

Though not a critical factor, I also found it important to try to set up each course in terms of the time of day. This was great in trying to make realistic conditions. However, it made some environments tough to drive in, especially courses meant to be done at night or with not as much sunlight. The VPP cars also had very weak lighting systems. You basically need to make your own spot lights on the car to illuminate the way. Either that, or add lighting around your course.


The Driving Aspect.

I needed a decent way to test my designs, so what I did was use the Vehicle Physics Pro asset for Unity. The provided asset for Unity for racing and driving is good for prototyping, but I needed a realistic solution for my simulation-type racing tracks. So I was fortunate enough to pick up the Vehicle Physics Pro asset (the Community/Free one).

Because I am using on-road racing, I am not using a model for off-road racing. The VPP asset from Edy features a sports coupe for on-road racing/driving and a pickup track tuned for off-road racing/driving. The default settings for the sport coupe are more than enough for performance driving, though the car seems pretty slow often times. The sport coupe's default settings max out the torque at about 220 Nm of torque (or about 162.32 lb. feet of torque). Granted this Unity asset doesn't drive like Gran Turismo, it is still a great way to get an idea of my courses in a simulation driving environment.


The Racing Aspect.

To test the tracks of mine in a performance environment, I set the car close to the Start/Finish line and then set up a stopwatch. I used a Clock application on one of my old smartphones to time one lap around the course. If my car flown off the track and falls forever, the run ends. I've done that multiple times. Sometimes, I had to re-do my sessions because the stopwatch function would not stop when I requested it to. I only tested in the normal direction of tracks.

Here is a progression in the tests I run:

• Hotlap - from a standing start, complete one lap around the course. These one-lap tests take place on each offered layout of each course.

• Two-Lap Sessions - from a standing start, complete two laps around a course. There are different two-lap tests for different variations of a track.

• Three-Lap Challenge - from a standing start, complete three laps around a course. A three-lap test is the default for a lot of races, so this is a test of a course in a basic sprint race.


One thing to keep in mind is that there are no AI drivers to contend against in these sessions. The purpose is to get a realistic driving sample for each course. With more experience and confidence, I may also pull longer tests- such as five-lap tests ("Grand Prix") and ten-lap tests ("Endurance").


A look at what you can expect is coming up, so visit the next section.


What You Can Expect Here


Any created track of mine that I complete will be made available across a number of 3D modeling stores online. I possibly will allow for my creations to be used in commercial racing/driving games, but reselling or selling modified versions of my courses will be disallowed or may require permission. This is a chance to finally share some of my most personal works with the world and make them available to the masses.


In Case You're Wondering...

If you are wondering about the vehicle controller I am using for my racing/driving tracks, I am using Edy's Vechicle Physics Pro (Community Edition), which you can find here: Vehicle Physics Pro - Community Edition | Physics | Unity Asset Store.


Again- I have nothing at present to share, but I will highlight more of my works in the future. So be sure to stay with "John's Creative Space" for more details. Thanks for visiting! If you enjoy my work, please Subscribe/Follow my blog(s) in any capacity if you love my work and want to support me any way you can. Share my blog post(s) with others if you enjoy my work. Thank you for reading! Take care and be well.

Visit my official website at johnbmarine.com, subscribe to My Blog(s), and/or Follow on Bloglovin!
Subscribe to John's Blog Space (JBS) Subscribe to John's Creative Space (JCS) Subscribe to John's Race Space (JRS) Subscribe to StyleSpace (SS) Subscribe to John's Life Space (JLS)
Support My Creative Works!
JMDesigns Patreon Soundcloud Bandcamp Twitch OpenGameArt TurboSquid
Get Social With Me!
Facebook (Friends) Facebook (Fans) Twitter YouTube Pinterest LinkedIn (professionals only) TikTok
Questions or Comments? Contact Me (serious inquiries only)...
Contact Me via E-Mail
read more...

Wednesday, January 5, 2022

Food on John's Creative Space

John B. Marine | 3:41 PM | | Be the first to comment!
"John's Creative Space" now has a new creative outlet- food! I had a long thought process on where to share my latest interests in being a cook. I have decided to breathe some extra life into JCS by discussing food I have prepared. So in the future, you will seeing me discuss meals I have prepared and how I prepared them. I feel this will be an opportunity to talk about food as another outlet of my creative energy.

When I do prepare posts regarding food, I must stress to you that I am NOT an experienced cook. I basically just started becoming better and more creative at preparing food. So don't take any of my cooking topics to be of the highest quality. Even I am still learning the ropes. Most of what I have been preparing is not only in the microwave, but I also have been learning to use my air fryer and my toaster oven air fryer. I may even give some of you all some inspiration and motivation to use your air fryer. I can only hope.


About the Label: Food/Drink/Cooking

Topics listed under this category pertain to preparing food and drinks. These can be recipes, gadgetry, and things of that nature.


Anyhow, that concludes my brief blog post announcing the discussion of food among my creative material. I hope you enjoy your time here! Be sure to Follow/Subscribe in some capacity if you enjoy my work. Your support is vastly appreciated.Thank you for reading! Take care and be well.

Visit my JohnMarineDesigns Weebly site, subscribe to My Blog(s), and/or Follow on Bloglovin! Let's connect:
Contact Me via E-Mail Contact Me via Discord Donate to Me (voluntary)
Visit and Subscribe to My Blogs...
Subscribe to John's Blog Space (JBS) Subscribe to John's Creative Space (JCS) Subscribe to John's Race Space (JRS) Subscribe to StyleSpace (SS) Subscribe to John's Life Space (JLS)
Get Social With Me!
Facebook (Friends) Facebook (Fans) Twitter YouTube
Pinterest LinkedIn (professionals only) TikTok Discord
Support My Creative Works!
JMDesigns JMDesigns on Payhip John on Envato
Patreon Soundcloud Bandcamp
Twitch OpenGameArt TurboSquid
read more...

Wednesday, September 8, 2021

Going Low-Polygon, Low-Resolution 3D Modeling

John B. Marine | 5:39 PM | | | Be the first to comment!
Low polygon and low resolution usually are not what most modern 3D types are like. However, those who model in the vein of Minecraft or PS1/N64/Saturn find a unique attraction to low-polygon work. I figured I'd join this realm myself. The reason why is because despite my best efforts to make 3D that can be well-loved and utilized, I never fully succeeded with many models I am proud out. So I figured I'd try to lessen my focus while still trying to find high quality in my low-spec work. I am also focusing in on a 3D modeling method I have adopted and practiced. This blog post is a look at my low-polygon, low-resolution work. It represents what I have worked on and what potentially may come in the future.

I can't believe I haven't updated this blog in almost a full year! That changes with this new blog post on "John's Creative Space!"


Going Low-Polygon, Low Resolution


While impressively realistic 3D rules the roost, some fancy lower-spec 3D. Mostly the reason lies in the simplicity of basic 3D models. Some even enjoy older 3D for the aesthetic. One thing I am realizing is that I am not a good digital artist or a good 3D modeler. Therefore, I am concentrating most of my artistic efforts towards low-polygon and low-resolution art. There is still a unique charm to doing this style of 3D work, and I look to try to capitalize on that.


Learning the Tiling Method (Through Blender).

Let me explain the method I am using as best as I can.

Although Blender has an add-on that allows you to make 3D models from a tileset or palette called Sprytile, I am doing my work without it. Sprytile actually originates from an older 3D modeling software via tiling called Crocotile 3D. What I define as the tile method is when you try to make models out of a series of plane meshes. One of the advantages of this is that you can apply a UV map to it easily to handle your art. What you do is make one plane and then duplicate it a lot to set up great art pieces. You will need to choose the proper sort of UV mapping to a tileset as you need to. Once you get into the process, it provides a nice challenge to 3D model. Having something like Sprytile and Crocotile 3D are not bad at all, and I am not opposed to financially supporting either program. My only thing is that I am learning of how to do those techniques without needing either tool.

The first thing to take note of is to build a texture atlas. If you already have a texture atlas to use for your work, disregard this section and move on to the next paragraph. A texture atlas combines all of the needed graphical assets into one image. Especially if you will be tiling art, it pays to build a texture atlas to contain everything. I am also trying to practice pixel art. So therefore, most of the textures I've developed in my art appear rudimentary. You can use whatever paint program you like, but I am using GIMP (one of many free art editors). For pixel art types, Aseprite is popular. I later learned that you do not need to necessarily have all tiles the same dimensions. In fact, the tiles don't even need to be powers of 2 in size (2, 4, 8, 16, 32, etc.). For example, I saw a texture atlas for a track for the PlayStation 1 game "Rage Racer," and it used a variety of different texture sizes to pack in this texture atlas. So sort of draw out and prototype the different tiles you want to use for your modeling project. You're going to be editing things again and again. If you are using Blender, you will need to constantly update the image you are using for your texture mapping. This means pressing Alt + R in the UV/Image editor panel (at least in Blender 2.79b).

The next step is to simply add a mesh plane in Blender. Make a new Material for it. Go to the Texture panel and choose "Image or Movie" for the texture type. Load in the texture atlas or whatever image you are using. Unwrap the plane mesh. To make your efforts much easier, enable "Snap to Pixels" in the UV/Image Editor panel. You can then take the vertices of each plane and adjust them accordingly to whatever tile(s) you are trying to connect to. Once you have one plane set up, you're going to do LOTS of duplicating to get the desired model you are trying to create. Duplicate as many different planes as possible to construct the scene. Afterwards, keep adjusting the UV mappings to whatever image you want a plane to show. Keep going until you complete the model you want to create. It is best to try to keep things connected. If you can, use a combination of holding down Ctrl and even Ctrl + Shift to properly move about faces. It also helps to go into individual views in orthographic mode for some movements of planes.

Once you are happy with the final model you've created, there are a few important things you need to know. I would recommend you save a copy of your finished work in Blender before doing anything else in this paragraph. It is important to select all of the planes and Remove Doubles. That means Alt + W (Blender 2.79b). Removing doubles reduces the number of vertices while also allowing you to properly manipulate the individual pieces of your model. If you need to adjust it again, it will be easier to do

My 3D Tile Modeling Runs.

Here are some of my practice runs of trying the tile modeling technique.

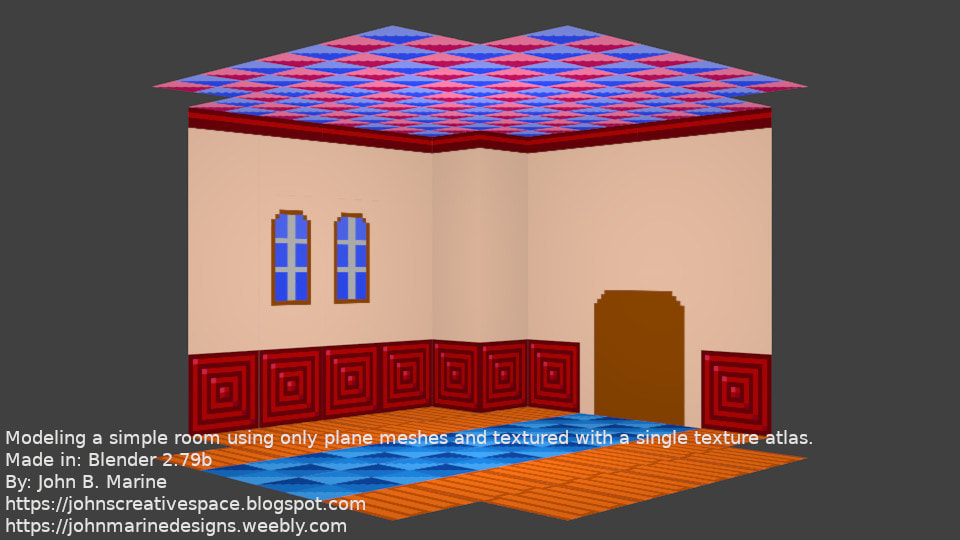
• Tiling a Simple Room
The point of this was to practice simply making a room. Only the floor, two walls, and the ceiling were modeled. I had to learn some of the ins and outs of trying this method out. All pieces were 16x16 tiles except for the windows. What I struggled most was trying to get sufficient lighting to the scene. Here is what I came up with:

simple room rendering

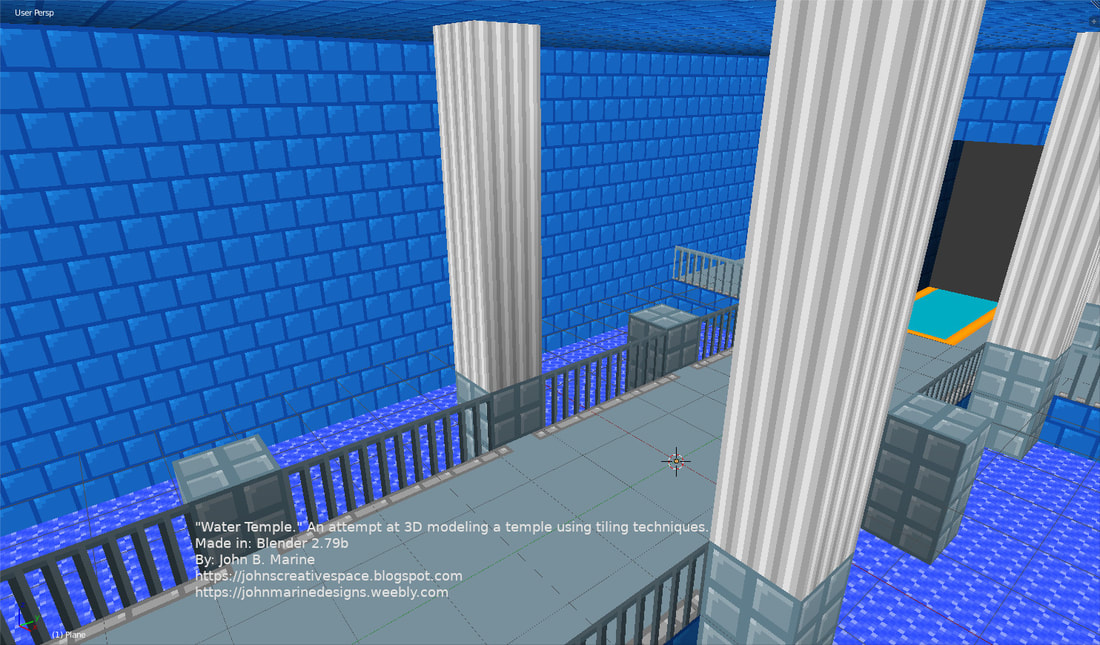
• Water Temple
This more complex interior modeling job really tested my patience. Originally intended to be a modeling of two different rooms, I basically went with just one. I left out the throne room of this temple and just modeled the hall leading to the throne room. The way to the throne room can be seen with the blue carpet. I had to properly adjust the individual tiles to get them the proper lighting. I also needed to adjust the alignment of the UV texture atlas to get some of the planes to display the correct UV mappings. I was still pretty pleased with my work that I decided to close this modeling run.

water temple rendering

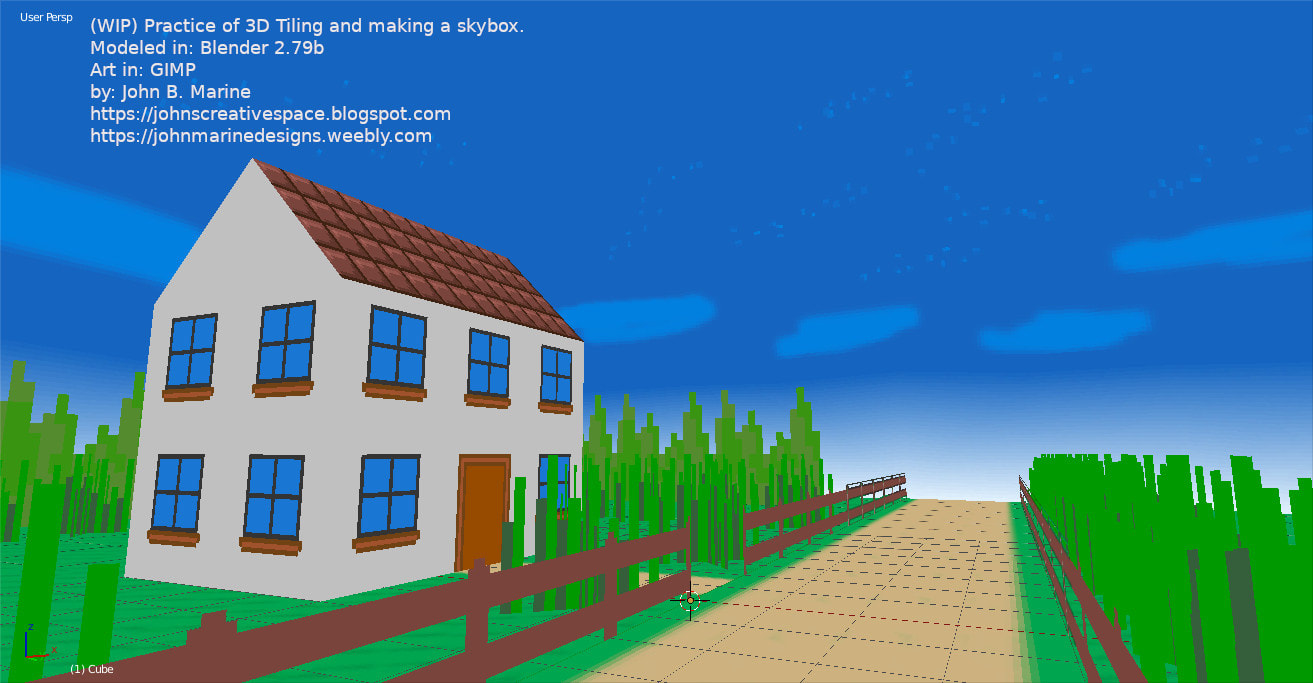
• Outdoor Scene
This was a challenge. The sky was not a tile challenge; instead, it was trying to model a skybox using a cube. I learned in one YouTube video how someone used a cube rather than a sphere to make a sky. The cube was made big enough to house the scene, and then the cube was given a Subdivision Modifier. I found out at least level 2 of the Subdivision Modifier is good enough to properly portray a sky. A skybox is easier to work with than a sphere, especially when UV mapping. I needed to adjust the alignment of the UV map for the faces of my sky when I was preparing my skybox.

I began to realize two important parts of the 3D tiling method. First off, these tiling models are done using shadeless settings. I prefer to work in Blender Render (nowadays called Eevee). I didn't learn to do this in Cycles yet. The second thing I learned was to turn off backface culling. If you enable backface culling, certain faces will not show from certain angles. I modeled my material more in the vein of Minecraft. That means a lot of boxy models. Here, however, I tried modifying the planes to try diagonals and even simulate things in Minecraft like tall grass. My only regret was maybe not adding variety to my pixel art grass and trees.

This was the final result after all of my modeling attempts:

outdoor country scene


I hope to make more material like this and practice more modeling in this style. I'll keep practicing and show you my best work in the future. Stay tuned!


It is really sad I haven't updated this blog in almost a full year. "John's Creative Space" is back, though! It will really be back when I keep making more content to share. Be sure to Subscribe/Follow if you enjoy my work. Thank you for reading! Take care and be well.

Visit my official website at johnbmarine.com, subscribe to My Blog(s), and/or Follow on Bloglovin!
Subscribe to John's Blog Space (JBS) Subscribe to John's Creative Space (JCS) Subscribe to John's Race Space (JRS) Subscribe to StyleSpace (SS) Subscribe to John's Life Space (JLS)
Support My Creative Works!
JMDesigns Patreon Soundcloud Bandcamp Twitch OpenGameArt TurboSquid
Get Social With Me!
Facebook (Friends) Facebook (Fans) Twitter YouTube Pinterest LinkedIn (professionals only)
Questions or Comments? Contact Me (serious inquiries only)...
Contact Me via E-Mail
read more...

Saturday, September 19, 2020

Voxel Buildings

John B. Marine | 8:11 AM | | | | | Be the first to comment!
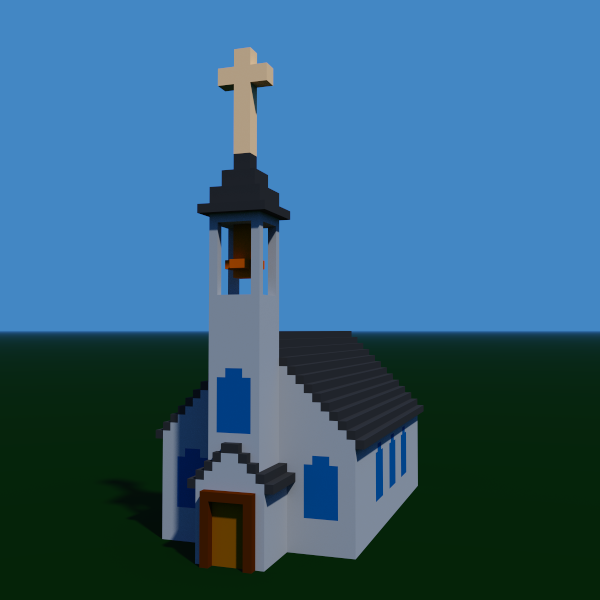
I returned to voxel modeling to try out MagicaVoxel 099.6. This newer version 099.6 ushers in a new level of development as it has enhanced facilities for modeling and rendering. Most notably, voxel models in MagicaVoxel can now go up to 256³, rather than being resticted to 126³ in dimensions. So more complicated models in one piece can be developed or viewed. This is great mostly for massive models or complex worlds. With these things in mind, I want to share with you two models I created and what I may intend using these for. Check these out...


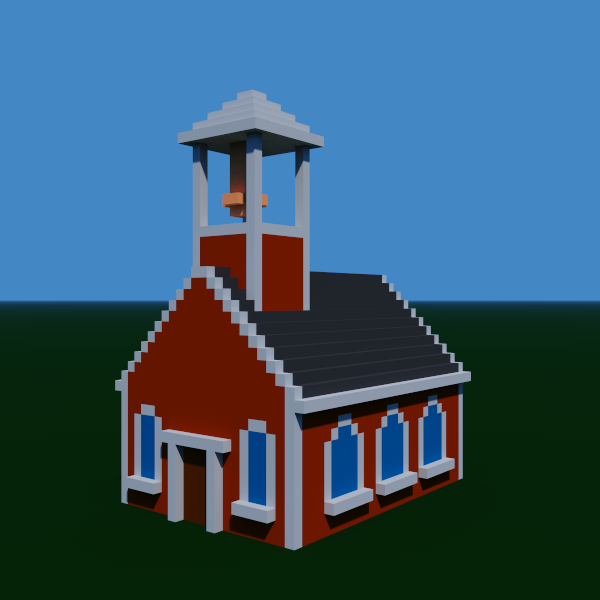
voxel buildnig church house
^ from: (JohnMarineDesigns) - My model of a vintage church house modeled and rendered in MagicaVoxel.

voxel building school house
^ from: (JohnMarineDesigns) - This is a vintage school house I modeled and rendered in MagicaVoxel.

What do I intend on making these models for? Well, I have had ideas of using them for possible game assets or some media projects. I was kind of thinking of making a classic-style SimCity deal where you build a city from the ground up with the voxel building models I am trying to create. Also, I was considering the voxels being used for voxel-style 3D RPGs. The problem with that is that I am mostly fixated on more modern style structures. Therefore, I am not as adept designing Medieval-type structures or worlds. The two models I created will still get things rolling as far as designing voxel buildings. I also want to make this easy by having consistent dimensions to piece together spaces in equal grid amounts. I may also decide to just let everything be set up freestyle, letting the developer add the voxel models as he/she/they see fit in their voxel worlds.


I'm glad you got a chance to view my creative works blog! This is my first blog post since the new changes Blgoger/Blogspot blog posts are made. Thank you for reading! Take care and be well.

Visit my official website at johnbmarine.com, subscribe to My Blog(s), and/or Follow on Bloglovin!
Subscribe to John's Blog Space (JBS) Subscribe to John's Creative Space (JCS) Subscribe to John's Race Space (JRS) Subscribe to StyleSpace (SS) Subscribe to John's Life Space (JLS)
Support My Creative Works!
JMDesigns Patreon Soundcloud Bandcamp Twitch OpenGameArt TurboSquid
Get Social With Me!
Facebook (Friends) Facebook (Fans) Twitter YouTube Instagram Pinterest LinkedIn (professionals only)
Questions or Comments? Contact Me (serious inquiries only)...
Contact Me via E-Mail
read more...

Monday, June 1, 2020

3D Model and Showroom Plans

John B. Marine | 4:16 PM | | | | | Be the first to comment!
Making skins for vehicles in games is cool and all, but I have lately had interest in designing my own original vehicles all skinned up. Actually, I have wanted to develop my own models and my own showrooms. It was a dream for a long time to develop my own showroom for vehicles for games. As I started getting better with Blender, I am having more realistic visions of developing the sort of showrooms I want to develop. Allow me the opportunity to express myself. Okay? Good! Let me begin...


3D Model and Showroom Plans


I feel the need to develop even more original content. So I want to share plans I have in regards to various 3D models and showroom plans. Take a look:


3D Plans: Models.

My main areas of concentration for 3D modeling include vehicles and characters.

Vehicle Plans
On the vehicle front, I am starting to gain a new sort of direction towards how to model vehicles. The main concentration lies in low-polygon vehicles. I want to make low polygon a quality thing. This could even evolve into trying to refine them for other projects. This is actually a plan of mine of late. As I am starting to better use Blender, I feel I could master some techniques to at least attempt high-quality vehicles.

Previously, I noted that I had no interest in high-quality 3D vehicle models. I've learned some techniques that make me think otherwise in recent times. One of the most important things I am coming around to is that I do not need to put everything into one single mesh. In fact, some high-quality designs are a combination of separated objects. So a headlight assembly could be the main casing and all the individual lights that make up that headlight case. You also could independently work on a certain object of a full model. The one thing I always fear is that I may make a lot of changes that somehow will require me to do extra merging so that the model remains as complete topology-wise. It seems like a daunting task to make a high-quality vehicle. However, part of me says it is doable without stressing too much over certain details.

I also previously did not have interest in re-creating actual vehicles. That has changed... to an extent. I am not seriously considering completely accurate models. At the same time, though, I don't want to make any models of actual vehicles that seem overly cheap. I need to be careful on this front because some legal clearances have to be granted to make 3D products of actually-licensed vehicles available and can be used. I am not sure if I want to develop such vehicles for free for game mods, or if I want to offer vehicles for rendering. I still prefer doing original designs, but I am somewhat open to modeling actual vehicles.


Character Plans
I have not yet attempted any original characters. On one end, I have thought more along the lines of avatar-type models. I am talking about mostly humanoid models that you could freely customize as opposed to some completely original characters. I have not yet found any true inspiration to make this happen. However, I do have some ideas by following a bunch of different videos. No concrete plans have been considered as of yet. If and when I do get around to developing characters, expect a mix of freely-customizable characters and original characters.


Other 3D Models?
I have considered locations as 3D model projects. Namely, I have thought of things like buildings, some light scenery, and some light terrain. I also want to develop things like motor racing tracks. For race tracks, I am slowly looking at trying to develop in the mindset of Assetto Corsa. Assetto Corsa prefers you measure things in meters. So to that end, I will have to learn to put things into meters for measurement.


3D Plans: Showrooms.

No 3D model(s) will ever be worth showcasing if you lack a proper way to market them. So as I make skins for games like Assetto Corsa and Automobilista among others, I feel I have to develop a showroom to nicely showcase my 3D models. A showroom doesn't have to a "room." It can, in fact, be an outdoor scene stylish enough for showcasing work. One idea i seem to like is that Blender can handle HDRI images. For the uninitiated, an HDRI image contains color information within the image that can serve as the lighting and color for any given scene. Usually, some of these HDRI images can be pretty big files. I tend to like decently-sized images that won't beat up my PC in trying to render. Blender rendering through HDRI images is only done in Cycles Rendering. I will need to practice Cycles Rendering to be able to come up with great renders.

While showrooms suggest indoor scenes, showrooms can really be indoor or outdoor scenes. While I don't want the showrooms to be the focal point of my work, I do want them to serve as stylish 3D locales for which to display my work. I am gathering ideas for which to think about what kind(s) of showrooms I want to make. Because Cycles Renders allow you to develop a vast amount of ideas, I want to be able to make the best renders I can make regardless of my PC's power to create them masterfully. In fact, I dream of making certain render scenes that would be great for Assetto Corsa, since the majority of my renders are for Assetto Corsa. I have used custom showrooms for vehicles in rFactor. So I have a general idea of the importance of making quality showrooms for any set of vehicles for almost any racing/driving game.

Other than vehicles, I want to make some stylish showrooms for characters and other things. Imagine stylish scenes for which a character can be showcased. For example, imagine a stylish young lady at a stylish restaurant on a date night. Certain props or game assets can also be stylishly shown off in some kind of showroom. I haven't yet thought of any interesting showroom concepts to make these visions happen.


Now you know about some of my 3D plans. We'll see what materializes from my work in the future.


Thank all of you who love and support my work! I hope I can keep bringing the awesome that I can provide. Thank you for reading! Take care and be well.

Visit my official website at johnbmarine.com, subscribe to My Blog(s), and/or Follow on Bloglovin!
Subscribe to John's Blog Space (JBS) Subscribe to John's Creative Space (JCS) Subscribe to John's Race Space (JRS) Subscribe to StyleSpace (SS) Subscribe to John's Life Space (JLS)
Support My Creative Works!
JMDesigns Patreon Soundcloud Bandcamp Twitch OpenGameArt TurboSquid
Get Social With Me!
Facebook (Friends) Facebook (Fans) Twitter YouTube Instagram Pinterest LinkedIn (professionals only)
Questions or Comments? Contact Me (serious inquiries only)...
Contact Me via E-Mail


read more...

Saturday, February 29, 2020

3D Modeling Detail

John B. Marine | 8:45 PM | | Be the first to comment!
A tactic of 3D modeling is to focus on how much to model for whatever application(s) in mind. Some go with high-polygon modeling and then dumb it down for low-polygon modeling. Some begin with low-polygon modeling and then increase the details. Which method is better? Well, it depends on how detailed you want your work to be and for what application(s) you plan on distributing your 3D models to. Through my modeling work, I have mostly focused on low-polygon modeling. I don't have the patience to try to flesh out low-polygon modeling. Some people do an amazing job taking basic rough shapes and then turning them into amazing 3D models. The different methods used to develop detailed models varies from different modelers.

I haven't yet designed anything spectacular, but I do hope to build 3D models from rough shapes to detailed modeling masterpieces.


This was a very brief post but with sufficient detail. Here is my discussion question for you:

What is your method of 3D modeling as far as detail is concerned?

Thank you for reading! Take care and be well.

Visit my official website at johnbmarine.com, subscribe to My Blog(s), and/or Follow on Bloglovin!
Subscribe to John's Blog Space (JBS) Subscribe to John's Creative Space (JCS) Subscribe to John's Race Space (JRS) Subscribe to StyleSpace (SS) Subscribe to John's Life Space (JLS)
Support My Creative Works!
JMDesigns Patreon Soundcloud Bandcamp Twitch OpenGameArt TurboSquid
Get Social With Me!
Facebook (Friends) Facebook (Fans) Twitter YouTube Instagram Pinterest LinkedIn (professionals only)
Questions or Comments? Contact Me (serious inquiries only)...
Contact Me via E-Mail


read more...

Wednesday, February 12, 2020

Does Blender Get the Respect it Deserves?

John B. Marine | 8:31 AM | | | | Be the first to comment!
(UPDATE: February 13, 2020)

#Blender3D is a free and open source program for 3D modeling. Everything from videos to intricate 3D models can be produced with Blender. Game developers even use Blender for assets and even complete games. However, Blender does get a bad rap from some people for a number of reasons. Even still, what you can accomplish in Blender goes far beyond what most other 3D modeling software can do. So I decided to blog about Blender and show some respect for it. Does Blender get the proper respect? I will explain why you should care (or maybe not) in this blog post here on "John's Creative Space!"


Before I Begin...

This is my first JCS blog post of 2020. Happy new year!


LATEST UPDATE(S)/REVISION(S):

FEB 13 2020 - added some extra details


Does Blender Get the Respect it Deserves?


Allow me to discuss Blender to you all.

Blender 3D logo
^ from: (Pinterest) - The Blender logo. Does Blender get the respect it deserves? I explain in this blog post.

Blender's history dates back to 1994, and its initial release dates back to 1998. What you can accomplish in Blender for development of media is astonishing. Many people look up to programs like 3D Studio Max as the gold standard of 3D modeling. It is a top-tier industry standard in regards to 3D modeling. Blender, however, is sometimes criticized for a number of reasons. People say the interface and UI are not very charming. Blender also has a seemingly steep learning curve. As someone who has not had much success making proper 3D models, even I am more comfortable using a program like Wings3D (which is also free) for 3D modeling. Maybe even another reason people discredit Blender is because it is free and open-source, usually meaning that free programs don't have the same level of quality compared to the top-level programs. When you finally learn and master Blender, you can do almost as much as you can with the more popular 3D programs like 3D Studio Max, Maya, Cinema 4D, and more. Blender makes you able to make impressive material without needing to stick to a payment schedule or subscription like most of today's 3D modeling powerhouse programs. You can use certain renders outside of Blender's own render engine to produce your images. These include the likes of the Cycles Renderer and the Eevee (not to be confused with the Pokémon Eevee) engine. While you can make 3D models, you can even do simple video editing as well as create entire videos and films with Blender. A popular example of a Blender film is the 2008-released film "Big Buck Bunny." Blender is free and always will be free unless someone buys Blender and cheapen the Blender experience entirely.

It took me over 20 years to make a 3D model I could be proud of when I made my first true Blender creation back circa 2016. My 3D skills are still subpar, but I have tried especially recently to learn Blender and utilize it. A handful of YouTube videos on Blender have helped me to develop my 3D modeling skills in Blender. I slowly tried to develop and practice using Blender techniques to produce 3D models. I still have a lot to learn, but I feel I can do a lot to try to master using this program.

One reason I have tried to learn Blender better is because I am offering my material for sale through sites like Turbosquid and Envato's 3D Ocean. Surely the latter is one of the different programs you can share as being the program you made models in. As of the time of this initial blog post (February 12, 2020), these are the accepted programs for which you share as being what 3D model was made in:

--- 3DOcean Accepted 3D Modeling Programs ---
• 3D Coat
• 3D Studio Max
• Autocad
• Blender
• Cinema 4D
• Lightwave
• Maya
• Moda
• SoftImage
• Vue
• ZBrush

You can still use whatever programs you like to 3D model in, but that is pretty much a list of top-level 3D modeling programs for you to sell your models on sites like 3DOcean. Blender even has a suite where people can sell their Blender 3D creations on called Blender Market.

One must also consider using Blender for more popular applications. For one, there is the crowd of using Blender for virtual reality and augmented reality. VR/AR has its own specifications and considerations when modeling. Blender can be a good enough program to use for VR or AR if you know what you're doing.


Blender for Gaming and Game Development.

Blender was made in C++ and Python. If you have skill in using Python, you can make simple games in Blender using Python code. Blender has had its Blender Game Engine (BGE) serve as the gaming base for those who develop games using Blender. Of late, however, Blender has dropped support of the Blender Game Engine. A program that maintains the appeal of the former BGE is a program called UPBGE. UPBGE stands for "Uchronia Project Blender Game Engine." Many of the features that made BGE an excellent suite for gaming and game development can be had with the UPBGE package.

While Blender could be used to develop games, some people ranging from hobbyists to various independent (indie) developers make assets in Blender to be used in programs like Unity3D and Unreal Engine. People who compete in game jams use programs like Blender for simple modeling of 3D models. Such people even do as great of a job with modeling 3D assets in Blender as almost anyone could with popular paid 3D modeling software.

Blender can also be used for programs like Armory3D. Armory3D is a 3D framework that integrates into Blender. So using a combination of Armory3D and Blender can work perfectly fine in the development of 3D games. So everything from a casual game project to a AAA-quality game could be made with a combination of Blender and Armory3D. You can use a number of other 3D frameworks and interfaces to use in game development with Blender, but Armory3D is a popular option.


Blender for Web Development.

Did you know you can build 3D websites with Blender? People use programs like Blender to build things such as 3D stores and various configurators of products. You could see 3D material with Blender with items ranging from fashion goods to even building your own car. I am mostly positive this suite for Blender mostly pertains to front end development and not much about front end and back end web development. There are people who model through Blender for website development to packages such as WebGL, Blend4Web, and Verge 3D.

Even I have thought of practicing making a 3D environment people can use to navigate for material I've created. Though, I haven't made anything cool enough to warrant any sort of attention. Stay tuned to "John's Creative Space" if I do develop some kind of 3D online environment for you to explore.


Blender for Video Production.

Let's face facts. Blender will NOT replace or substitute programs like After Effects, Premiere Pro, or Vegas. A lot of the videos and video effects you can make in most popular video programs can be done in Blender. If you were to try to upload your creations to video sites like Envato's Videohive, you can't say you created the video material in Blender. So you may need to find some other programs for which to produce videos with. I haven't had too much video experience with Blender, so I will leave my discussion there.


Since I mentioned Blender in a number of lights, does this program get the respect it deserves? Here are my final thoughts...


Does Blender Get the Respect it Deserves? - Final Thoughts


Just because something is free doesn't mean it lacks the quality of more established programs. Really, Blender has become its own established program throughout its development. Some people don't want to commit to a subscription service just to use a high-quality 3D modeling program. Those who don't want to do so have limited options for which to 3D model with. Therefore, Blender and its free nature is a boon to the 3D modeling community. Just because not many people look to Blender for quality 3D modeling doesn't mean there is no reason to use Blender. The interface may be tough, the learning curve may be steep; but once you master using Blender and learn many techniques to model with Blender, it becomes apparent this program is just as good... if not better... than most of the top-level, *industry standard* 3D modeling programs. You can always make Blender better if you develop scripts and add-ons to enhance the capabilities of Blender. Just because Blender is free doesn't mean it lacks the quality and polish of other top-level 3D modeling software. You can always make sacrifices if you feel Blender is somehow not good enough to meet your standards of 3D modeling.

So if you are on the fence about Blender, give it a chance and try to learn to use Blender. Try to master using Blender even if you are more comfortable using other 3D modeling software. Blender actually deserves more credit than most people give it. At least... to me.


For More Information...

Learn more about Blender by going to www.blender.org. Find more 3D resources I've curated by visiting my Creative Resources page.


Those are my own thoughts on Blender. Let me know what you think...

Do you think Blender gets the respect it deserves?

Be sure to Subscribe/Follow my blog(s) to keep up with my latest material. Visit my other blog posts to see more of my work and more of my thoughts on a variety of issues. Thank you for reading! Take care and be well.

Visit my official website at johnbmarine.com, subscribe to My Blog(s), and/or Follow on Bloglovin!
Subscribe to John's Blog Space (JBS) Subscribe to John's Creative Space (JCS) Subscribe to John's Race Space (JRS) Subscribe to StyleSpace (SS) Subscribe to John's Life Space (JLS)
Support My Creative Works!
JMDesigns Patreon Soundcloud Bandcamp Twitch OpenGameArt TurboSquid
Get Social With Me!
Facebook (Friends) Facebook (Fans) Twitter YouTube Instagram Pinterest LinkedIn (professionals only)
Questions or Comments? Contact Me (serious inquiries only)...
Contact Me via E-Mail


read more...

Thursday, October 10, 2019

Basic Voxel Vehicle Pack

John B. Marine | 6:58 AM | | | | | Be the first to comment!
After several years putting it off and in not deciding what to do, I recently have FINALLY offered my voxel vehicles to the Internet public! This blog post describes what all I have done with these voxel vehicles I created. You will be able to purchase my voxel vehicles towards the end of this post. So stick around for more information!


My Basic Voxel Vehicle Pack


This is an opportunity for me to share with you my voxel vehicles. More information is included in this post, so read on if you are interested in my voxel vehicles.


What You Should Know.

My voxel vehicle creations were as of 2014 producing them with MagicaVoxel. I shared my voxel models across social media showcasing my work. I long planned to use my voxel models to develop a racing game. That game, however, never materialized. So the models I created have basically remained on my PC to never be available to the public. Despite a good amount of demand by some people who reached out to me, I was never fully ready to share my voxel models. That is until I finally decided in September 2019 to consider joing Envato. On October 1, I joined Envato. My first upload to any Envato product was made on October 7. My package was approved to 3DOcean for my voxel vehicle pack. Therefore, I am pleased to announce that my voxel vehicle pack is LIVE!

In my original upload to 3DOcean, I decided to keep the vehicles as static models. I had planned for some time to make the voxel models ready for animation. That will probably come in either an update or as a separate package. To keep polygon counts low, I filled up the invisible portions of the voxel models with voxels. Most of my models originally came with visible interiors if you remove the glass windshields and doors. Everything is low-polygon for the sake of game development. That was the original intent of my models.

The reworked voxel vehicles can be imported into programs like Blender or in game engines like Godot Game Engine. If you want to further use models for various applications, you are on your own to take my models and import them into other programs. So you will need to use a program like Blender to export my models into Unity3D if you want to use Unity with my voxel vehicle models. The Basic Voxel Vehicle Pack is available in three different formats: COLLADA DAE, OBJ, and the native MagicaVoxel VOX. Use the native VOX to freely edit the voxel models in their raw form.


Want to Get My Voxel Vehicles?

My voxel vehicle pack is available on Envato's 3DOcean. Purchase the Regular License if you want to feature my voxel vehicles in a free game or in certain media projects. Purchase an Extended License if you plan on using my voxel vehicle models in a paid game. Click on the image or link below to get started:

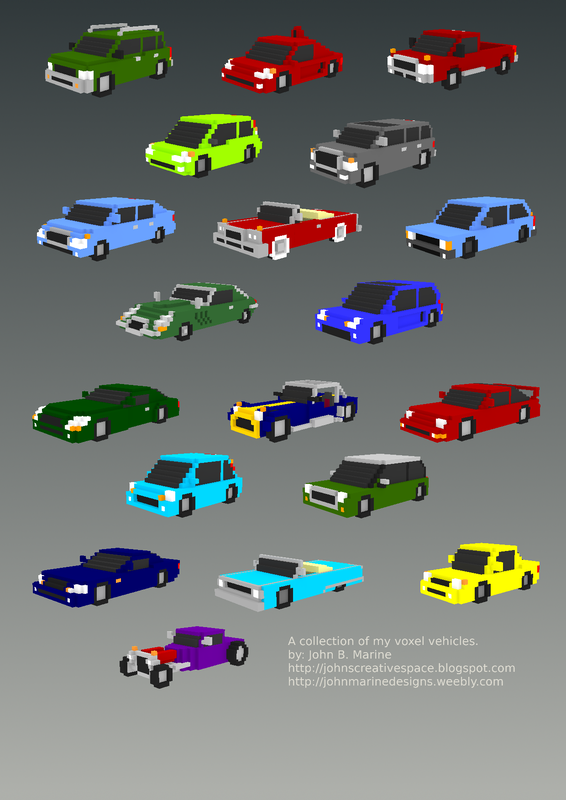
basic voxel vehicle pack
^ Click on the image or click on the following link to buy my voxel vehicle pack: Basic Voxel Vehicle Pack (Envato, 3DOcean)!

If you use my voxel vehicles in any project (personal or commercial), please let me know! I want to see how you plan on utilizing my voxel models. Please help support me and my work any way you can. Purchasing this package is one such way of showing your support... if you don't mind. I would appreciate your support.


That is all for this post! I hope you found it interesting. Thank you for reading! Take care and be well.

Visit my official website at johnbmarine.com, subscribe to My Blog(s), and/or Follow on Bloglovin!
Subscribe to John's Blog Space (JBS) Subscribe to John's Creative Space (JCS) Subscribe to John's Race Space (JRS) Subscribe to StyleSpace (SS) Subscribe to John's Life Space (JLS)
Support My Creative Works!
JMDesigns Patreon Soundcloud Bandcamp Twitch OpenGameArt TurboSquid
Get Social With Me!
Facebook (Friends) Facebook (Fans) Twitter YouTube Instagram Pinterest LinkedIn (professionals only)
Questions or Comments? Contact Me (serious inquiries only)...
Contact Me via E-Mail


read more...

Friday, October 4, 2019

John Joins Envato!

John B. Marine | 12:35 AM | | Be the first to comment!
On October 1, 2019; I joined @Envato! I feel a lot like #Envato has a lot of material I could contribute to. It may also be my best outlet for building a portfolio outside of my JohnMarineDesigns Weebly site. So I will use this time to discuss joining Envato and why I am doing so. I also have a little announcement to share in this blog post, so stay tuned for that!


Before I Begin...

WHOA! I haven't updated "John's Creative Space" in almost four months? Sorry to keep you fans of this blog this blog rarely updated!


John Joins Envato!


Allow me to talk about Envato and why I joined this service.


What is Envato?

Envato is an Australian company where people buy and sell digital goods. Such goods include music, graphic designs, videos, 3D models, coding/programming, and more. This company was founded in 2006 and is based in Melborne, Victoria, Australia. As of the time of this post, Envato Market has had over 55M items sold and has earned over $760M USD in earnings. So Envato is a highly successful marketplace for all sorts of digital goods. Some people sell their creative digital goods on Envato but may also sell elsewhere. Some others, though, market exclusively through Envato. So while you may see some creative work work promoted on other websites, their marketing medium is usually Envato.

If you want extra insight on Envato, take a look at this video:


^ The Envato Story | Inside Envato


[Some of] Envato's Services.

Just like Google, one account on Envato opens you to all of their services. I say there are various services I feel I can contribute to. Here are some of the many...

• AudioJungle - AudioJungle is the service where people provide stock music. Usually, a lot of the music is corporate stock music used in applications ranging from business videos to YouTube videos. Some online video have AudioJungle songs used as background music. The easiest way to tell a song from AudioJungle is used is when you hear the "AudioJungle" watermark during the course of songs or videos. All AudioJungle material are all royalty-free stock music. If you want an example of a song on AudioJungle with the watermark playing at times, here is a sample song from one video I saw once:


^ Pinkzebra "Larger Than Life" feat. Benji Jackson - Upbeat Song for Videos

• GraphicRiver - GraphicRiver is used in the distribution of graphic designs. These range from logos to presentation slides to gaming assets. This site covers lots of ground.

• 3DOcean - The 3D model marketplace on Envato is 3DOcean. Various 3D models are offered here.

These are among some of the many products offered by Envato.


Why I Joined Envato.

I joined Envato after doing some research. I felt most of what I want to create mostly is along the lines of what Envato has to offer. I felt the desire to financially profit from my work and offer quality work to the world. A lot of you probably know I find great importance in offering creative content as a means of escape. Along with that, I am hopeful I can offer creative material to profit with. I found Envato to be a fairly interesting ecosystem to be a part of. All that was left for me, then, was to take that plunge and motivate myself to make content that I'm sure can benefit any number of individuals.

I also took the inspiration to join Envato when I saw that a number of game developers and game asset providers sell their content on Envato. While sites themselves may market their material on their websites, they sell a lot of their material mostly on sites like Envato. That was extra motivation for me to join this service. I'm too cheap to set up a proper store, so I decided to join Envato to sell my creative content.


Having said this, I'd like to share something. Check it...


Special Announcement!


I would like to announce that as I join Envato, I am planning to finally release my voxel model cars among various other assets I've created. I feel so much like Envato is an environment for which I can get the most exposure and perhaps profit best. I haven't earned ANYTHING for my paid Turbosquid content. So therefore, I feel my work on Envato can help me not only get some exposure, but also finally profit from my work and offer some quality.

Another announcement I want to share is that I will also consider uploading my voxel characters. I might re-work my voxel characters or leave them static. I haven't decided what I want to do there just yet. Of course, I will let you know my final decision on my voxel characters in the future.

Through the Envato ecosystem, these voxel assets would fall under the 3DOcean service.


For More Information...


To learn more about Envato and its services, visit envato.com. I also wanted to include a link to my profile on Envato, but I am unable to. I guess you have specific profiles showcasing all of your content you have uploaded to Envato on different services. If I find some other method to this, I will update this blog post with extra links.


Hopefully this will get me in the mood to design material and profit from it. I will keep you posted, as always. Thank you for reading! Take care and be well.

Subscribe to My Blog(s), and/or Follow on Bloglovin!
Subscribe to John's Blog Space (JBS) Subscribe to John's Creative Space (JCS) Subscribe to John's Race Space (JRS) Subscribe to StyleSpace (SS) Subscribe to John's Life Space (JLS)
Support My Creative Works!
JMDesigns Patreon Soundcloud Bandcamp Twitch OpenGameArt TurboSquid
Get Social With Me!
Facebook (Friends) Facebook (Fans) Twitter YouTube Instagram Google+ LinkedIn (professionals only)
Questions or Comments? Contact Me (serious inquiries only)...
Contact Me via E-Mail


read more...
JohnMarineDesigns on TurboSquid

Would you like to donate to support my creative work? If so, please show your support using this PayPal item:
I am now on Patreon! Support my creative work on Patreon today at: www.patreon.com/johnbmarine!
 
Copyright © 2015 John's Creative Space • All Rights Reserved.
Template Design by BTDesigner • Powered by Blogger