


(UPDATED: September 28, 2017)
As I returned to 3D modeling recently, I want to make cars and tracks. The latter is what I have mostly been doing lately in my return. This blog post shows practice runs of mine modeling tracks in Wings3D. It will give you an idea of what I hope to provide in the future for all of you.
When designing a race course, you have to consider designing a course in regards to making something that will be enjoyable and fun. Your ability to create a virtual space that serves as a quality race track is paramount to making something memorable. I tend to believe you need quality locations to challenge the limits of vehicles in games. Without fine venues, a car, nor its driver(s) will ever shine. So it pays to build some quality material in your own world and with your own level of craftsmanship and expertise.
A long time ago, I had envisioned making tracks for rFactor. Nothing ever materialized from my work then, and I lacked the skill and desire to make 3D models. It wasn't until recently that I decided to give 3D modeling another try. You may remember I discussed why I abandoned the 3D modeling scene some time ago. Now... I'm back!
I want to show a bit of my evolution in trying to re-learn Wings3D and Blender. I still use Wings3D for my modeling, but I am doing more of re-learning Blender to put everything together. The next section will show some practice modeling runs of mine.
None of my designs here will be part of any project, but I did practice designing courses. I have shown a few of my practice runs in pictures in my Facebook profile, but never truly worked on them much since. So what you are going to see are mostly practice runs with a slow evolution of my skill.
NOTE: I am now using Flickr to display some of my images.
A lot of racing fans would find oval racing boring. However, these are some of the most basic courses anyone can construct. Just think about it for a moment- you have some simple straights and a few corners. Completely simple to make. If you want to do more complicated ones, though, you'll have some extra work to do.
This practice run was about designing a race course with objects. The objects on this course include a gate at the Start/Finish line, grandstands, and a garage. Even the outside concrete wall is a separate object. The advantage to a design like this is that if the performance is low, certain track objects can be removed to help improve frame rate for games. I probably shouldn't have made the outside wall a separate object, but I did. Remember- this is practice. This probably will not likely going to materialize into a track.
One time, I learned a skill important in the design of race courses- the ability to bend geometry. I made a road course once that was mostly a bunch of rough cubes. Learning how to bend pieces allowed me to make smoother corners for tracks. As you can see in my test run for a road course, you can see the smooth corners.
(ADDED: September 28, 2017) This unusual-looking track was created to practice making elevation changes and an overpass. Careful placement of vertices were key in making this possible. Selecting individual loops were key in preparing this model and making the different elevation changes. Elevation changes, when making a race track, are paramount on how you actually model them. Providing too steep an angle can almost make a vehicle seem like it is hitting a wall. So you need to be careful to not make the angle too steep for whatever vehicle(s) may maneuver around it.
Please note that in all of my pictures and in my test modeling runs before my 4th practice run, the track itself is flat. I have not yet gone to the level of making modeling runs of race tracks with elevation changes or overpasses. Perhaps I will share those runs in a future post. Stay tuned to my blog for more on that front! Meanwhile, check out the next section.
How did I create these in Wings3D, and how can you make your own work? Well, part of my workflow is to design the basic proportions of the course followed by drawing points through the center of the different edges. The center line drawn around the track is then beveled using the Bevel function. Three colors are used to mark the outer section (usually grass), the bounds of the course (usually the white lines marking the edges of a track, and the road itself (usually tarmac or non-tarmac). It is also possible to extrude the outer portions of the track to put up barriers to help keep the car in-bounds. Or in the case of temporary circuits, what could be used to define the boundaries of the road and the outer part can simply be used as the barriers as you see on most street course tracks.
You can build your courses any way you please, but this is how I've come to learn how to design courses.
I imported a model of one car from one game and did a little experiment on it. When you make a basic cube in Wings3D or Blender, you get a cube that is about 2x2x2 units. Each unit from the basic scale is one foot (or one meter for Metric measurements). A car with a measurement of two units wide and four units long will require about two cubes under it to properly fit it onto the ground. When you make a 3D model or a scene, you can always upscale it to your heart's content. So in the case of a 4x4x4 cube, a car of 2x4 dimensions would fit onto it but wouldn't look too good on such a small surface. So you would need to scale it up by twice or thrice as much for it to be used as a model to race on a track.
You can start small but then raise the scale to make it better able to be used in a game or in any animation. If you are making a track for a game, be mindful of performance limitations of whatever device(s) you are developing for.
Other than that... have fun modeling!
That's all for this post. If I do offer something fun, I'll share it with all of you. Meanwhile... thank you for reading! Take care and be well.
read more...
As I returned to 3D modeling recently, I want to make cars and tracks. The latter is what I have mostly been doing lately in my return. This blog post shows practice runs of mine modeling tracks in Wings3D. It will give you an idea of what I hope to provide in the future for all of you.
LATEST UPDATE(S)/REVISION(S):
SEP 28 2017 - added another section, edits made3D Track Modeling
When designing a race course, you have to consider designing a course in regards to making something that will be enjoyable and fun. Your ability to create a virtual space that serves as a quality race track is paramount to making something memorable. I tend to believe you need quality locations to challenge the limits of vehicles in games. Without fine venues, a car, nor its driver(s) will ever shine. So it pays to build some quality material in your own world and with your own level of craftsmanship and expertise.
A long time ago, I had envisioned making tracks for rFactor. Nothing ever materialized from my work then, and I lacked the skill and desire to make 3D models. It wasn't until recently that I decided to give 3D modeling another try. You may remember I discussed why I abandoned the 3D modeling scene some time ago. Now... I'm back!
I want to show a bit of my evolution in trying to re-learn Wings3D and Blender. I still use Wings3D for my modeling, but I am doing more of re-learning Blender to put everything together. The next section will show some practice modeling runs of mine.
Track Designs
None of my designs here will be part of any project, but I did practice designing courses. I have shown a few of my practice runs in pictures in my Facebook profile, but never truly worked on them much since. So what you are going to see are mostly practice runs with a slow evolution of my skill.
NOTE: I am now using Flickr to display some of my images.
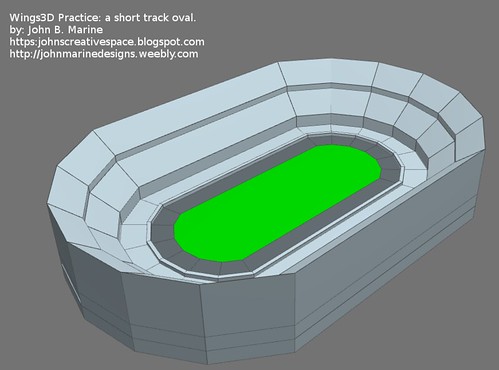
Practice Run 1: Oval.
A lot of racing fans would find oval racing boring. However, these are some of the most basic courses anyone can construct. Just think about it for a moment- you have some simple straights and a few corners. Completely simple to make. If you want to do more complicated ones, though, you'll have some extra work to do.
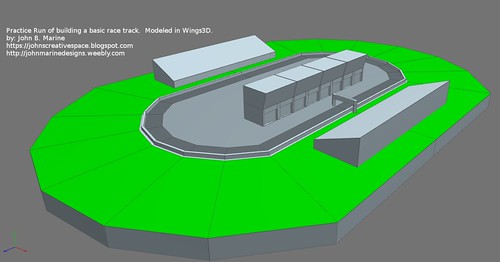
Practice Run 2: Oval With Objects.
This practice run was about designing a race course with objects. The objects on this course include a gate at the Start/Finish line, grandstands, and a garage. Even the outside concrete wall is a separate object. The advantage to a design like this is that if the performance is low, certain track objects can be removed to help improve frame rate for games. I probably shouldn't have made the outside wall a separate object, but I did. Remember- this is practice. This probably will not likely going to materialize into a track.
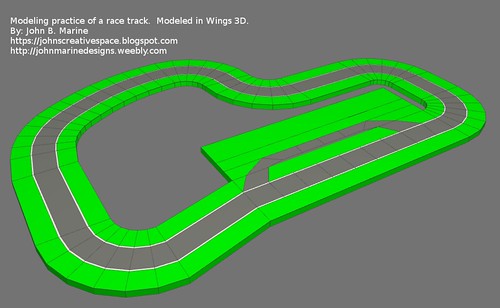
Practice Run 3: Road Course.
One time, I learned a skill important in the design of race courses- the ability to bend geometry. I made a road course once that was mostly a bunch of rough cubes. Learning how to bend pieces allowed me to make smoother corners for tracks. As you can see in my test run for a road course, you can see the smooth corners.
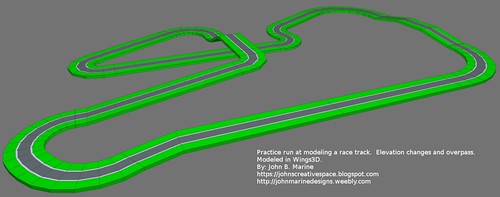
Practice Run 4: Elevation Changes and Overpass.
(ADDED: September 28, 2017) This unusual-looking track was created to practice making elevation changes and an overpass. Careful placement of vertices were key in making this possible. Selecting individual loops were key in preparing this model and making the different elevation changes. Elevation changes, when making a race track, are paramount on how you actually model them. Providing too steep an angle can almost make a vehicle seem like it is hitting a wall. So you need to be careful to not make the angle too steep for whatever vehicle(s) may maneuver around it.
Please note that in all of my pictures and in my test modeling runs before my 4th practice run, the track itself is flat. I have not yet gone to the level of making modeling runs of race tracks with elevation changes or overpasses. Perhaps I will share those runs in a future post. Stay tuned to my blog for more on that front! Meanwhile, check out the next section.
Explaining the Workflow
How did I create these in Wings3D, and how can you make your own work? Well, part of my workflow is to design the basic proportions of the course followed by drawing points through the center of the different edges. The center line drawn around the track is then beveled using the Bevel function. Three colors are used to mark the outer section (usually grass), the bounds of the course (usually the white lines marking the edges of a track, and the road itself (usually tarmac or non-tarmac). It is also possible to extrude the outer portions of the track to put up barriers to help keep the car in-bounds. Or in the case of temporary circuits, what could be used to define the boundaries of the road and the outer part can simply be used as the barriers as you see on most street course tracks.
You can build your courses any way you please, but this is how I've come to learn how to design courses.
An Interesting Observation...
I imported a model of one car from one game and did a little experiment on it. When you make a basic cube in Wings3D or Blender, you get a cube that is about 2x2x2 units. Each unit from the basic scale is one foot (or one meter for Metric measurements). A car with a measurement of two units wide and four units long will require about two cubes under it to properly fit it onto the ground. When you make a 3D model or a scene, you can always upscale it to your heart's content. So in the case of a 4x4x4 cube, a car of 2x4 dimensions would fit onto it but wouldn't look too good on such a small surface. So you would need to scale it up by twice or thrice as much for it to be used as a model to race on a track.
You can start small but then raise the scale to make it better able to be used in a game or in any animation. If you are making a track for a game, be mindful of performance limitations of whatever device(s) you are developing for.
Other than that... have fun modeling!
That's all for this post. If I do offer something fun, I'll share it with all of you. Meanwhile... thank you for reading! Take care and be well.
| Subscribe to My Blog(s), and/or Follow on Bloglovin! | |||
|---|---|---|---|
| Subscribe to John's Blog Space (JBS) | Subscribe to John's Creative Space (JCS) | Subscribe to John's Race Space (JRS) | Subscribe to StyleSpace (SS) |
| Support My Creative Works! | ||||||
|---|---|---|---|---|---|---|
| JMDesigns | Patreon | Soundcloud | Bandcamp | Twitch | OpenGameArt | TurboSquid |
| Get Social With Me! | ||||||
|---|---|---|---|---|---|---|
| Facebook (Friends) | Facebook (Fans) | YouTube | Google+ | LinkedIn (professionals only) | ||
| Questions or Comments? Contact Me (serious inquiries only)... |
|---|
| Contact Me via E-Mail |


