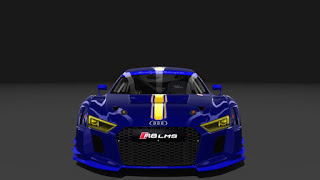
First, here is a decent skin I created:

^ This is a 2016 Audi R8 LMS colored in my Moonlight Motorsports livery.
This skin was created by me after learning how to properly design liveries for cars using GIMP. Part of this involved some trial and error. Making a skin with GIMP is not really difficult; it is just not as efficient and intuitive as with Photoshop.
What are my recommendations? First off, save the PSD format template to GIMP's proprietary XCF format. If you try to save over the PSD in GIMP, you will lose the texture group information- and you don't want that. So try to save the PSD file into XCF before doing any painting in GIMP. Assetto Corsa uses the DDS format for textures. The recommended format is DXT1 for textures that do not use alpha channels. Use DXT5 format DDS for images that have transparency to them. Transparency options usually are reserved for things like windshield graphics and some car skins that are basically overlays to cars.
When you save a DDS file through GIMP, the car skin will appear light at first. It is as if gamma correction is provided when a skin is successfully loaded into the game or through some external viewer. Also, pay special attention to what layer is active in GIMP, because the active layer will be exported when you try to load the skin onto a car. So when you're done with all of the livery graphics, flatten the image so all visible layers are applied to the car. Make sure also to not have the wireframe layer active if a skin has a wireframe layer. What about the colors? The method I use is to darken the color lightness and add some saturation. Use the "Hue-Saturation" option from the Colors menu in GIMP. The settings I use are Lightness at -75 and about Saturation of 15. After doing this, the skin comes out properly when I upload the skins into Assetto Corsa.
So in review, here is the skinning process:
• paint your livery onto a given car
• flatten the image
• darken the Lightness of the image and add some Saturation
• save the DDS file in DXT1 format, and also generate mipmaps
If you have Assetto Corsa, I recommend using "Content Manager" to preview skins for cars. The program updates skins in real time, so you can edit the skins as many times as you like to sample your skin before playing it in the game.
Now for the trial and error process. Consider the following:
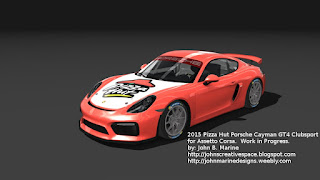
Skinning Too Light.

^ This was a Porsche Cayman GT4 Clubsport appearing too bright.
With this effort, the colors appear faded, like badly worn jeans or other clothes. The colors are not rich enough and real enough for my tastes. Actually, I had previously added more saturation just to make sure the colors appear right. Even still, there was that sort of gamma correction that made the colors appear brighter than they should be. I didn't want that kind of gamma correction hampering the quality of my livery designs.
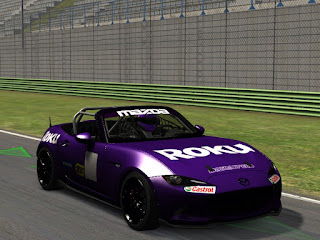
Skinning Too Dark.

^ This Mazda MX-5 Cup test car was colored darker than the original image.
There was a point where I sampled colors too dark. What I did was apply an all-black layer and gave it some opacity. This would darken my image without needing to apply Lightness or Saturation once I flattened the image. This worked well. However, it made some of my skins appear darker and less saturated than what they should be. So I then retired that method.
Lessons Learned.
Until I find a way around gamma correction, this is the method I use to try to apply proper color quality to my car skins in Assetto Corsa. The cars still come out beautifully once I import them into the game.Happy new year, mates! Thank you for reading! Take care and be well.
| Support My Creative Works! | ||||||
|---|---|---|---|---|---|---|
| JMDesigns | Patreon | Soundcloud | Bandcamp | Twitch | OpenGameArt | TurboSquid |
| Get Social With Me! | ||||||
|---|---|---|---|---|---|---|
| Facebook (Friends) | Facebook (Fans) | YouTube | Google+ | LinkedIn (professionals only) | ||
| Questions or Comments? Contact Me (serious inquiries only)... |
|---|
| Contact Me via E-Mail |


0 comments:
Post a Comment