Showing posts with label Scenes. Show all posts

Saturday, January 10, 2015

Top Fuel Drag Race

John B. Marine | 12:53 AM | | | Be the first to comment!
(UPDATED: September 17, 2015)

I made a voxel drag racing scene once. The scene I created in MagicaVoxel is what I'd like to share in showcasing more of my voxel artwork. I will present this scene to you all to showcase my art as well as offer a little story to it. My hope is that you are enjoying the work I've created and showcased in my blog. If you enjoy my work, thank you. I appreciate your support. Anyhow, let's get cracking!


--- Voxel Scene: Top Fuel Drag Race ---

Here is the scene in question:

voxel drag race
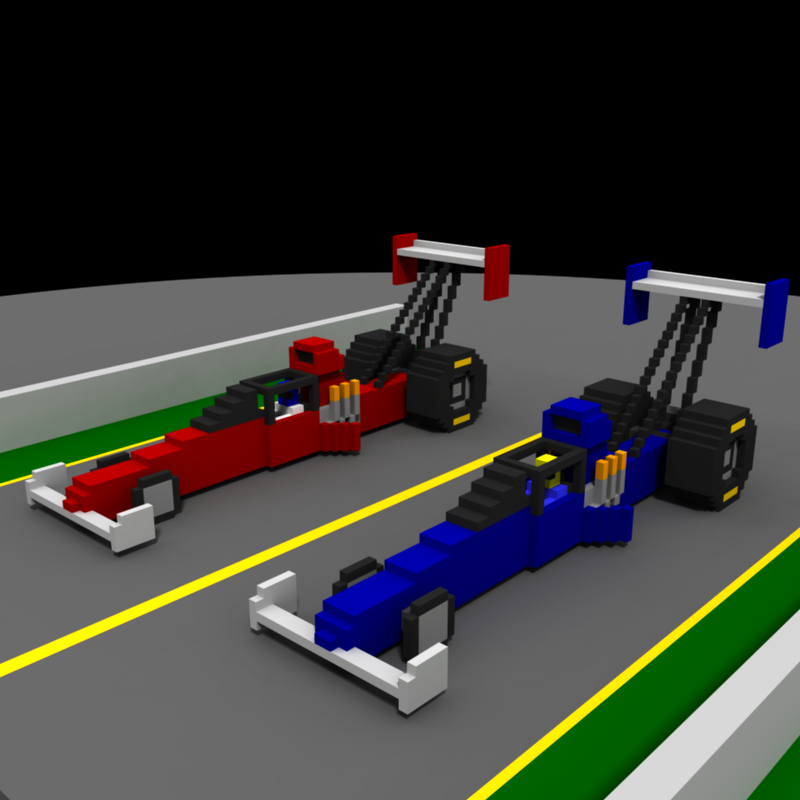
^ 0-300 mph in five seconds! Top fuel drag racers make this happen.

I created this scene as a mock-up of a drag race. While it looks like I created two cars, I actually used one model and colorized the other one in a different way. The base model is the red top fuel dragster. The base model also does not have flames shooting out of the engine- I added those effects specifically for this render.

If you are not educated about racing, let me briefly describe what you are seeing. The cars you are seeing in my render are top fuel drag race cars. These speed demons often take very little time to blast down a quarter mile drag strip. The highest end top fuel dragsters can reach speeds well over 300 miles per hour. A top fuel dragster can clear the quarter mile in five seconds or (sometimes) less at speeds of about 320 mph or greater. Unlike a lot of other race cars, these are purpose-built race cars specifically meant to travel down a quarter mile drag strip. There is a steering wheel inside these cars to help keep the cars stay straight down the drag strip. To help slow these cars down after a pass down the drag strip, parachutes deploy to further help slow down the cars after a long pass.

Now that you know about these cars, I hope you appreciate and like this voxel scene I created!


Thanks again for visiting "John's Creative Space!" I hope you enjoyed your time here. Please be sure to Subscribe and Follow if you want to see more of my work and be in the know for when my latest posts are released. If you enjoy my work, please be sure to help support my work rather than spam the crap out of my posts or ludicrously view my post(s) just to spam up views. Thank you for reading! Take care and be well.

"Like" me on Facebook, Follow JCS, and/or Contact Me via E-Mail!
Subscribe to John's Blog Space (JBS) Subscribe to John's Creative Space (JCS) Subscribe to John's Race Space (JRS) Subscribe to StyleSpace (SS)
read more...

Friday, January 9, 2015

Oni's Body Shop

John B. Marine | 11:38 PM | | | | Be the first to comment!
This MagicaVoxel scene I created is one of the first buildings I've created. I will share you this voxel scene and what it's about with this blog post. The building represents Oni's Body Shop- a business designed to repair or customize vehicles. The body shop is named after its owner. You'll get to know more about this scene as this blog post continues. Welcome to "John's Creative Space!" And also, happy new year- since this is my first post of 2015 on JCS!

About the Label: "Scenes"

All of the scenes I've created in artwork are featured under my "Scenes" label. I will share various scenes and offer stories to them to make each scene interesting.


--- Oni's Body Shop ---

Here is a look at the scene I created in MagicaVoxel. By the way, do you notice something a bit unusual about this image? Take a look:

Oni's Body Shop
^ Oni's Body Shop.

The reason why it looks so nice is because this is the first-ever picture I've taken using the MagicaVoxel Render program. There is also another difference with this picture- there are two new cars I haven't featured in my blog or on Twitter. You have the light blue old car in the garage, and then you have the blue roadster with the yellow stripe down the middle. Don't worry- I'll showcase all of my latest voxel models in the future.

Let me go back to the scene for a moment. I call this as "Oni's Body Shop," named for Onesimo Oliveira, the owner of this body shop. Onesimo is nicknamed "Oni." His body shop does more than just repair cars- people even come into Oni's Body Shop to have their automobiles customized with aftermarket parts and other cosmetic and performance features. People can wait in the main store area as their cars get customized or repaired. In a commercial, here is Onesimo promoting his body shop:

"Hi. My name is Onesimo Oliveira, better known as Oni. Are you tired of your jalopy? Do you want your ride to shine? If so, me and my mechanics can help get your baby back on the road. Or do you want to upgrade your vehicle's performance? I can help with that, too. To keep your car alive, you got to make that drive! Only Oni!"

-Onesimo ("Oni") Oliveira


Constructing the Scene.

Designing this scene required me to make a massive enough garage. I designed two so that it doesn't seem like the body shop only services so many cars. I took a number of car models I created to help in the process of designing Oni's Body Shop. I used some of Mike Judge's garage models for reference on how high and how wide to make the garage openings. I needed to make the garage deep enough to handle some of my longer car models. The two garages allow for only so much business. The interior of the main garages had the walls colored. I then decided on how I wanted to do the building, because I didn't want it to look completely generic. I went ahead and put on "Oni's Body Shop" in a nice way.

I kind of wasn't sure what vehicles I wanted to feature. The cars I created are all fictional cars with cues taken from real-world cars. In the garage are an old blue hatchback and a dark gray luxury SUV. To give the impression of realism with a car driving by, I included a British roadster inspired by what you'd see from Caterham. Adding to the realism is a visible driver driving the British roadster. I try to model all of my vehicles so that they can be used by characters for realism. I want to be able to drop in one of my characters to provide a realistic experience.

I wanted to use the MagicaVoxel Render program to make this special image. While it worked wonders for my external scene, the inside of the garage appears dark since there are no lighting options. The exterior still looks great with the render and the sun effects. The default size for wallpaper in MagicaVoxel Render is 1600 x 1600. I reduced it to 800 x 800 for a shorter picture. I could have halved the samples from 1024 to 512, but I kept the samples at 1024 in my wallpaper render of Oni's Body Shop. I adjusted the sun scale for full brightness.

And there is your look at this scene I created.


I hope you enjoyed my art work. I actually created this scene back on December 16, 2014; and it is just now I decided to make a blog post about it. Thanks to all of you for supporting my work and having some sort of interest in my material. I will be sure to post more material to keep this blog rolling along. Thank you for reading! Take care and be well.

"Like" me on Facebook, Follow JCS, and/or Contact Me via E-Mail!
Subscribe to John's Blog Space (JBS) Subscribe to John's Creative Space (JCS) Subscribe to John's Race Space (JRS) Subscribe to StyleSpace (SS)
read more...

Wednesday, October 15, 2014

My First MagicaVoxel Scene

John B. Marine | 6:00 PM | | | | | Be the first to comment!
Using MagicaVoxel, I made my first scene of any kind last night. I designed a scene with two models I created in MagicaVoxel. The important thing in all of this is learning how to use the Pattern brush. Through this blog post, I will share what I learned so you can design your own scenes using MagicaVoxel. I intended on making this blog post mostly as a tutorial for MagicaVoxel as well as to simply share my latest work through MagicaVoxel.

If you are new here, welcome to my creative works blog- "John's Creative Space!"


--- Making MagicaVoxel Scenes ---

Take a look at this scene I created:

MagicaVoxel scene
Here is the first scene attempt I made using MagicaVoxel. Just for fun, what do you think these guys are talking about in this scene? CAPTION THIS! :)

Once you learn to use the Pattern brush, it is possible to create scenes or even larger models. I used only two models I created to compile this scene. All I did was change up the color of one of the guys by making his shirt black. Other than that, I used only two models. The other model I used is a single vertical arcade unit. If you want to set up your own scenes in MagicaVoxel, let me share with you some tips.


Making Scenes in MagicaVoxel.

You could use a program like Blender to make scenes and to properly animate scenes. However, if you just want to make a scene through MagicaVoxel, let me explain how I got to learn making scenes in MagicaVoxel.


• Setting Up the Scene
First, you are going to need to set up a large-enough scene for whatever scene you are coming up with. Just set up the dimensions to be as large as you want them to be to fill in the space. If you are unsure as to what is an acceptable size for your scene, you may want to use some of the larger default models in MagicaVoxel (such as "nature" or "room"), make a new model based on the dimensions, and click on "Zero" from the Edit - Tool menu. Make sure to save your scene under a special name if you want to save your work. A helpful hint would be to turn on the Frame feature from the "Line" menu. Turning on the Frame feature (the "F" in the Line section) will allow you to see the ground arranged in a grid layout. Pay special attention to two menus: "Shape" and "Pattern."


• Find the Pattern Brush in the "Shape" Section
In the column with the Brush menu is the "Shape" feature. Click on the Shape section and click on "Pattern." The Pattern brush will allow you to import MagicaVoxel models into your scene. The models can then be rotated and such to your liking as you place them into the scene.


• Find the "Pattern" Section; Using the Pattern Brush
Below the Model menu featuring all of the models, there is a menu called "Pattern." Click on "Pattern" to view all of the models. The Pattern menu allows you to add models into your scene for when you use the Pattern brush from the Shape Menu. Find a MagicaVoxel model you want to use and click on it. Using the Shape - Pattern feature, you will be able to add your voxel models into the scene. You can rotate the pattern models you put in by pressing the "-" and "+" keys (not the ones on the keypad). You can move pattern models up and down (respectively) using the Page Up and Page Down keys. You can reset all parameters of an imported pattern model by pressing the "0" key (the number pad; not the keypad). Models placed are rooted to the ground. You can stack imported pattern models on top of each other if you choose.


• Building the Scene Itself.
Once you start to practice putting multiple models into one scene, you begin to grow confident in building scenes, maps, and even creating larger models by piecing together multiple smaller models. So the Pattern feature can be very useful and beneficial for scenes and larger models. Take advantage of this feature like I did to create amazing scenes.


• Photography
All that basically remains is you taking pictures of your scene.

Use a combination of the mouse wheel to zoom in and out as well as clicking and holding the right mouse button to rotate around the scene. Once you find the angle or angles you wish to use you are free to take snapshots.

From the Edit - Export section, look for the "Snap" tool. There are a few things you must take note of before snapping pictures of your scene. First of all, if you click on Snap (or press F6 or CTRL+F6), everything enabled in the main window will be saved into a PNG format picture. So turn off certain features if you want a clean-looking view of your scene. You can collapse some of the extra menus to get a wider shot of your scene if you wish to make wider snapshots. Click on "Snap" from the Export section or press F6 or CTRL+F6 to save screenshots. All exported screenshots can be found in the "Export" folder of your MagicaVoxel folder.


I hope this is helpful for you in making scenes with MagicaVoxel. You can still use programs like Blender to animate your models and make all sorts of other effects, but I wanted to simply mention making scenes and importing multiple models into one scene in MagicaVoxel. In the future, I may create some extra material just to demonstrate making different kinds of scenes or even showing that it is possible to make larger models by simply making good use of the Pattern brush. Enjoy what I've created for now for you, though.


Being able to make a scene in MagicaVoxel has given me some new confidence in possibly making animations and other material. If I do create something interesting, I will be sure to share my work with all of you. Thank all of you for reading my blog post here on "John's Creative Space." I hope you continue to stay with me to see more of my work. Maybe I can inspire you to create your own material if you enjoy my work. Thank you for reading!

"Like" me on Facebook, Follow JCS, and/or Contact Me via E-Mail!
Subscribe to John's Blog Space (JBS) Subscribe to John's Creative Space (JCS) Subscribe to John's Race Space (JRS) Subscribe to StyleSpace (SS)
read more...
JohnMarineDesigns on TurboSquid

Would you like to donate to support my creative work? If so, please show your support using this PayPal item:
I am now on Patreon! Support my creative work on Patreon today at: www.patreon.com/johnbmarine!
 
Copyright © 2015 John's Creative Space • All Rights Reserved.
Template Design by BTDesigner • Powered by Blogger