Showing posts with label Vehicles. Show all posts

Monday, June 1, 2020

3D Model and Showroom Plans

John B. Marine | 4:16 PM | | | | | Be the first to comment!
Making skins for vehicles in games is cool and all, but I have lately had interest in designing my own original vehicles all skinned up. Actually, I have wanted to develop my own models and my own showrooms. It was a dream for a long time to develop my own showroom for vehicles for games. As I started getting better with Blender, I am having more realistic visions of developing the sort of showrooms I want to develop. Allow me the opportunity to express myself. Okay? Good! Let me begin...


3D Model and Showroom Plans


I feel the need to develop even more original content. So I want to share plans I have in regards to various 3D models and showroom plans. Take a look:


3D Plans: Models.

My main areas of concentration for 3D modeling include vehicles and characters.

Vehicle Plans
On the vehicle front, I am starting to gain a new sort of direction towards how to model vehicles. The main concentration lies in low-polygon vehicles. I want to make low polygon a quality thing. This could even evolve into trying to refine them for other projects. This is actually a plan of mine of late. As I am starting to better use Blender, I feel I could master some techniques to at least attempt high-quality vehicles.

Previously, I noted that I had no interest in high-quality 3D vehicle models. I've learned some techniques that make me think otherwise in recent times. One of the most important things I am coming around to is that I do not need to put everything into one single mesh. In fact, some high-quality designs are a combination of separated objects. So a headlight assembly could be the main casing and all the individual lights that make up that headlight case. You also could independently work on a certain object of a full model. The one thing I always fear is that I may make a lot of changes that somehow will require me to do extra merging so that the model remains as complete topology-wise. It seems like a daunting task to make a high-quality vehicle. However, part of me says it is doable without stressing too much over certain details.

I also previously did not have interest in re-creating actual vehicles. That has changed... to an extent. I am not seriously considering completely accurate models. At the same time, though, I don't want to make any models of actual vehicles that seem overly cheap. I need to be careful on this front because some legal clearances have to be granted to make 3D products of actually-licensed vehicles available and can be used. I am not sure if I want to develop such vehicles for free for game mods, or if I want to offer vehicles for rendering. I still prefer doing original designs, but I am somewhat open to modeling actual vehicles.


Character Plans
I have not yet attempted any original characters. On one end, I have thought more along the lines of avatar-type models. I am talking about mostly humanoid models that you could freely customize as opposed to some completely original characters. I have not yet found any true inspiration to make this happen. However, I do have some ideas by following a bunch of different videos. No concrete plans have been considered as of yet. If and when I do get around to developing characters, expect a mix of freely-customizable characters and original characters.


Other 3D Models?
I have considered locations as 3D model projects. Namely, I have thought of things like buildings, some light scenery, and some light terrain. I also want to develop things like motor racing tracks. For race tracks, I am slowly looking at trying to develop in the mindset of Assetto Corsa. Assetto Corsa prefers you measure things in meters. So to that end, I will have to learn to put things into meters for measurement.


3D Plans: Showrooms.

No 3D model(s) will ever be worth showcasing if you lack a proper way to market them. So as I make skins for games like Assetto Corsa and Automobilista among others, I feel I have to develop a showroom to nicely showcase my 3D models. A showroom doesn't have to a "room." It can, in fact, be an outdoor scene stylish enough for showcasing work. One idea i seem to like is that Blender can handle HDRI images. For the uninitiated, an HDRI image contains color information within the image that can serve as the lighting and color for any given scene. Usually, some of these HDRI images can be pretty big files. I tend to like decently-sized images that won't beat up my PC in trying to render. Blender rendering through HDRI images is only done in Cycles Rendering. I will need to practice Cycles Rendering to be able to come up with great renders.

While showrooms suggest indoor scenes, showrooms can really be indoor or outdoor scenes. While I don't want the showrooms to be the focal point of my work, I do want them to serve as stylish 3D locales for which to display my work. I am gathering ideas for which to think about what kind(s) of showrooms I want to make. Because Cycles Renders allow you to develop a vast amount of ideas, I want to be able to make the best renders I can make regardless of my PC's power to create them masterfully. In fact, I dream of making certain render scenes that would be great for Assetto Corsa, since the majority of my renders are for Assetto Corsa. I have used custom showrooms for vehicles in rFactor. So I have a general idea of the importance of making quality showrooms for any set of vehicles for almost any racing/driving game.

Other than vehicles, I want to make some stylish showrooms for characters and other things. Imagine stylish scenes for which a character can be showcased. For example, imagine a stylish young lady at a stylish restaurant on a date night. Certain props or game assets can also be stylishly shown off in some kind of showroom. I haven't yet thought of any interesting showroom concepts to make these visions happen.


Now you know about some of my 3D plans. We'll see what materializes from my work in the future.


Thank all of you who love and support my work! I hope I can keep bringing the awesome that I can provide. Thank you for reading! Take care and be well.

Visit my official website at johnbmarine.com, subscribe to My Blog(s), and/or Follow on Bloglovin!
Subscribe to John's Blog Space (JBS) Subscribe to John's Creative Space (JCS) Subscribe to John's Race Space (JRS) Subscribe to StyleSpace (SS) Subscribe to John's Life Space (JLS)
Support My Creative Works!
JMDesigns Patreon Soundcloud Bandcamp Twitch OpenGameArt TurboSquid
Get Social With Me!
Facebook (Friends) Facebook (Fans) Twitter YouTube Instagram Pinterest LinkedIn (professionals only)
Questions or Comments? Contact Me (serious inquiries only)...
Contact Me via E-Mail


read more...

Thursday, October 10, 2019

Basic Voxel Vehicle Pack

John B. Marine | 6:58 AM | | | | | Be the first to comment!
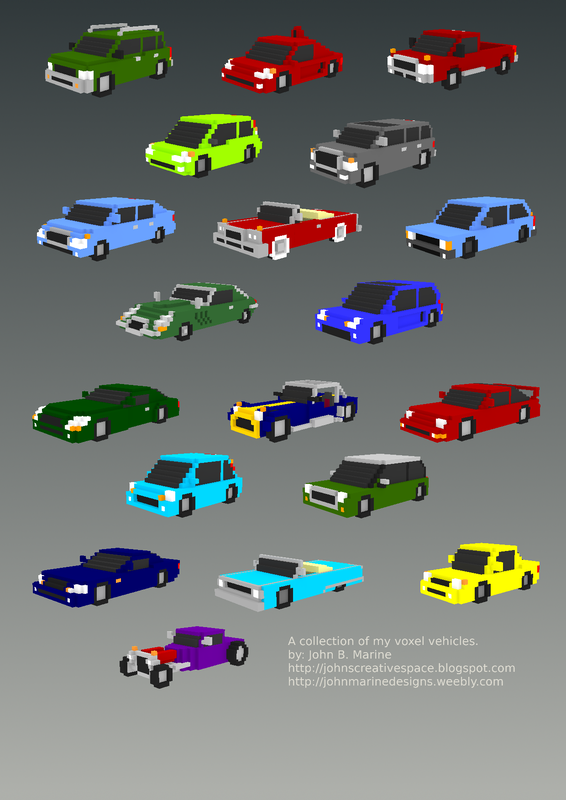
After several years putting it off and in not deciding what to do, I recently have FINALLY offered my voxel vehicles to the Internet public! This blog post describes what all I have done with these voxel vehicles I created. You will be able to purchase my voxel vehicles towards the end of this post. So stick around for more information!


My Basic Voxel Vehicle Pack


This is an opportunity for me to share with you my voxel vehicles. More information is included in this post, so read on if you are interested in my voxel vehicles.


What You Should Know.

My voxel vehicle creations were as of 2014 producing them with MagicaVoxel. I shared my voxel models across social media showcasing my work. I long planned to use my voxel models to develop a racing game. That game, however, never materialized. So the models I created have basically remained on my PC to never be available to the public. Despite a good amount of demand by some people who reached out to me, I was never fully ready to share my voxel models. That is until I finally decided in September 2019 to consider joing Envato. On October 1, I joined Envato. My first upload to any Envato product was made on October 7. My package was approved to 3DOcean for my voxel vehicle pack. Therefore, I am pleased to announce that my voxel vehicle pack is LIVE!

In my original upload to 3DOcean, I decided to keep the vehicles as static models. I had planned for some time to make the voxel models ready for animation. That will probably come in either an update or as a separate package. To keep polygon counts low, I filled up the invisible portions of the voxel models with voxels. Most of my models originally came with visible interiors if you remove the glass windshields and doors. Everything is low-polygon for the sake of game development. That was the original intent of my models.

The reworked voxel vehicles can be imported into programs like Blender or in game engines like Godot Game Engine. If you want to further use models for various applications, you are on your own to take my models and import them into other programs. So you will need to use a program like Blender to export my models into Unity3D if you want to use Unity with my voxel vehicle models. The Basic Voxel Vehicle Pack is available in three different formats: COLLADA DAE, OBJ, and the native MagicaVoxel VOX. Use the native VOX to freely edit the voxel models in their raw form.


Want to Get My Voxel Vehicles?

My voxel vehicle pack is available on Envato's 3DOcean. Purchase the Regular License if you want to feature my voxel vehicles in a free game or in certain media projects. Purchase an Extended License if you plan on using my voxel vehicle models in a paid game. Click on the image or link below to get started:

basic voxel vehicle pack
^ Click on the image or click on the following link to buy my voxel vehicle pack: Basic Voxel Vehicle Pack (Envato, 3DOcean)!

If you use my voxel vehicles in any project (personal or commercial), please let me know! I want to see how you plan on utilizing my voxel models. Please help support me and my work any way you can. Purchasing this package is one such way of showing your support... if you don't mind. I would appreciate your support.


That is all for this post! I hope you found it interesting. Thank you for reading! Take care and be well.

Visit my official website at johnbmarine.com, subscribe to My Blog(s), and/or Follow on Bloglovin!
Subscribe to John's Blog Space (JBS) Subscribe to John's Creative Space (JCS) Subscribe to John's Race Space (JRS) Subscribe to StyleSpace (SS) Subscribe to John's Life Space (JLS)
Support My Creative Works!
JMDesigns Patreon Soundcloud Bandcamp Twitch OpenGameArt TurboSquid
Get Social With Me!
Facebook (Friends) Facebook (Fans) Twitter YouTube Instagram Pinterest LinkedIn (professionals only)
Questions or Comments? Contact Me (serious inquiries only)...
Contact Me via E-Mail


read more...

Saturday, November 24, 2018

Project Rhiannon Update 2

John B. Marine | 7:31 PM | | | | Be the first to comment!
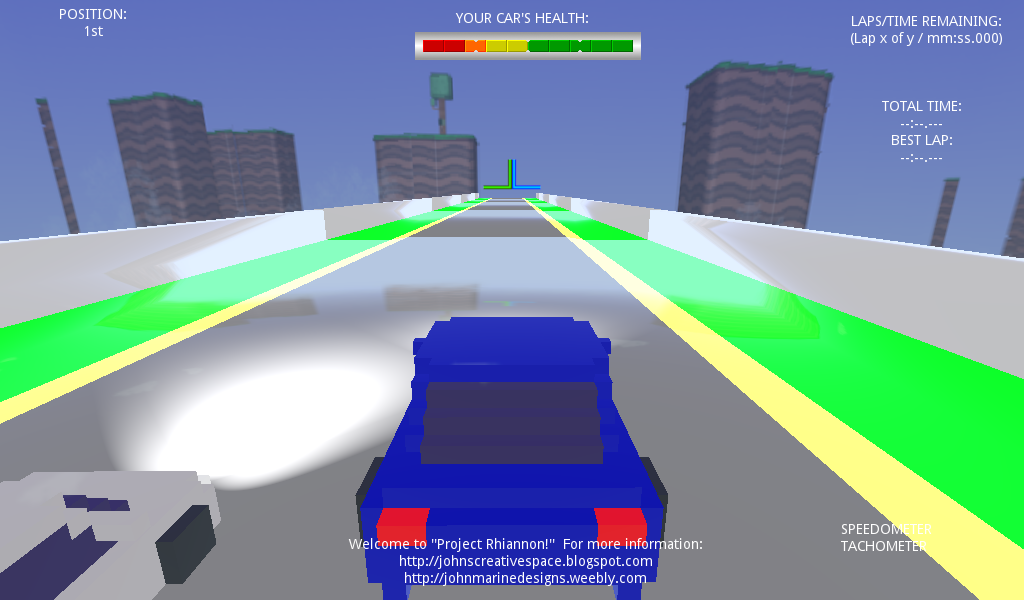
My Godot racing project, Project Rhiannon, lives on! I recently went from trying to make modular voxel land to making polygon land. This was inspired by Gran Turismo 5's Course Maker feature. Seven environments make up GT5's collection of environments. To practice designing levels, I did some box modeling in Wings3D. I tried to closely follow some of the design nature of custom tracks in Gran Turismo 5 in trying to design modular assets for a race track. What I practiced mostly was simple modeling of such a course, rather than build a proper course. Here is a look at what I've come up with:

Project Rhiannon game development
^ Instead of voxel land, I tried polygon tracks. I haven't yet found out how not to make things extremely shiny in Godot.

For some reason, I wanted to make some kind of non-tarmac course initially. I then decided to build an entire tarmac course in Wings3D and then scale it greatly in Godot to be used. I did not include a pit road, so this track isn't COMPLETELY practical. I wanted to make the road have subdivisions and loop cuts to allow for the possibility of making individual elevation changes to pieces of the track geometry. I am also learning that you do not have to model objects into the main model themselves. You build the track first followed by adding whatever objects you like. This can even help in the case where not rendering objects can help in the frame rate department as well as in reducing draw calls.

I still have a lot to learn, but I feel I can possibly make a proper track that I can eventually implement into racing games. It is a slow process that will eventually pay off into something amazing.


Driving Model.

While I am still using my voxel model cars for my test car, I am slowly wanting to develop my own proper 3D vehicles to use as my testing vehicles. I still have somewhat of a "to do" list to enhance my driving model. The driving model in Godot does not really allow for meticulous driving models. That is, unless you are incredibly adept at coding/logic for a proper model. The basics of the Godot Game Engine for vehicles are the commands of engine force (acceleration), brake (braking), and steering. I was looking to try to find some alternative methods to utilize these features. Everyone who has designed their own driving model through Godot GDScript has made his/her/their own spin on the vehicle model. These methods have been expressed in various games, and no one model is perfect. A driving model is only as perfect as the one(s) who deem it as perfect.

Engine Force
I allowed for more interesting acceleration by dividing the vehicle's Engine Force by a number less than 1. What would happen in this instance is that the car gets off from its starting position and go fast- almost like a drag racer. What I want to do is set a base speed that increases incrementally. So I want to properly simulate going from a standing start to properly accelerating away. I also want to develop a speedometer to know just how fast I am going as well as a tachometer to simulate the RPM range.

Braking
However, I have been struggling a bit to properly slow down the vehicle. The brakes work fine with my models. What I want to do is make the braking power more efficient. If I wanted to be more advanced, I would want to simulate brake balance. So a car with strong front brake balance could have some understeer dialed in. A car with strong rear brake balance can induce some oversteer. Too much either way can upset a vehicle's handling behavior.

Steering
Steering can be a bit slow. When I decided to meddle with the steering values, the vehicle may not even turn or only turn so slowly. Once I reached a numerical value that gives me some semblance of control, I basically left it alone and not chance ruining the steering angles.


I still need to get around these issues in trying to develop a driving model I can be proud of.


Extra Insight.

I mentioned Gran Turismo 5 and its Course Maker. Gran Turismo 5 allows you to construct race tracks purely on a set number of parameters and features. The environments differ. While you do not have meticulous control of each environment, your track is given a set number of variables you can control. There are seven locations you can choose from in Gran Turismo 5:

• Toscana (Tarmac)
• Eifel (Circuit)
• Mt. Aso (Tarmac)
• Liège (Gravel)
• Alaska (Snow)
• Eifel (Kart)
• Tokyo Bay (Kart)

The tarmac environments are primarily designed to be run by almost any kind of car. The dirt environment of Liège is meant for gravel rally racing. The snow of Alaska is meant for racing on snow and ice. The kart environments are short courses suited mostly for go-karts. Each environment includes a number of different features unique to that environment. For example, the Toscana environment features mostly a stroll along the Italian countryside in beautiful Toscana, complete with Italian Cypress trees. It also has fireworks going off at night.

If you have actually played with Gran Turismo 5, though, you know many of the environments appear very sparse. Almost like incomplete terrains. That is kind of like what my environment deal is like at present. Implementing some of my work will require some extra geometry edits as well as triangle tesselation. I do feel good about designing a practical course that could be implemented into games or certain other projects.

What I did was study how the roads for the environments were set up. I looked at differences in elevation, the placement of the road, grass, barriers, and things like that. Go back to the Toscana tarmac example for instance. You have a mostly wide road that has little edges on the side close to the rail fances. Down the way are usually either bushes or trees. These object placements do not have to be uniform all the way around the track, but you can put certain features in to make the environment a bit more entertaining and lively. I hope to learn from these in building my courses from scratch. Maybe if I learn certain algorithms to design procedural locations, I could create locations without having to do everything by hand.


Now you know a little more about my development of racing/driving games of late. I have yet to find a winning balance.


Now you have an update about my racing/driving game development. Thank you for reading! Take care and be well.

Subscribe to My Blog(s), and/or Follow on Bloglovin!
Subscribe to John's Blog Space (JBS) Subscribe to John's Creative Space (JCS) Subscribe to John's Race Space (JRS) Subscribe to StyleSpace (SS) Subscribe to John's Life Space (JLS)
Support My Creative Works!
JMDesigns Patreon Soundcloud Bandcamp Twitch OpenGameArt TurboSquid
Get Social With Me!
Facebook (Friends) Facebook (Fans) Twitter YouTube Instagram Google+ LinkedIn (professionals only)
Questions or Comments? Contact Me (serious inquiries only)...
Contact Me via E-Mail


read more...

Monday, January 1, 2018

Assetto Corsa Skinning

John B. Marine | 8:23 PM | | | | Be the first to comment!
Skinning for Aseeto Corsa cars is something I've done lately in trying to learn how to mod cars for this game. I have used GIMP for my skinning of cars. The really nice thing about this game is that all cars have templates for them supplied by the developer, Kunos Simulazioni. Part of the process is in trying to learn how to properly put in my material. I will share with you some of the skins I made for Assetto Corsa and what I have learned.

First, here is a decent skin I created:

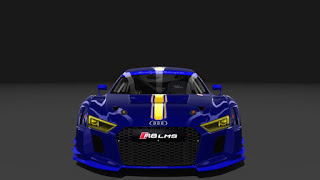
Assetto Corsa skin
^ This is a 2016 Audi R8 LMS colored in my Moonlight Motorsports livery.

This skin was created by me after learning how to properly design liveries for cars using GIMP. Part of this involved some trial and error. Making a skin with GIMP is not really difficult; it is just not as efficient and intuitive as with Photoshop.

What are my recommendations? First off, save the PSD format template to GIMP's proprietary XCF format. If you try to save over the PSD in GIMP, you will lose the texture group information- and you don't want that. So try to save the PSD file into XCF before doing any painting in GIMP. Assetto Corsa uses the DDS format for textures. The recommended format is DXT1 for textures that do not use alpha channels. Use DXT5 format DDS for images that have transparency to them. Transparency options usually are reserved for things like windshield graphics and some car skins that are basically overlays to cars.

When you save a DDS file through GIMP, the car skin will appear light at first. It is as if gamma correction is provided when a skin is successfully loaded into the game or through some external viewer. Also, pay special attention to what layer is active in GIMP, because the active layer will be exported when you try to load the skin onto a car. So when you're done with all of the livery graphics, flatten the image so all visible layers are applied to the car. Make sure also to not have the wireframe layer active if a skin has a wireframe layer. What about the colors? The method I use is to darken the color lightness and add some saturation. Use the "Hue-Saturation" option from the Colors menu in GIMP. The settings I use are Lightness at -75 and about Saturation of 15. After doing this, the skin comes out properly when I upload the skins into Assetto Corsa.

So in review, here is the skinning process:
• paint your livery onto a given car
• flatten the image
• darken the Lightness of the image and add some Saturation
• save the DDS file in DXT1 format, and also generate mipmaps

If you have Assetto Corsa, I recommend using "Content Manager" to preview skins for cars. The program updates skins in real time, so you can edit the skins as many times as you like to sample your skin before playing it in the game.


Now for the trial and error process. Consider the following:


Skinning Too Light.

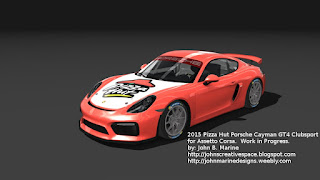
Assetto Corsa skin
^ This was a Porsche Cayman GT4 Clubsport appearing too bright.

With this effort, the colors appear faded, like badly worn jeans or other clothes. The colors are not rich enough and real enough for my tastes. Actually, I had previously added more saturation just to make sure the colors appear right. Even still, there was that sort of gamma correction that made the colors appear brighter than they should be. I didn't want that kind of gamma correction hampering the quality of my livery designs.


Skinning Too Dark.

Assetto Corsa skin
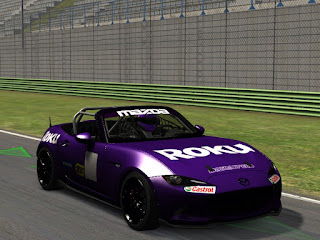
^ This Mazda MX-5 Cup test car was colored darker than the original image.

There was a point where I sampled colors too dark. What I did was apply an all-black layer and gave it some opacity. This would darken my image without needing to apply Lightness or Saturation once I flattened the image. This worked well. However, it made some of my skins appear darker and less saturated than what they should be. So I then retired that method.


Lessons Learned.

Until I find a way around gamma correction, this is the method I use to try to apply proper color quality to my car skins in Assetto Corsa. The cars still come out beautifully once I import them into the game.


Happy new year, mates! Thank you for reading! Take care and be well.

Subscribe to My Blog(s), and/or Follow on Bloglovin!
Subscribe to John's Blog Space (JBS) Subscribe to John's Creative Space (JCS) Subscribe to John's Race Space (JRS) Subscribe to StyleSpace (SS) Subscribe to John's Life Space (JLS)
Support My Creative Works!
JMDesigns Patreon Soundcloud Bandcamp Twitch OpenGameArt TurboSquid
Get Social With Me!
Facebook (Friends) Facebook (Fans) Twitter YouTube Instagram Google+ LinkedIn (professionals only)
Questions or Comments? Contact Me (serious inquiries only)...
Contact Me via E-Mail


read more...

Wednesday, March 29, 2017

Historically-Accurate Car Skins

John B. Marine | 9:31 PM | | Be the first to comment!
I attempted historically-accurate GTR2 skins. It wasn't the period I initially hoped for, but I tried out some minimalist skins for the 1986 Volvo 240 Turbo. A GTR2 mod had someone convert "Volvo: The Game" cars into GTR2. So I took the opportunity to take templates for the cars and paint up some cars. My first attempt to try historic style cars was to be with "GT Legends" cars converted to GTR2, but I wanted to try the Volvo 240 Turbo because I was somewhat '80s nostalgic. I focused on computers and software, especially the likes of two companies as you'll see below:


^ 1986 Apple Volvo 240 Turbo


^ 1986 Microsoft Volvo 240 Turbo

I don't do period-specific style cars. Sure it offers authenticity and realism, but I am just not good at certain time-themed works. You can see more of my work by going to my "JohnMarineDesigns" page and going to the Game Mods page of my Portfolio. Or if you want to go there now, visit: JMDesigns - Game Mods.

What I really want to do in terms of historically-accurate liveries is work with the GT Legends cars. You amy see that work in the future from me.


Thank all of you for your support! Please continue to support my work if it interests you. Thank you for reading! Take care and be well.

"Like" me on Facebook, Follow JCS, visit my Weebly site, and/or Contact Me via E-Mail!
Subscribe to John's Blog Space (JBS) Subscribe to John's Creative Space (JCS) Subscribe to John's Race Space (JRS) Subscribe to StyleSpace (SS)
read more...

Thursday, February 16, 2017

Pizza Hut Cup

John B. Marine | 4:59 PM | | | Be the first to comment!
Earlier in 2016, I made a skin for GTR2's Saleen Mustang SE Challenge. The motivation was to make another GTR2 video. The cars share the same Pizza Hut livery. There is a story behind making a one-off event, and this blog post details that storyline. As of yet, I haven't made any kind of video or anything on it. Rest assured I will be providing links to any video material or anything else I come up with in this blog post. As of the initial blog post, however, I am simply announcing the storyline.

Since this is my first post to this blog of 2017, HAPPY NEW YEAR!!!


DISCLAIMER:

This story and its contents are purely fiction. Any relation between this project's storyline, characters, or anything of that nature is purely coincidental.

Pizza Hut and its name, logos, and related marks are a registered trademark of Pizza Hut, Inc.


Pizza Hut Cup


Here is a look at the skin I created for the GTR2 mod:

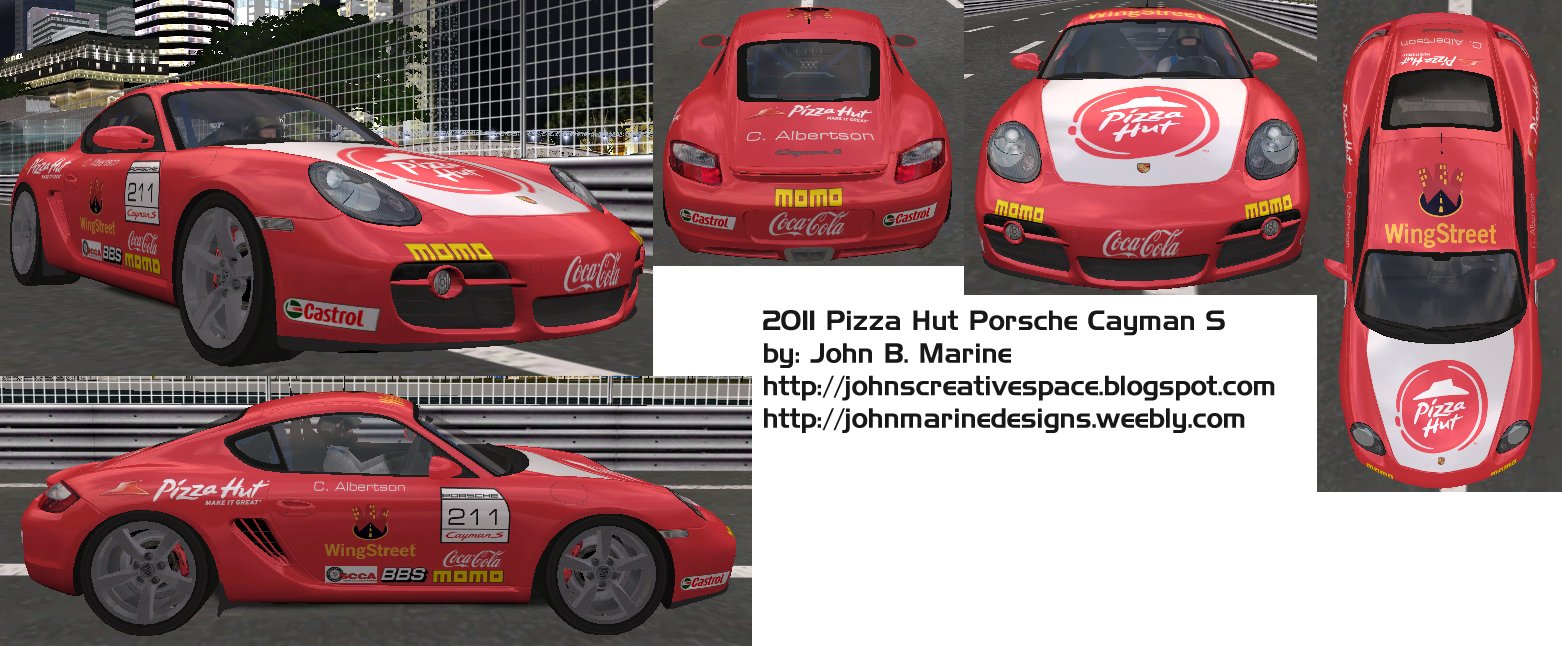
Pizza Hut Porsche Cayman S
^ from: (my Weebly site) - This is the Pizza Hut Cup car, a 2011 Porsche Cayman S. I originally had a Saleen Mustang SE to serve as my race car for the Pizza Hut Cup.

And here is the story...


Pizza Hut Cup: Story.

The main story of this race is that there is a race sponsored by Pizza Hut and promoted to run a special support race. A collection of 20 identically prepared and identical liveried cars will compete among each other. While the event is a racing event, there is one important caveat. Each of the drivers paid certain fees that went towards providing vouchers for individuals. The vouchers allow for individuals and families to be fed to a proper Pizza Hut meal. Those vouchers will be part of a raffle. The meals these vouchers pay for include the following:

• a large size pizza with any choice of toppings and crust
• the customer's choice of wings or breadsticks
• pasta
• a 2-liter bottle of soda

Racing hard while also providing delicious dinner is the premise behind this series and how it is catching on. I want this to be a rather interesting story of "paying it forward." Good food and doing good for others. Win-win, right?


Pizza Hut Cup: The Competition Car.

The car is a Porsche Cayman S race car. The car is nimble and makes fairly decent horsepower. Prior to recent times, the car I intended to have as the competition car for this series was a Saleen Mustang SE race car. I only went as far as designing the outer skin. And just like the Summer Speed Series deal I created for GTR2, the drivers featured are mostly generated or generic drivers. I have to have some kind of way to identify the drivers so it doesn't seem like a bunch of drones racing each other.

JUST SO YOU KNOW... I also created a skin for rFactor long ago to make a Pizza Hut car for that game. However, I haven't made a proper set of cars to make it unique for rFactor. I also used a different car. For rFactor, the Pizza Hut car I created is a Panoz Esperante GTS race car. If I make something for rFactor on this topic, I'll be sure to share my work with you all.

One of the real challenges was in trying to design the car skin. I can't seem to load the skins for the car using 3DSimEd, so I have to load GTR2 to get a general feel for what I am trying to design.


~~~ this space reserved for a video - check for updates ~~~


I hope you enjoyed my work here. Make sure to Subscribe and Follow this blog (and my others) if you enjoy my work. Also be sure to follow me on social media for more of the goodness I have to offer. Thank you for reading! Take care and be well.

"Like" me on Facebook, Follow JCS, visit my Weebly site, and/or Contact Me via E-Mail!
Subscribe to John's Blog Space (JBS) Subscribe to John's Creative Space (JCS) Subscribe to John's Race Space (JRS) Subscribe to StyleSpace (SS)
read more...

Tuesday, March 15, 2016

My First SketchUp Model!

John B. Marine | 7:34 PM | | | Be the first to comment!
I completed my first SketchUp model! I made my latest 3D model based on my 3D skill and on how much I've learned so far trying to make models with SketchUp. This post is my opportunity to share with you my latest creation and second-ever 3D model I completed. So without further hesitation, take a look at my latest creation:

SketchUp Car
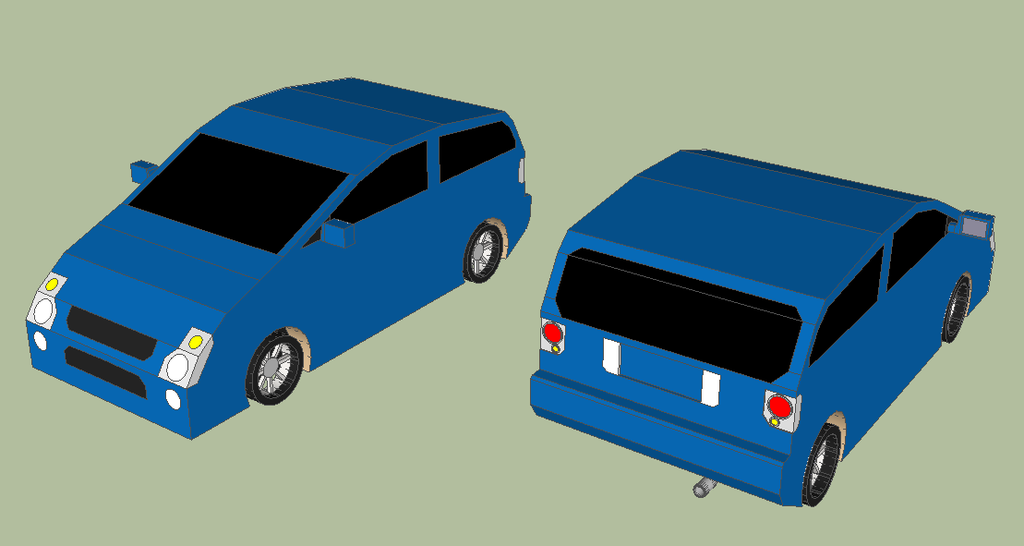
^ Here is my first model I created in SketchUp- a car.

I began creating this model by tracing the side profile of a Citroen C2 VTR 1.6. Then after that, I extruded the body and envisioned making the rest of the car. I used only a basic side silhouette to envision making the rest of the car. For the most part, I went with the strategy of modeling the half of the car. So I modeled the left side of the car to begin. Afterwards, I copied my entire creation and then tried to piece together the car. To say the least, the process of piecing together the car is a MUCH easier process in SketchUp than in Blender. All I had to do afterwards was flip the car along the red axis. Only other modification I made was modeling a muffler on the right side of the car from the back. Another simple process was to combine the geometry. By simply marking up all of the faces I wanted to have join the main body of the car, I just simply used the Intersect Faces option to apply the geometry of my muffler to the car. I could then easily erase some of the extra geometry to reduce unnecessary polygons.

This car was sort of a tricky one to me. My emphasis was mostly on low polygons, but I wanted to make the car a bit detailed without going overboard. It was all entirely made through materials. No textures of any kind were used, but I did use a few textures early on just to learn SketchUp. The final model didn't have any textures. I created this car within the course of one day. I actually worked on it all of this past Monday and then put on finishing touches this Tuesday. So this was a car that actually probably took maybe a total of 3-5 hours when it could have been made in one or two hours. There are no overly insane details I made with this model.

I hope to offer this model on TurboSquid, but no plans right now have been made to actually offer it. I actually want to test my creation before wanting to offering it online.


So do you like my work? Let me know what you think by commenting. Thank you for reading! Take care and be well.

"Like" me on Facebook, Follow JCS, visit my Weebly site, and/or Contact Me via E-Mail!
Subscribe to John's Blog Space (JBS) Subscribe to John's Creative Space (JCS) Subscribe to John's Race Space (JRS) Subscribe to StyleSpace (SS)
read more...

Thursday, March 3, 2016

Voxel Vehicle Starter Kit

John B. Marine | 1:27 AM | | | | Be the first to comment!
(UPDATED: April 23, 2016)

My first offering of voxel cars is with a package that went live on TurboSquid recently. I created a "Starter Kit" featuring four cars I designed myself including one tire model for games and media projects. I offered this to get my work exposed as well as get people started in their projects using some fine voxel models. While this package does not include any machines I've created previously, I do offer my own designs to help people get started and get a feel for my artistic style.

Here is a look at my work:

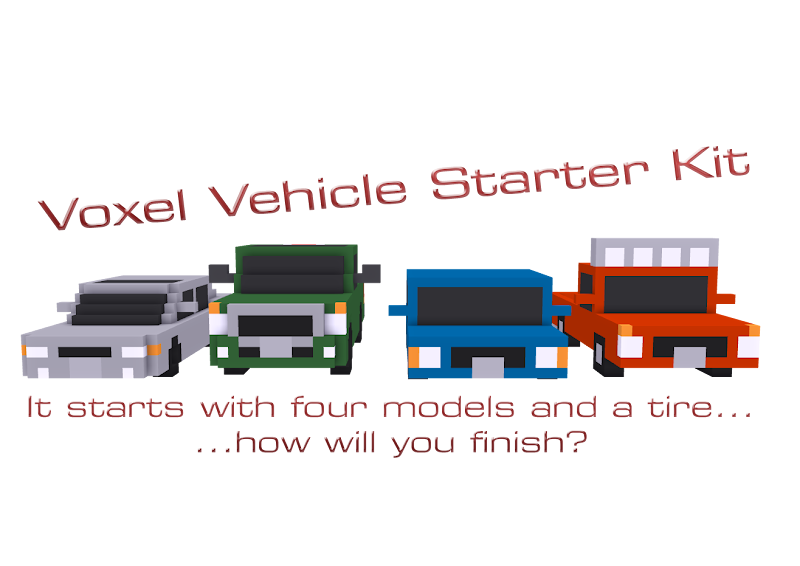
my first TurboSquid product
^ learn more here: Voxel Vehicle Starter Pack - I have finally offered my own voxel car designs to others.

Because this was my first TurboSquid product and because I want this to be a gateway to making more quality material, I am offering this for free. Each of the vehicles I have created are my own designs amd feature versions both with static wheels and with no wheels. The versions with no wheels can be used in programs like Blender in the creation of games and media projects. Since the no wheel versions (obviously) don't have wheels, I have included a tire that can be added to models. The tire model I created features a tire with an attached eight-spoke wheel all made of voxels. Just re-size the tires to fit into the wheel arches. It may look awkward with the rest of the vehicle, but you are at least fitting a nice set of wheels on the car. Of course, you could always make your own tires and wheels and affix them to the car in programs like Blender or something. You can set up the vehicle to have a basic rig setup or try more advanced rigs with suspension setups. No matter what, I have given a unique start to help fuel the dreams of those who love cars with my voxel vehicles.

You're welcome, world. :) For more information on this package, please visit: Voxel Vehicle Starter Pack (TurboSquid). Credit me if you use my work in your projects. Please?

To see more of my work, visit: JohnMarineDesigns on TurboSquid


LATEST UPDATE(S)/REVISION(S):

APR 23 2016 - edited a link, extra edits


If you loved this package, I hope to offer more material to you all in the future. If you liked this blog and/or this blog post, I hope to offer more blog material to you all. Thank you for reading! Take care and be well.

"Like" me on Facebook, Follow JCS, visit my Weebly site, and/or Contact Me via E-Mail!
Subscribe to John's Blog Space (JBS) Subscribe to John's Creative Space (JCS) Subscribe to John's Race Space (JRS) Subscribe to StyleSpace (SS)
read more...
JohnMarineDesigns on TurboSquid

Would you like to donate to support my creative work? If so, please show your support using this PayPal item:
I am now on Patreon! Support my creative work on Patreon today at: www.patreon.com/johnbmarine!
 
Copyright © 2015 John's Creative Space • All Rights Reserved.
Template Design by BTDesigner • Powered by Blogger